Call Center User's Guide
Description
The Call Center is a web-based system allowing agencies, clients, donors, etc., to communicate with Fresh Start via a web browser, email, or phone. This guide describes how these contacts should be handled. It is strongly suggested that you play the part of an end-user and utilize these systems to understand what the end-user would experience. There is a separate guide that describes how to handle donors.
Volunteers are assigned to various Call Center groups, depending on what work they want to do. For example, we have an Agency group, which handles questions on how agencies utilize our systems. We also groups for Clients, the Director, Donations, President, Volunteers, Web Master, etc.
The basic unit of work is a ticket, which contains the correspondence between a user and Fresh Start. Anyone in a group can access a ticket and take action on it. That way, if someone can't handle their tickets, anyone can pick them up.
Contact Methods
Tickets are created when an end-user contacts Fresh Start. There are three ways that tickets are created: Email, website, or via our phone system.
- Email: If an end-user sends an email to our info account, a ticket gets generated. Someone in the Info group will read the ticket and assign it to the appropriate group.
- Website: The end-user accesses our website and uses a form to correspond with us. The form creates a ticket in the appropriate group.
-
Phone: The end-user calls our main number and follows voice prompts to the appropriate group. Some groups allow the end-user to leave a message. We are trying to limit the availability of leaving messages and forcing the end-user to use our website forms. Right now, only clients with appointments are allowed to leave messages.
-
If a message is left, it will be translated into text (some translations are better than others), and the transcript and audio will be attached to a ticket. If there's an existing ticket from the same phone number, the audio & translation will be attached to the existing ticket.
Once a ticket has been created and assigned to a group, anyone in that group can use the Call Center system to email the end-user. All correspondence to/from the end-user is copied to the ticket. An end-user can only have one ticket open per group.
Workflow
The basic workflow is as follows:
- An end-user uses the website form to submit a question, sends an email to the info-account, or calls our main number and leaves a message
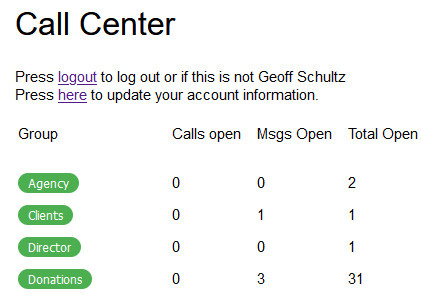
- As a Call Center member, you will have a Call Center button in your list of apps when you log in. Multiple groups use the Call Center, and depending upon what groups you're in, you will see a display something like the following:
This displays the number of phone calls that are open, messages needing some action, and the total number of open tickets in that group. - Click on a green button with the name of the group that you want to access.
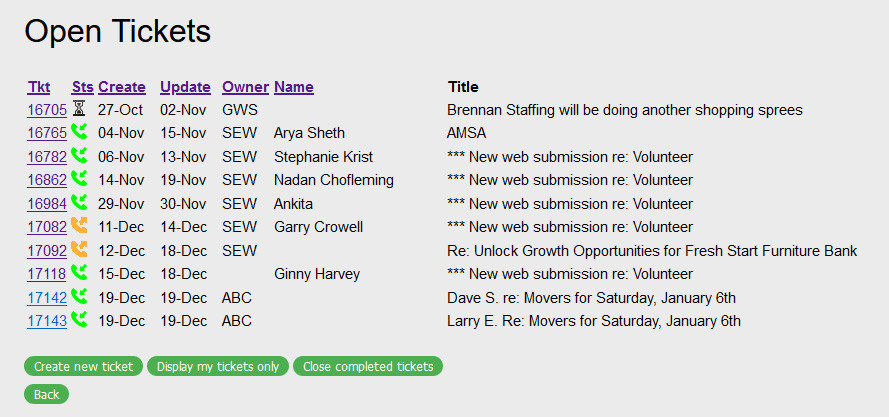
- If you were to click on the green Volunteer button, you would see a list of open tickets, as shown below:
- This shows the ticket number, the ticket status, when it was created and last updated, the ticket owner's initials, the end-user's name, and a title that should describe what the ticket is about.
The Sts (status) field provides a visual status of the ticket:- A yellow phone indicates that we need to contact the end-user.
- A green phone means we're waiting to hear from the end-user.
- An hourglass icon that implies that you're waiting for some event to occur in the future.
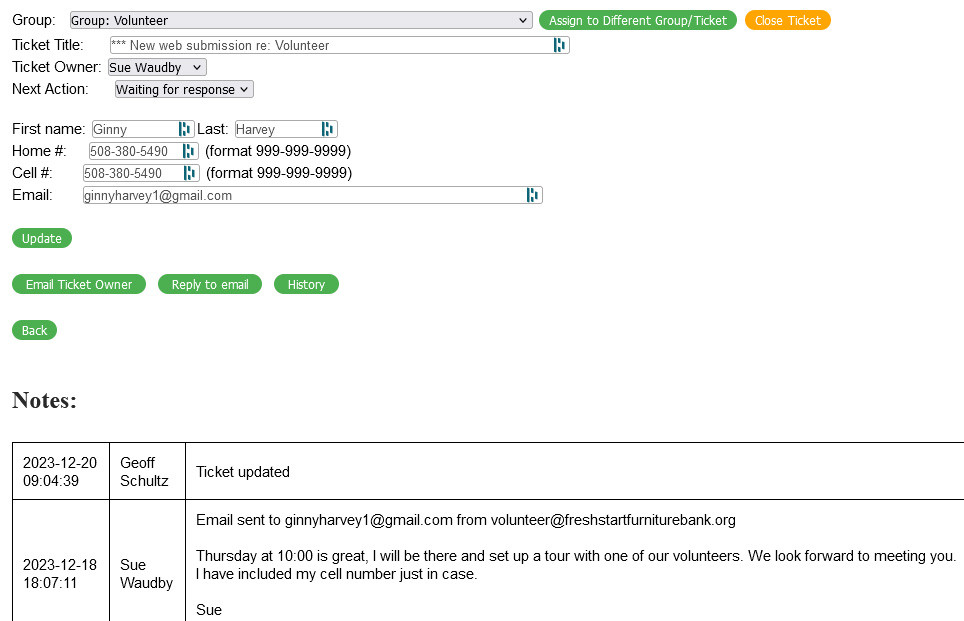
- To view a ticket, click on the ticket number. You will then see a ticket similar to the following:
This shows the group that the ticket belongs to, the ticket owner, the next action for the ticket, the end-user's name, and contact info.
There are a series of buttons which:
-
-
Sends an email to the owner of the ticket.
-
Sends an email to the end-user.
-
Displays the history showing who has done what with the ticket
-
-
- Below that is the correspondence with the end-user and/or notes that have been created. Finally, there is a button to add a new note.
If any photos have been received, they will be displayed under the notes. If you place the cursor over a photo, a magnified view will appear to the right, showing photo details.
The way that I (Geoff) like to handle tickets is to:
- Click on a ticket with a yellow phone icon.
- If this is a new ticket, change the Ticket Owner to yourself.
- Review the information that the end-user has sent.
- Change the Ticket Title to something that describes the ticket.
- Press Update to save your changes
- Click on "Reply to Email".
Feel free to use any system that works for you
Replying to an Email
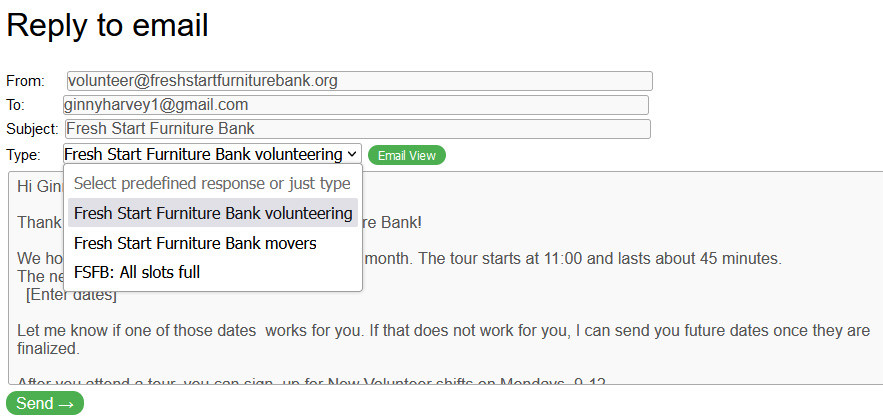
- Pressing the "Reply to email" button causes a new web page to appear:
The end-user's email address is filled in, and there are a series of canned responses that you can utilize. Each group (i.e. Donations, Clients, Agencies, etc) has its own set of canned responses. The titles of the canned responses should give you an idea as to what they're about. Select one that best matches the question, or write your own. - You can edit the canned responses. In some cases, there are fields that need to be replaced. For example, in the above canned response, you would need to replace “[Enter dates]” with the dates that we run new-volunteer tours/training. Be careful not to corrupt the HTML (the stuff between the <>).
- Pressing the "Email View" button displays what the email will look like to the end-user. Press again to switch back to edit mode.
- When you're all set, press the "Send" button. Then press the "Return to Tickets" button. The "Status" icon will change to a green phone.
- You will then see a list of tickets. Lather-rinse-repeat for any other tickets that need responses.
Open Tickets Page Details
This section provides details on all of the various buttons and fields on the Open Tickets page:
- There is a black menu bar at the top of the page with the following links:
- Volunteer – Takes you to the main volunteer app page.
- Call Center – Takes you to the main Call Center page where you can pick groups.
- Tickets – Displays the Open Tickets page.
- You will see column titles at the top of the page. You can click on any of these to sort by that field.
- "Create new ticket" does exactly what it sounds like. It creates a new, blank ticket.
- "Display my tickets only" causes the web page to display only the tickets that you own AND any tickets that haven't been assigned an owner.
- "Close completed tickets" closes any tickets that have a green checkmark next to them. These are tickets that have had a pick-up scheduled and that pick-up has occurred.
- "Find closed tickets" displays the last 100 closed tickets. You can specify a date range if you need to find an older ticket. The "Search note field" is not very useful.
Ticket Page Details
This section provides details on all of the various buttons and fields on the Open Tickets page:
- "Assign to Different Group/Ticket" allows you to move a ticket to a different group or to merge two tickets. The Group pull-down lists various options.
For example, if a ticket ends up in the Info group, but is really actually related to a client, use the pull-down to select "Group: Clients" and then press the "Assign to Different Group/Ticket" button.
If a new ticket gets created and it is actually related to an existing ticket, use the pull-down to select the existing ticket, and then press the "Assign to Different Group/Ticket" button to merge the tickets. - "Close Ticket" closes the ticket.
- "Update" updates the database with any changes you have made on the form.
- "Email ticket owner" displays an email form with a To: address of the ticket's owner.
- "Reply to Email" displays an email form with a To: address of the end-user.
- "History" displays information on who has done what with the ticket.
- "Add Note" lets you add a note to the ticket.
- "Attachments" section displays photos sent via email or text message.
Photos
Photos are typically only associated with the Donations group, but an end-user may want to send photos for other reasons. Photos appear at the bottom of the ticket. If you're using a PC, you can place the cursor over a section of the image, and a magnified view of the image will appear to the right. If you're on a device that doesn't have a mouse/trackpad, you can click on the filename above the image. This will open up a separate browser window just containing the image.
There are 2 ways that photos can be sent:
- If the end-user provided a cell phone number, they can text photos to the number in the email. Photos will immediately be attached to the ticket upon receipt.
- They can reply to the email that they received and attach photos. The system only processes emails once an hour, so it can take up to an hour for them to appear.
Once you close a ticket, the photos are deleted. As a result, you probably want to make sure that you're completely finished with the ticket before closing it.
Update User Setting
On the main page of the Call Center, you will see a link for "Press here to update your account information." When you click on this link, you will see the normal settings to update your account information, plus the following:
Enter the initials that you want to display on tickets that you own on the Open Tickets page.
The "Send group email notifications on" section only applies to the Donations group. Check any days that you want to receive emails regarding new tickets. You will always receive email, regardless of what's checked above, when an end-user updates a ticket that you own.
Press Submit when you're done.


