Volunteer Policies and Procedures
- Call Center
- Call Center User's Guide
- Call Center User's Guide for the Donations Group
- Info email from GetHelpMail.com
- How To Print The Transport Schedule
- Transport Schedule
- Manage Groups and Users
- Donations
- Finance
- Front Desk
- Client Appointments
- Client Checkin Duties
- Additional Resources for Clients
- Snow Day/Shift Cancellation
- Front Desk Job Responsibilities
- Inventory Entry
- Movers and QR
- Personal Shopper
- Personal Shopper User Guide
- Selecting Linens and Kitchenware
- How to pick Mattresses, Bed Frames & Platform Beds
- Personal Shopper- Client Shopping Flow
- Sorting
- Transport
- Computer/Technical Issues
- Volunteers
Call Center
Call Center User's Guide
Description
The Call Center is a web-based system allowing agencies, clients, donors, etc., to communicate with Fresh Start via a web browser, email, or phone. This guide describes how these contacts should be handled. It is strongly suggested that you play the part of an end-user and utilize these systems to understand what the end-user would experience. There is a separate guide that describes how to handle donors.
Volunteers are assigned to various Call Center groups, depending on what work they want to do. For example, we have an Agency group, which handles questions on how agencies utilize our systems. We also groups for Clients, the Director, Donations, President, Volunteers, Web Master, etc.
The basic unit of work is a ticket, which contains the correspondence between a user and Fresh Start. Anyone in a group can access a ticket and take action on it. That way, if someone can't handle their tickets, anyone can pick them up.
Contact Methods
Tickets are created when an end-user contacts Fresh Start. There are three ways that tickets are created: Email, website, or via our phone system.
- Email: If an end-user sends an email to our info account, a ticket gets generated. Someone in the Info group will read the ticket and assign it to the appropriate group.
- Website: The end-user accesses our website and uses a form to correspond with us. The form creates a ticket in the appropriate group.
-
Phone: The end-user calls our main number and follows voice prompts to the appropriate group. Some groups allow the end-user to leave a message. We are trying to limit the availability of leaving messages and forcing the end-user to use our website forms. Right now, only clients with appointments are allowed to leave messages.
-
If a message is left, it will be translated into text (some translations are better than others), and the transcript and audio will be attached to a ticket. If there's an existing ticket from the same phone number, the audio & translation will be attached to the existing ticket.
Once a ticket has been created and assigned to a group, anyone in that group can use the Call Center system to email the end-user. All correspondence to/from the end-user is copied to the ticket. An end-user can only have one ticket open per group.
Workflow
The basic workflow is as follows:
- An end-user uses the website form to submit a question, sends an email to the info-account, or calls our main number and leaves a message
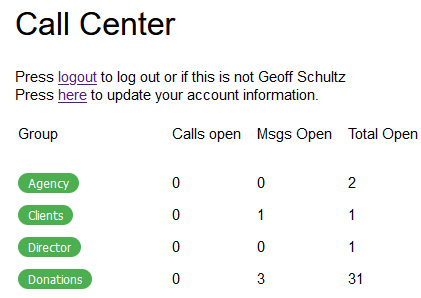
- As a Call Center member, you will have a Call Center button in your list of apps when you log in. Multiple groups use the Call Center, and depending upon what groups you're in, you will see a display something like the following:
This displays the number of phone calls that are open, messages needing some action, and the total number of open tickets in that group.
- Click on a green button with the name of the group that you want to access.
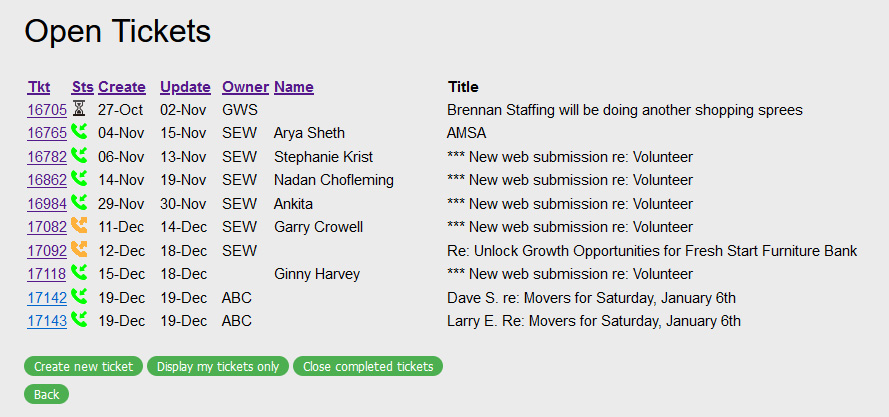
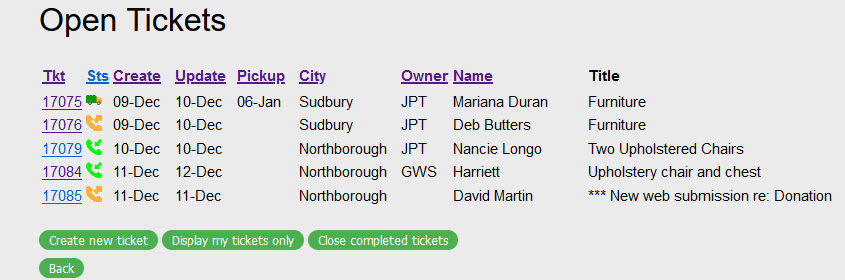
- If you were to click on the green Volunteer button, you would see a list of open tickets, as shown below:

- This shows the ticket number, the ticket status, when it was created and last updated, the ticket owner's initials, the end-user's name, and a title that should describe what the ticket is about.
The Sts (status) field provides a visual status of the ticket:- A yellow phone indicates that we need to contact the end-user.
- A green phone means we're waiting to hear from the end-user.
- An hourglass icon that implies that you're waiting for some event to occur in the future.
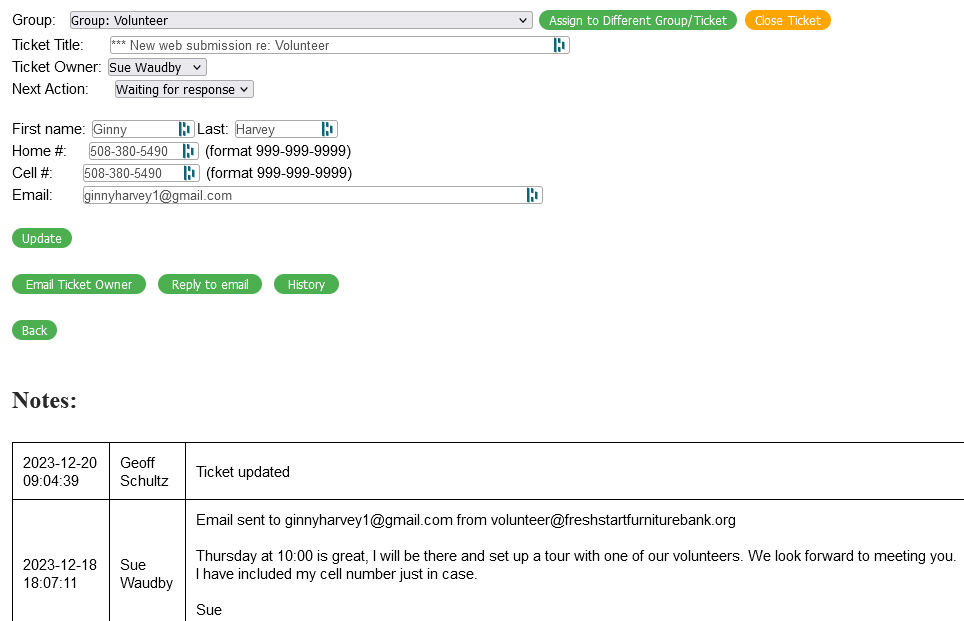
- To view a ticket, click on the ticket number. You will then see a ticket similar to the following:

This shows the group that the ticket belongs to, the ticket owner, the next action for the ticket, the end-user's name, and contact info.
There are a series of buttons which:
-
-
Sends an email to the owner of the ticket.
-
Sends an email to the end-user.
-
Displays the history showing who has done what with the ticket
-
-
- Below that is the correspondence with the end-user and/or notes that have been created. Finally, there is a button to add a new note.
If any photos have been received, they will be displayed under the notes. If you place the cursor over a photo, a magnified view will appear to the right, showing photo details.
The way that I (Geoff) like to handle tickets is to:
- Click on a ticket with a yellow phone icon.
- If this is a new ticket, change the Ticket Owner to yourself.
- Review the information that the end-user has sent.
- Change the Ticket Title to something that describes the ticket.
- Press Update to save your changes
- Click on "Reply to Email".
Feel free to use any system that works for you
Replying to an Email
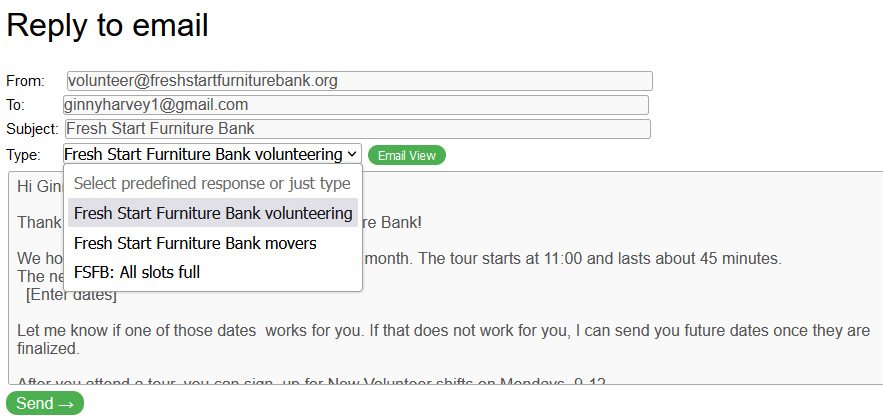
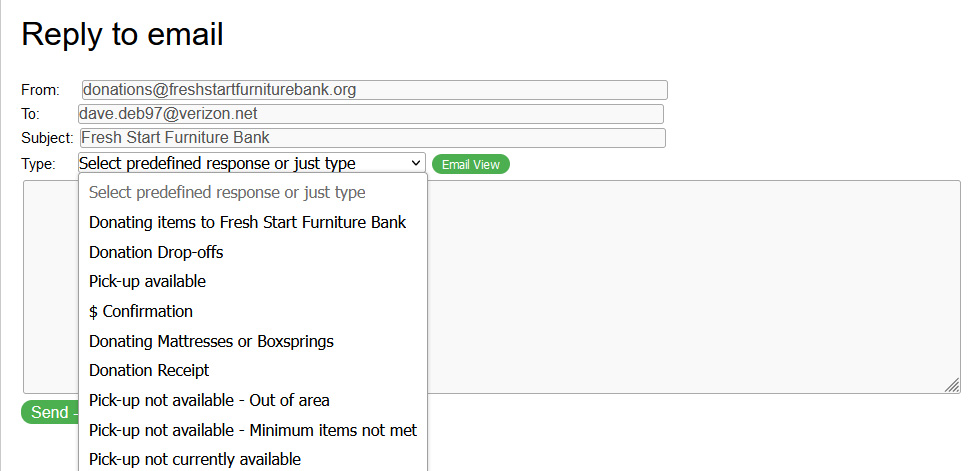
- Pressing the "Reply to email" button causes a new web page to appear:

The end-user's email address is filled in, and there are a series of canned responses that you can utilize. Each group (i.e. Donations, Clients, Agencies, etc) has its own set of canned responses. The titles of the canned responses should give you an idea as to what they're about. Select one that best matches the question, or write your own. - You can edit the canned responses. In some cases, there are fields that need to be replaced. For example, in the above canned response, you would need to replace “[Enter dates]” with the dates that we run new-volunteer tours/training. Be careful not to corrupt the HTML (the stuff between the <>).
- Pressing the "Email View" button displays what the email will look like to the end-user. Press again to switch back to edit mode.
- When you're all set, press the "Send" button. Then press the "Return to Tickets" button. The "Status" icon will change to a green phone.
- You will then see a list of tickets. Lather-rinse-repeat for any other tickets that need responses.
Open Tickets Page Details
This section provides details on all of the various buttons and fields on the Open Tickets page:
- There is a black menu bar at the top of the page with the following links:
- Volunteer – Takes you to the main volunteer app page.
- Call Center – Takes you to the main Call Center page where you can pick groups.
- Tickets – Displays the Open Tickets page.
- You will see column titles at the top of the page. You can click on any of these to sort by that field.
- "Create new ticket" does exactly what it sounds like. It creates a new, blank ticket.
- "Display my tickets only" causes the web page to display only the tickets that you own AND any tickets that haven't been assigned an owner.
- "Close completed tickets" closes any tickets that have a green checkmark next to them. These are tickets that have had a pick-up scheduled and that pick-up has occurred.
- "Find closed tickets" displays the last 100 closed tickets. You can specify a date range if you need to find an older ticket. The "Search note field" is not very useful.
Ticket Page Details
This section provides details on all of the various buttons and fields on the Open Tickets page:
- "Assign to Different Group/Ticket" allows you to move a ticket to a different group or to merge two tickets. The Group pull-down lists various options.
For example, if a ticket ends up in the Info group, but is really actually related to a client, use the pull-down to select "Group: Clients" and then press the "Assign to Different Group/Ticket" button.
If a new ticket gets created and it is actually related to an existing ticket, use the pull-down to select the existing ticket, and then press the "Assign to Different Group/Ticket" button to merge the tickets. - "Close Ticket" closes the ticket.
- "Update" updates the database with any changes you have made on the form.
- "Email ticket owner" displays an email form with a To: address of the ticket's owner.
- "Reply to Email" displays an email form with a To: address of the end-user.
- "History" displays information on who has done what with the ticket.
- "Add Note" lets you add a note to the ticket.
- "Attachments" section displays photos sent via email or text message.
Photos
Photos are typically only associated with the Donations group, but an end-user may want to send photos for other reasons. Photos appear at the bottom of the ticket. If you're using a PC, you can place the cursor over a section of the image, and a magnified view of the image will appear to the right. If you're on a device that doesn't have a mouse/trackpad, you can click on the filename above the image. This will open up a separate browser window just containing the image.
There are 2 ways that photos can be sent:
- If the end-user provided a cell phone number, they can text photos to the number in the email. Photos will immediately be attached to the ticket upon receipt.
- They can reply to the email that they received and attach photos. The system only processes emails once an hour, so it can take up to an hour for them to appear.
Once you close a ticket, the photos are deleted. As a result, you probably want to make sure that you're completely finished with the ticket before closing it.
Update User Setting
On the main page of the Call Center, you will see a link for "Press here to update your account information." When you click on this link, you will see the normal settings to update your account information, plus the following:
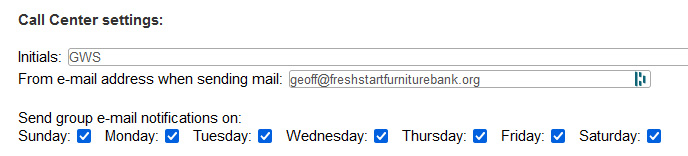
Enter the initials that you want to display on tickets that you own on the Open Tickets page.
The "Send group email notifications on" section only applies to the Donations group. Check any days that you want to receive emails regarding new tickets. You will always receive email, regardless of what's checked above, when an end-user updates a ticket that you own.
Press Submit when you're done.
Call Center User's Guide for the Donations Group
Description
The Fresh Start Furniture Bank Call Center group is responsible for handling web-based queries and e-mail from donors wishing to donate items to Fresh Start Furniture Bank. This guide describes how these contacts should be handled. It is strongly suggested that you play the part of a donor and utilize these systems to understand what the donor would experience.
Workflow
The basic workflow is as follows:
- A donor goes to the Fresh Start website and clicks on the Donate Items button. This takes them to a page that:
- Describes our quality standards.
- Provides a detailed list of what we take and don't take. You should thoroughly review this list, as donors will test you on it on a regular basis.
- Lists our pick-up schedule, showing availability and what towns we'll be picking up in on each date.
- Provides contact information for external for-pay companies who can pick up their items if they are outside our pick-up radius or we can't pick them up in time.
- Provides a link to download a donation receipt that the donor can fill out.
- Has a Pick-up Request button that allows the donor to request a pick-up.
- Has a Donation Question button that allows them to ask a general question.
- The Pick-up Request button takes the donor through a series of questions before allowing them to fill out the Pick-up Request form:
- Asks if they've read the what-we-take and don't-take lists.
- Informs the donor that items must be in a garage or curbside.
- Allows them to enter their address to ensure they are within a 25-minute driving radius of Fresh Start.
- If they pass the above, they can fill out a form asking for their name, address, email, and a description of what they want to donate.
- Once they have submitted the form, they will receive an email thanking them for contacting us. We ask that they send photos of their items via email or text and let them know that we'll get back to them once we receive their photos.
- The Donation Question button:
- Asks if they've read the what-we-take and don't-take lists.
- Checks to ensure they're not using this for a pick-up request.
- Collects their name and email address.
- Allows them to ask questions about donating something.
- Sends them a thank-you message and lets them know we'll get back to them.
- Both of these buttons create a Donations ticket in our Call Center and sends email to the members of the Donations group who have elected to receive emails on that day of the week. These tickets track correspondence with the donor and allow all members of the Donations group to interact with the donor.
- As a Call Center member, you will have a Call Center button in your list of apps when you log in. The Call Center is used by multiple groups, and depending upon what groups you're in, you will see a display something like the following:
This displays the number of phone calls that are open, messages needing some action, and the total number of open tickets in that group. - If you were to click on the green Donations button, you would see a list of open tickets, as shown below:

This shows the ticket number, the status of the ticket, when it was created and last updated, the pick-up date (if one has been scheduled), the city, the ticket owner's initials, the donor name, and a title that should describe what is being donated.
The Sts (status) field provides a visual status of the ticket. The truck means that a pick-up has been scheduled, a yellow phone indicates that we need to contact the donor, and a green phone means that we're waiting to hear from the donor. There's also an hour-glass icon that implies that you're waiting for some event to occur in the future, and a checkmark to indicate that a transport has been completed for the ticket.
- To view a ticket, click on the ticket number. You will then see a ticket similar to this:

This shows the group that the ticket belongs to, the ticket owner, and the next action for the ticket. It also shows the donor's name, address, and contact info. If the donor provided a cell phone number, they can text photos of their items directly to us. There are also fields showing how far away the pick-up is from FSFB. Finally, there is a field that shows the selected pick-up date and/or available pick-up dates.
There are a set of buttons which:
- Calculates the time from FSFB to the donor.
- Displays a map of the donor's location.
- Sends an email to the owner of the ticket.
- Sends an email to the donor.
- Displays the history showing who has done what with the ticket.
Below that is the correspondence with the donor and/or notes that have been created. Finally, there is a button to add a new note.If any photos have been received, they will be displayed under the notes. If you place the cursor over a photo, a magnified view will appear to the right, showing photo details.
-
As described in the "Update User Settings" section below, you can specify which days of the week you want to receive emails regarding new tickets. For example, if you're handling Tuesdays, you should have Tuesday enabled at minimum, and you will receive an email when a new ticket is created on a Tuesday. If you are the owner of a ticket, you will receive an email whenever that ticket is updated by the donor.
If you want, you can respond immediately, or you can wait until the end of the day, or even wait until the next day to handle the calls that come in on Tuesday. The yellow telephone icon marks tickets that need responses.
- The way that I (Geoff) like to handle tickets is as follows. Note that you may find a workflow that works better for you, and that's fine.
- Click on a ticket with a yellow phone icon.
- If this is a new ticket, change the Ticket Owner to yourself.
- Review the information that the donor has sent.
- Change the Ticket Title to something that describes the ticket.
- If the donor hasn't sent photos of the items yet, change the Next Action to "Waiting for response". This will change the Next Action icon to a green phone when updated.
- If you need to schedule a pick-up:
-
Press the "Calculate distance" button. This will populate the Distance and Time fields. The donor needs to be within 25 minutes of FSFB.
-
Most pick-ups have a duration of 45 minutes. You may need to increase the time if you have a very large pick-up. Alternately, if several small pick-ups are located near one another, you may want to decrease this value to fit in an additional pick-up. Use the Duration drop-down to modify the duration if appropriate.
-
Select the pick-up date from the "Date" pull-down menu.
-
Once you have selected a pick-up date, a box will appear under the pick-up date, which is titled "Notes for transport team." This is what the transport team will see when doing the pick-up.
Make a list of the items to be picked up, one item per line. Also, include a note as to what to expect for a donation. The phrase "Donation OK" is often used to indicate that the donor agreed to provide a donation.
-
- Press Update to save your changes.
-
If you can see that we can't do a pick-up for various reasons (i.e. they want us to do a pick-up for just a single item), use the "Reply To Email" button to send a canned response informing them why. That way, they don't have to waste their time sending us photos of the chair. Go back to that ticket and click on the Close Ticket button.
-
At this point, you probably need to reply to the donor, so press the "Reply to email" button. If you will be letting the donor know about pick-up dates, click on the "Date" pull-down menu prior to "Reply to email" to see what dates are available.
- Pressing the "Reply to email" button causes a new web page to appear:

The donor's email address is filled in, and there are a series of canned responses that you can utilize. Each group (i.e. Donations, Clients, Agencies, etc) has its own set of canned responses. - For the donations group, here's a quick summary of what is in each canned response:
- "Donating Items to FSFB": This is the message that is initially sent to a donor when they request a pick-up.
- "Donation Drop-offs": Provides our donation drop-off hours, location, and quality standards.
- "Pick-up available": Provides information about pick-up dates that are available, pick-up donation, location of items, etc. You need to fill in the date, which will come from the Ticket screen.
- $ Confirmtion: If a pick-up has been scheduled, but the donor hasn't committed to a donation, use this to nicely ask if they will donate.
- "Donating Mattresses or Boxsprings": Describes our mattress quality standards and drop-off times.
- "Donation Receipt": Provides a link to download a donation receipt.
- "Pick-up not available – out of area": Used when the donor is outside of our 25-minute pick-up radius. Describes drop-off times.
- "Pick-up not available – Minimum items not met": We can only schedule pick-ups with a minimum of two major items (Sofa/Love Seat, Dresser, Table/Chairs, etc.). Provides drop-off info.
- "Pick-up not currently available": Used when we don't have any pick-ups available within the donor's timeframe.
- You can use a canned response or type in your own. You can also edit the canned responses. Be careful not to corrupt the HTML (the stuff between the <>).
- Pressing the "Email View" button displays what the email will look like to the donor. Press again to switch back to edit mode.
- When you're all set, press the "Send" button. Then press the "Return to Tickets" button. The "Status" icon will change to a green phone.
- You will then see a list of tickets. Lather-rinse-repeat for any other tickets that need responses.

Open Tickets Page Details
This section provides details on all of the various buttons and fields on the Open Tickets page:
- There is a black menu bar at the top of the page with the following links:
- Volunteer – Takes you to the main volunteer app page.
- Call Center – Takes you to the main Call Center page where you can pick groups.
- Tickets – Displays the Open Tickets page.
- Transportation Schedule – Displays the Pick-up (Transport) schedule page.
- You will see column titles at the top of the page. You can click on any of these to sort by that field.
- "Create new ticket" does exactly what it sounds like. It creates a new, blank ticket.
- "Display my tickets only" causes the web page to display only the tickets that you own AND any tickets that haven't been assigned an owner.
- "Close completed tickets" closes any tickets that have a green checkmark next to them. These are tickets that have had a pick-up scheduled, and that pick-up has occurred.
- "Find closed tickets" displays the last 100 closed tickets. You can specify a date range if you need to find an older ticket. The "Search note field" is not very useful.
Ticket Page Details
This section provides details on all of the various buttons and fields on the Open Tickets page:
-
"Assign to Different Group/Ticket" allows you to move a ticket to a different group or to merge two tickets. The Group pull-down lists various options.
For example, if a ticket ends up in the Donations group, but is really actually related to a client, use the pull-down to select "Group: Clients" and then press the "Assign to Different Group/Ticket" button.
If a new ticket gets created and it is actually related to an existing ticket, use the pull-down to select the existing ticket, and then press the "Assign to Different Group/Ticket" button to merge the tickets.
-
"Close Ticket" closes the ticket.
-
"Update" updates the database with any changes you have made on the form.
-
"Calculate distance" calculates the time and distance from FSFB to the donor's address and displays them on the form.
-
"Map" displays a map of the donor's location. I sometimes use the Google Maps street view to see a photo of where the pick-up will be.
-
"Email ticket owner" displays an email form with a To: address of the ticket's owner.
-
"Reply to Email" displays an email form with a To: address of the donor.
-
"History" displays information on who has done what with the ticket.
-
"Add Note" lets you add a note to the ticket.
-
"Attachments" section displays photos that have been sent via email or text message.
Photos
It is important to receive photos of items before scheduling a pick-up. It's amazing how many donors will tell you that their items are in great shape…until you see them. Photos provide a chance to turn down items before the transport team shows up at the donor's house.
Photos allow you to see if there are obvious rips/tears/stains/etc on an item. You can also tell if something is an antique, beat up, or too large for our clients.
Photos appear at the bottom of the ticket. If you're using a PC, you can place the cursor over a section of the image, and a magnified view of the image will appear to the right. If you're on a device that doesn't have a mouse/trackpad, you can click on the filename above the image. This will open up a separate browser window just containing the image.
The message sent to the donor when they requested a pick-up includes instructions on how to send photos. There are 2 ways that they can do this:
- If they provided a cell phone number, they can text photos to the number in the email. Photos will immediately be attached to the ticket upon receipt.
- They can reply to the email that they received and attach photos. The system only processes emails once an hour, so it can take up to an hour for them to appear.
Update User Settings
On the main page of the Call Center, you will see a link for "Press here to update your account information." When you click on this link, you will see the normal settings to update your account information, plus the following:
- Enter the initials that you want to display on tickets that you own on the Open Tickets page.
- Check any days that you want to receive emails regarding new tickets. You will always receive an email, regardless of what's checked above, when a donor updates a ticket that you own.
- Press Submit when you're done.
Info email from GetHelpMail.com
There's a website called FindHelpMail.com, which connects people who need help with an appropriate agency/group. We receive emails from them in our Info account. The following describes how to handle these emails:
- Assign the ticket to the Clients group
- Go to the Clients group and open the ticket
- Check to see if the email includes the client's email address. If it doesn't, you have 2 options
- Just close the ticket
- Call the client to get an email address.
- Change the email address to the client's email address, which is in the GetHelpMail email.
- Update the ticket
- Click on Reply to Email
- Select the "How to Obtain a Referral to Fresh Start" message, which will tell them how to go about getting a referral.
- Send the mail
- Close the ticket
How To Print The Transport Schedule
- Start a web browser
- Log into your FSFB account
- Click on the Call Center app button
- Click on the Donations group button
- On the black menu bar at the top of the screen, you should see "Transport Schedule". Click on that.
- Transport Schedule will only appear for users who have the Transport Admin privilege.
- You will see a display showing available transport dates. Click on the appropriate date.
- Click on the Print button at the bottom of the screen.
- If you use ^P, it will print too small.
Transport Schedule
Description
This guide describes how to view the transportation schedule, set the route, and schedule new transport slots.
Viewing the Transport Schedule
You can view the transport schedule by going into the Call Center app and selecting the Donations group. There will be a black navigation bar at the top of the page. If your FSFB account has the "Transport Admin" privilege, you will see a "Transport Schedule" link on the black menu bar. Clicking on that link will display a page similar to this: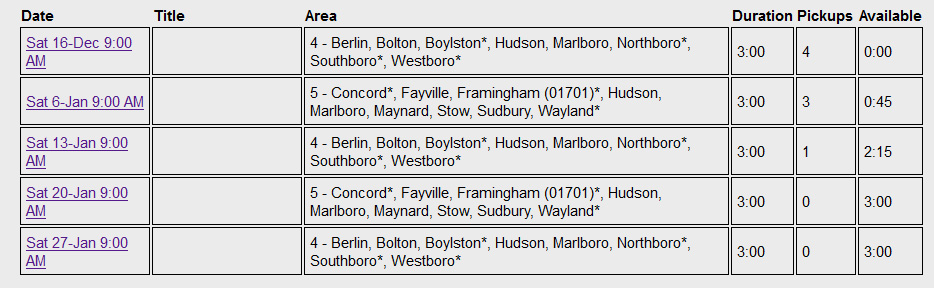
This shows the date of the transport, an optional title, the towns we will be picking up from, the overall duration of the transport, how many pick-ups have been scheduled, and the amount of time available for pick-ups.
If you click on one of the dates, it will display the details for that pick-up: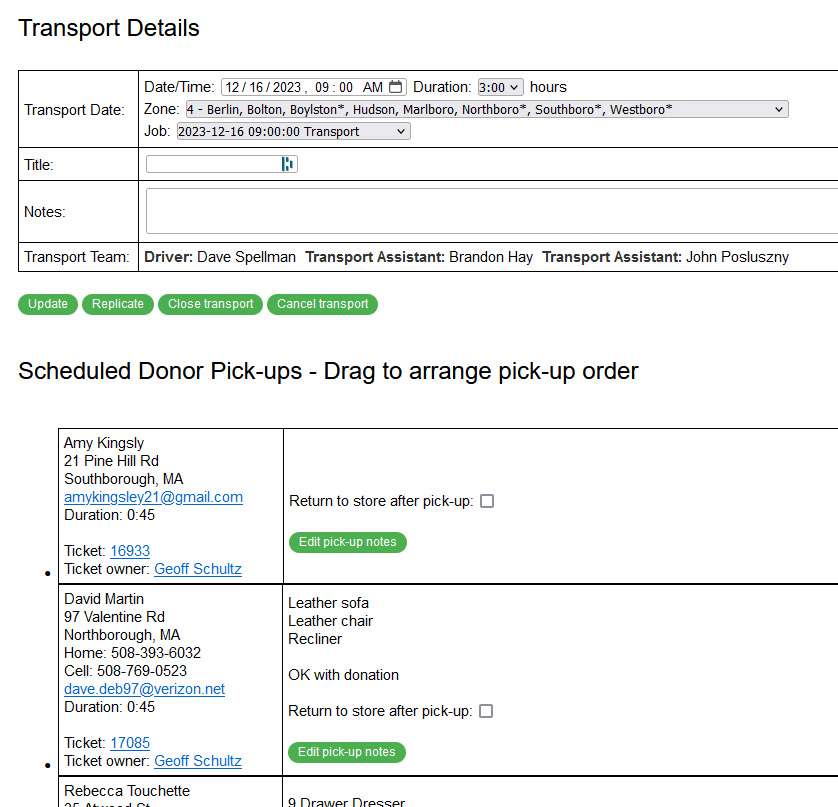
You can edit any of the fields on the form. Press Update to save your changes.
- The "Close Transport" button appears when a transport date has passed. Clicking on this will remove it from the list of available transport dates and mark the tickets associated with the pick-up as having been completed.
- The "Cancel Transport" button will send an email to all of the tickets associated with the transport, letting them know that their pick-up has been canceled. The associated tickets will have the transport canceled, and their status will be set to Unknown.
- The "Reopen Transport" button will appear if a transport has been closed. As you may be able to guess, this will reopen a closed transport.
At the bottom of the page, under the list of pick-ups, you will find the following buttons:
Transport Schedule Routing
To arrange the pick-up schedule:
- Use the above section to open the transport schedule for a given date. Typically, we do this on the Thursday (Friday at the latest) before the pick-up.
- Press the Map button at the bottom of the page.
- Use Google Maps to arrange the pick-ups in an order that makes sense.
- We like to schedule the furthest away pick-up first and then work our way back towards the store. That way if we have to drop off furniture at the store mid-route, we're closer to the store.
- Note the order of the pick-ups.
- Return to the browser page you opened in step 1 and drag the tickets, using the cursor, into the same order you did in step 4. Note that you can't do this with a tablet/phone, as you don't have a mouse.
- Press the Map button to make sure that the order is correct.
- If appropriate, use the Send Email buttons to notify the donors and the team.
Creating a New Transport Slot
At the bottom of the Transport Schedule display, there is a button labeled "Schedule New Transport". Click on that and you will see:

- Click on the calendar icon in the Date/Time field, and select a date. Set the time to whenever the pick-up should start (typically 9:00 AM).
- Set the duration to however long the pick-up should last. The typical duration is 3:00 hours.
- Select a zone for the pick-up.
- We typically alternate between zones 4 and 5.
- Zone 99 is reserved for special pick-ups that aren't constrained by ZIP code.
- If a volunteer job has been scheduled for the date in the Date/Time box, one or more jobs will appear in the Job drop-down menu. Typically you will pick the "Transport" job. If volunteers have signed up for that job, the Transport team field will populate with the divers and movers signed up.
- Press Update to save your changes.
Manage Groups and Users
- To add or remove a user from a group (Agency, Clients, Donations, etc), go into the Call Center and at the bottom, you'll see a link titled "Manage Groups and Users". Click on that.
- Select the group from the pull-down menu that you want to add or remove a user.
- The system will display a list of users who are currently in the group, and a list of users who can be added to the group.
- If you want to remove a user, click on a user who is part of the group.
- If you want to add a user, click on the user in the "Available Volunteers" list.
Donations
Inspecting Donations
Guidelines for Inspecting Furniture
Look for the following:
- Rips or tears in the fabric, even if they are on the underside of the cushion or back of a couch that are large.
- Leather or paint that is peeling/chipping off - hazardous to kids
- Poorly refinished/painted pieces of furniture
- Broken zippers on cushions so that foam is sticking out
- Stained or dirty - no stains on cushions that are noticeable
- If the cushion can flipped over to a side with no stains, we may accept it
- Not covered in pet hair
- Claw marks from pets – should be nothing noticeable
- Must function as designed
- Missing pieces
- Mold, strong, musty smell/cigarette smoke or water damage
- The item should be sturdy and not fall apart when trying to move it
- No items that need more than 2 men to lift
- No excessively tall items
- Veneer is missing – use your judgment
- Inspect for bed bugs
- Lift up all cushions
- Open drawers to look for visible evidence of bugs or rodents. If you see any evidence, turn it down immediately.
- If the furniture is large or oversized and won't fit in a truck easily, please turn it down. Most of our clients live in small apartments, and/or items have to go up staircases.
*** If your first reaction when you see the furniture is not good, go with your gut as it is what most others will think too.***
Saturday Donations Process Flow
TRAFFIC COP
Prepare clip board with tax receipt, tally by town form, client names
Greeting of arriving vehicle
- Thank you for coming.
- What town are you from?
- Have you been here before?
- Do you need a tax receipt?
- Drive to the right, someone will wave you to the unloading point.
For early arrival of clients
- Welcome, your name and appt. time?
- Direct them to park, let them know you’ll let inside know you’re here
- Go inside to tell check-in person
GREET & INSPECT DONATIONS
Review Donation Take and Don’t Take sheets
Greeting of arriving vehicle
- Thank you for coming! Have you been here before?
- What do you have for us today?
- Please turn off your car.
- We’ll inspect it and then unload
Inspect: **does it pass the “I’d give this to my family”.
- Condition – tears, stains, very worn, very faded,
- Smells – mold, cigarettes, pet “friendly”
Further Inspect items:
- Read the What We Take/Don't Take on the FSFB website
- Housewares – scan box for scratched, worn pots, pans, plastic dishes & containers,
- Linens – “have they recently been cleaned?”
- Rugs – many/large stains on top & bottom (usually by pet), smells
- Upholstered chairs – worn arms, cushions, back; stains; tears(if small, may have the time to fix).
- Mattresses – where has this been used? (guest room is usually acceptable, need 8” thickness
- Box Springs – we’ll take them!...unless large tear that can’t be taped
If items don’t meet FSFB standards, thank them, explain
- We don’t accept these items. Did you see our website?
- These items don’t move.
- These items are better for Savers.
- We’re unable to take this item as it won’t fit/work for our clients small space
- Linens can go in our Fiber Recycling bin
DONATIONS MOVERS
- Setup outside - cones, carts, small, carts, linen bins, mattress tarp
- Spray mattresses, box springs
- Apply same color dots to table & chair sets, and bedroom sets
- Unload inside - linens, appliances, furniture in back
- Wrap table legs and bed frames….recheck for same color dots!
Other places to donate:
- Savers – Marlborough, Framingham
- Ashland Worcester - ReStore – light fixtures, paint
- Sudbury - Goodwill truck
- Buynothingsellnothing.com
- Maynard – dump 1 item
- Sudbury – Facebook “Sudbury Curb Alert”
Additional Resources for Donors
Clothing
- Berlin: Many Hands Thrift Shoppe – 24 Central St. (Rte. 62) (508) 838-2575
- Marlborough: Our Lady Thrift Shop – 197 Pleasant St. (508) 481-1284
- Savers – 222a East Main St. ( 508) 485-5191 https://www.savers.com/
- Marlborough Food Pantry – 255 Main St. (508) 481-4080
- Framingham: Savers – 500 Cochituate Rd. (508) 875-0225 https://www.savers.com/
- Hopkinton: Project Just Because- 109 South St. (508) 435-6511
- Worcester: Savers- 490 Lincoln St. (508) 853-3653
Mattresses
- Acton: Household Goods 530 Main St - 978-635-1710 http://householdgoods.org/
- Chelmsford: The Wish Project – 166 Middlesex St. North – 866-947-4360 http://thewishproject.org/
- Walpole: New Life Furniture Bank – 102 Elm St – 774-316-NEWL https://www.newlifefb.org/
Futons, Sleeper Sofas
- Acton: Household Goods 530 Main St. (978) 635-1710 http://householdgoods.org/
Baby Furniture, Car Seats, and Strollers
- Acton: Household Goods– 530 Main St. (978) 635-1710
- Chelmsford: The Wish Project – 166 Middlesex St., North (866) 947-4360Building Supplies & Appliances
Cabinets, sinks, fixtures, hardwired lights, etc.
- Habitat for Humanity Restore Donation Centers: http://www.habitat.org/restores/
- Ashland- 310 Pond St. (508) 799-9259 x-204
- Leominster- 637 Lancaster St. (978) 227-5556
- Worcester- 640 Lincoln St., Suite 100 (779) 236-6283
On-Line
- freecycle.org
- craigslist.org has a free section.
- nextdoor.com
- Facebook Marketplace both have free sections.
Other
- Big Brothers Big Sisters Schedule a free pick up: https://www.bbbsfoundation.org
- They will pick up clothing, most children’s/ baby items, sewing machines, etc.
The above information came from these group’s websites, so call ahead to double-check what they take.
Finance
How to Import PayPal Donations
- Someone with access to the PayPal account needs to log into the PayPal web site
- Click in Activity/All Reports
- Click on Activites
- Click on Activity Report
- Click on Activity download
- Select "Balance affecting"
- Select a date range for the data.
- I would suggest doing this on a monthly basis and import the prior 2 months. The range doesn't matter as the system keeps track of the last transaction that it downloaded and will only import data after that date.
- Select CSV format
- Click on Create Report
- Under Activity reports you'll see see your requested report showing a status of something like "Requested". It will change to "Download" when it completes.
- Click on the Download button once it has completed.
- You should find a file named Download.CSV in your Downloads folder.
- Double-click on the Download.CSV file
- This will cause it to open in Excel
- In Excel:
- Change the name of the sheet to "Download" if necessary.
- File/Save As
- Change the name to "PayPal"
- Change the "Save as type" to "XLXS"
- Click on Save
- Start the Access database
- Go into the Administrative Tasks tab
- If you want to change the thank-you letter which will be e-mailed, click on the "Edit External Messages" button.
- The interface to this is pretty clunky.
- Use the Record buttons at the bottom of the screen to advance through the various messages.
- The message that you want has a "messageType" of "DTY19"
- Edit the text & when you're happy with it, press the "<" or ">" Record buttons to move to another record.
- Press the "Import PayPal" button
- You'll see a pop-up message stating how many records it imported
- It will ask if you want to delete the PayPal.XLS and PayPal.CSV file. Answer yes if everything worked as expected.
- The donation reports and thank-you letters will be e-mailed
- In Word:
- Run the mail merge and print any hardcopy thank-you letters.
Financial Records Tasks
Financial Records Tasks
- Get the mail from the very back of the storage area or from the safe. Sort it into checks, bills/statements, or other info. There is a rack of file folders behind the desk with folders for credit card, truck, deposits, and more. File any paperwork that is obvious, other than the checks. It should be noted on credit card receipts what was purchased (office supplies, gas, etc.)
- Sort the checks and corresponding paperwork into two piles - transport donations, and all the rest. We separate the deposits for these two. All checks should be stamped with the "For Deposit" stamp found in the top drawer in the desk.
- For the transport deposit,
- Write on the transport schedule the check numbers next to the donated amounts that the guys wrote down when they made the pickup.
- Make a copy of all the checks, then on that sheet, write down "transport deposit" and if there was any cash, the amount of cash along with the name of the person (people) who gave cash. For the checks, circle or highlight the person that wrote the check, if there are two names on the check. Then sum up at the bottom the total of the transport donation (cash and checks).
- Enter the transport deposits in the database. For each donation:
- Search for the donor's name in the database to see if they have donated before. If they have, select their record, and if not, create a new record and enter in the name/address/phone info that you have.
- On the Donor Items tab, click on "add item". Enter the date of the pickup, the quantity donated ($ amount), the item (select Transport Donation from the drop-down), and in the notes field enter the check number, cash, cashier's check, etc. Save by selecting "update".
- Go back to the check copy page and write "entered in DB".
- For non-transport donations,
- Copy the checks as before, and sum up the totals for the page. Write the type of income it is under each check (individual donation, corporate donation, grant, recycling, consignment, etc.). We enter Gail McCarthy (Scentinel Nose Work) as a corporate donation.
- Go to the database, enter the checks as before, selecting the right type of income from the drop down, and putting the check number or cashier check in the notes field. You don't have to change the dates on these, the day they are entered (default date) is fine. Do pay attention to the dates of checks at the beginning of the year when income might be from the previous fiscal period.
- When checks come from places like Fidelity, they are almost always on behalf of an individual donor so enter them under that donor's name. Sometimes it is tricky to find that info on the letter.
- For an anonymous donation, create a new donor by entering the last name as 'Anonymous' and the first name as the date (yyyymmdd).
- Go back to the check copy page and write "entered in DB".
- To check your work, run the Access database report titled "Donated Items by Date by Donor". The date range you enter should reflect the dates of the donations and not necessarily the date you manually entered the deposit. If you see any inconsistencies, research and correct.
- If a donation is $250 or greater, it needs a printed out thank-you letter. Print out the letter, sign it, address and stamp it. Envelopes are in the bottom drawer of the left side and there are more either in the penalty box or anywhere else office supplies might be. Stamps are in the safe, and return address labels are in the main drawer under the desk. We don't have mail pickup at FS so you will need to mail these.
- For both transport and other deposits, get deposit tickets from the top drawer of the desk (don't use the one with our account number on it) and write the account number on them (you don't have to fill out the other info). List the checks and cash on the back, total it on the front, and take it to Avidia bank to deposit it and get the receipt.
- Put all the deposit paperwork in the safe until you get the receipt. When you do, staple the receipt to the top left-hand corner of the paperwork and then file it in the deposits folder.
Front Desk
Client Appointments
Client Appointments
To access client appointments you need to log-into the system as an agency.
- Go to freshstartfurniturebank.org
- Select For Agencies from the menu bar
- Scroll down to Hudson in the city list
- Select FSFB
- Select your name
- Log in

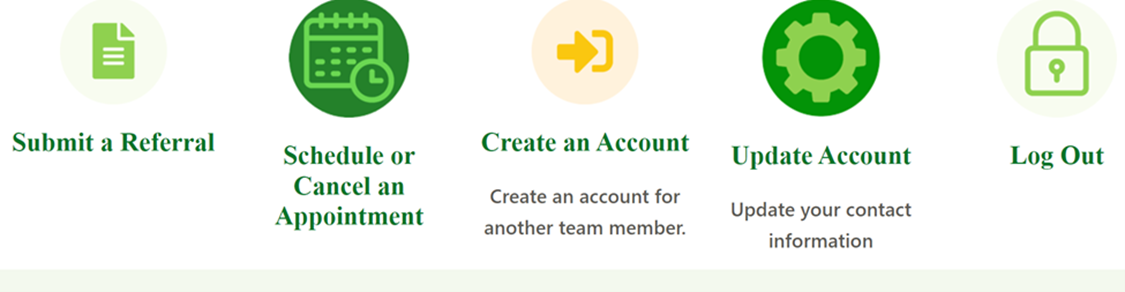
To schedule or cancel an appointment
-
Scroll down to the icons at the bottom of the page.
-
Click on Schedule Appointment or Cancel an Appointment.
- It will bring you to the Main Menu where all open referrals are listed.

- It will bring you to the Main Menu where all open referrals are listed.
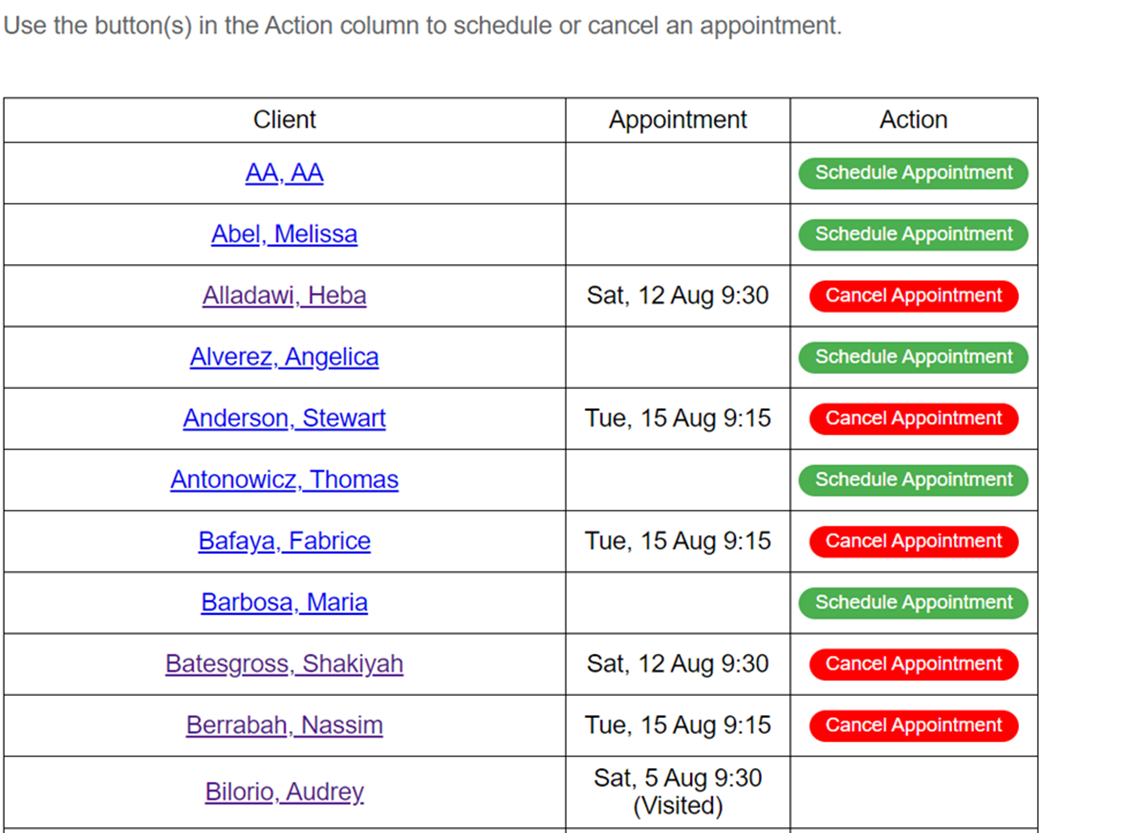
To cancel an appointment
-
-
Select the Cancel Appointment button.

-
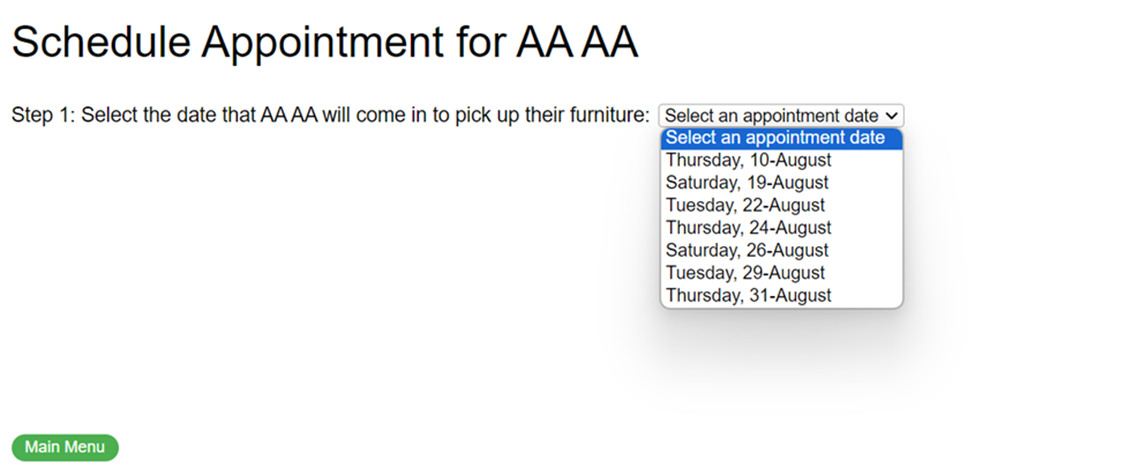
To schedule an appointment:
-
Click on Schedule Appointment button
- A list of available appointment dates will be shown
- If no dates appear, the referral will close before an appointment is available.
-
Select the desired appointment date
-
Select the appointment time
-
Click the Schedule Appointment button.

-
Once the appointment is scheduled, you will go back to the Main Menu.
-
Below you can see that an appointment for AA AA was scheduled for August 31st at 9:15.

- If you click on the client's name, it will bring you to the Client Detail page.


Extending a referral
If you need to extend a referral:
- Open the client's referral
- Press the Extend Referral button,
- This will extend the referral by 15 days one time.
- If you need to extend the referral longer, edit the "Expire on" field and Update the referral.
-
Go back to the main menu and refresh the page.
-
You should now be able to make an appointment.
Client Checkin Duties
- Greet the Client.
- Verify the client's name, address, and contact info on the referral form.
- Note on the referral form that information is correct or which items need to be updated.
- Write vehicle/truck size on the whiteboard and the green check-in sheet.
- Determine if the vehicle is empty. If not:
- Make sure that the shopper knows this and adjusts the available space accordingly. For example, if the truck is 1/2 full, the shopper must stop adding items when they hit 35% instead of the usual 70%.
- Give the client a Target gift card and record the card # on the green check-in sheet.
- Review the list of shoppers and determine which shopper is available. Assign a shopper and write the shopper’s name on the whiteboard.
- Explain bonus items to the client and give the client a bag to shop for these items.
- Ask the client to take these items to their vehicle before meeting with their shopper.
- If the shopper is ready, the bonus items can be shopped for at the end of their visit.
- Introduce the client to their assigned shopper.
- Put an orange tag with the client’s name on the back of their vehicle.
Additional Resources for Clients
Clothing
Berlin: Many Hands Thrift Shoppe – 24 Central St. (Rte. 62) (508) 838-2575
Marlborough: Our Lady Thrift Shop – 197 Pleasant St. (508) 481-1284
Savers – 222a East Main St. ( 508) 485-5191 https://www.savers.com/
Marlborough Food Pantry – 255 Main St. (508) 481-4080
Framingham: Savers – 500 Cochituate Rd. (508) 875-0225 https://www.savers.com/
Hopkinton: Project Just Because- 109 South St. (508) 435-6511
Worcester: Savers- 490 Lincoln St. (508) 853-3653
Mattresses
Acton: Household Goods * 530 Main St - 978-635-1710 http://householdgoods.org/
Chelmsford: The Wish Project – 166 Middlesex St. North – 866-947-4360 http://thewishproject.org/
Walpole: New Life Furniture Bank – 102 Elm St – 774-316-NEWL https://www.newlifefb.org/
Futons, Sleeper Sofas &Newer TVs
Acton: Household Goods 530 Main St. (978) 635-1710 http://householdgoods.org/
Baby Furniture, Car Seats, and Strollers
Acton: Household Goods– 530 Main St. (978) 635-1710
Chelmsford: The Wish Project – 166 Middlesex St., North (866) 947-4360
Additional Furniture and Lamps For Sale at Discount Prices
Habitat for Humanity Restore Donation Centers: http://www.habitat.org/restores/
Ashland- 310 Pond St. (508) 799-9259 x-204
Leominster- 637 Lancaster St. (978) 227-5556
Worcester- 640 Lincoln St., Suite 100 (779) 236-6283
The client will need a referral to visit the above organizations.
The above information came from these group’s websites, so call ahead to double-check what they take.
Snow Day/Shift Cancellation
Procedure for a Snow Day/Shift Cancellation
In the event that a shift will be canceled due to a snow day or some other reason, the following steps will be followed:
- If it is a weekday, a volunteer will check whether the Hudson Public Schools are closed and if so, the store should also be closed.
- If it is a weekend (or a weekday where we have decided to close the store independent of HPS), then a store manager or volunteer will determine that the store should be closed.
- The volunteer will send an email from within the scheduling system to all volunteers signed up for the shift alerting them that the store will be closed. [Schedule Details -> pick date -> 'send messages' (at bottom of page) -> select only 'signed up' and 'any group' -> 'find volunteers' -> write email -> 'send email']
- The volunteer will update store closed dates in the system so that the web page and voice mail system reflect the store closing. [Call Center -> 'update store closed dates' -> enter date -> 'create']
- The volunteer will notify the social media person and ask them to post news about the closing on social media.
- The volunteer will note which clients are affected by the store closing (as this information will be lost once appointments are cancelled).
- For each client,
- The volunteer will call the client to let them know about the closing. If the volunteer is unable to reach the client, they will leave a voice message and also send an email, if possible. They will document their efforts in the client's records. [Select client on scheduling page -> Client Details page lists the phone # and email of the client -> 'add note' to document contact attempt(s)]
- The volunteer will extend the client's referral expiration date by up to a month, if necessary. [On Client Details page -> change expiration date -> 'update']
- The volunteer will then cancel the client's appointment in the system so the client is able to reschedule. [Schedule Details -> pick date -> 'cancel appointment' for client]
- The volunteer will check to see if there are open appointments in the next few weeks. If there are open appointments, suggest that the client reschedule their own appointment.
- If the next few weeks are fully booked, the volunteer will offer to open up a new appointment on an already full day. They will schedule the appointment. [To open appointment slot, Schedule Details -> pick date -> 'enable slot'. To then make an appointment for the client, sign in as agency FSFB -> 'schedule or cancel an appointment' -> pick client -> 'schedule appointment'] (Note: If you are adding an appointment onto an already full appointment date, do not offer that same date to more than one client.)
Front Desk Job Responsibilities
Front Desk and Client Check-in Duties
Tasks associated with the front desk and client check-in are as follows:
- Get gift cards from the safe for the number of clients MINUS any refugee clients handled through he various agencies (they don't get gift cards). Put them in the bank pouch in the desk drawer or in your apron/pocket. Do not leave them unattended on the counter or desk.
- Update the white board with the client names and towns, if it's not already set up. Write out two sets of truck tags for each client's last name, and tape one to the board and put the other set in the binder clip on the nail by the mover's board/display.
- If you see volunteers are in the store but they haven't checked in, check them off. If any volunteers come in who had not signed up, add them to the shift in the volunteer scheduling system.
- Scan the notes and family size info for the day's clients and have a general idea which personal shopper you are going to have shop for each client.
- For each client that arrives:
- Greet the Client.
- Verify name, address, and contact info on referral form. Note on the referral form that information is correct or which items need to be updated.
- Write vehicle/truck size on the white board and on the green check-in sheet. Determine if vehicle is empty.
- Give client a Target gift card and record the card # on the green check-in sheet.
- Review list of shoppers and determine which shopper is available. Assign a shopper and write the shopper's name on the white board.
- Explain bonus items to the client and give the client a bag to shop these items. Ask the client to take these items to their vehicle before meeting with their shopper. If the shopper is ready, the bonus items can be shopped for at the end of their visit.
- Introduce the client to their assigned shopper.
- Put the orange tag with the client's name on the back of their vehicle.
- Be available for the shopper if they have any questions.
- If a client wants to shop remotely, make sure you know whether the truck is coming and if so, have the shopper call the client at the appointment time. In that case, the shopper will fill out all three sheets. Put the gift card in an envelope with the client's name and give it to the QR person to put it in the dish set.
- Keep an eye on the clients' carts to make sure the shoppers have all the correct bed parts and are keeping to the established limits.
- Two to three days ahead of each shift, go to the Client Appointments or Schedule Details app and click on each client and check their notes to see if there are any matching names/previous visits/strange circumstances, etc. If this is a second visit from quite a while ago, we usually let them come again but we print out the list of what they got the first time. If it's a second visit from quite recently, unless it's for one item, we usually cancel the appointment and reach out to the agency explaining it's one visit only. Sometimes a duplicate name can be confusing especially for nationalities that use several different last names. Usually checking the cell phone or address makes it clear. If we have to cancel an appointment due to it being a second trip, we usually suggest Household Goods to them.
- At end of shift, go to the Client Appts app and check "visited store" for each client who has come in. For any client no-show, check 'no-show'. If they didn't call to explain, go into the database and close the referral. If they did call with a reason, go into the database and make a note of the reason that they missed their appointment and leave their referral open for one more try.
- Get all the white sheets for the day (you may have to retrieve some from the shoppers or they might be on top of the file cabinet next to the desk) and put the no-show sheets on top - write no-show on them - and then staple the whole days' worth together and put it in the front of the accordion file on top of the white desk. We save these for a month or so in case we need to look back at anything.
- File the volunteer sheet in the folder on the desk. These are saved for a month in case we need to refer back to them for exposure to sickness on a certain shift, etc.
- Return any unused Target gift cards to the safe, and count the total number of gift cards, and compare it to the number in the system (inventory #4621). Write that number down on the post-it in the safe and if it matches check it off. If it does not agree, you need to review the order for each client visiting the store to ensure that the shopper correctly added the Target gift card. We are doing this after every shift to make it easier to catch mistakes.
- Go to the very back of the storage area and get the mail from the tray that is by the back right door. Bring it up to the desk, open everything, and if there are any checks stamp the back with the deposit stamp in the drawer. Put any mail that needs to be dealt with in the safe for the financial person to handle.
- Erase the board, clean it if necessary, and set up the client list for the next shift.
Inventory Entry
General Instructions
Main Menu
- Turn on the lights in the photo area.
- Position the lights so that they adequately illuminate to photo area.
- Go to the Volunteer page on the FS website
- Log in
- Select the Inventory Entry application
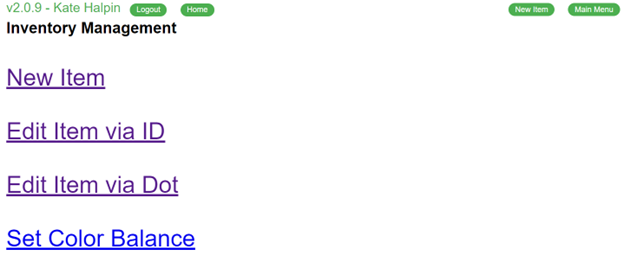
- This icon opens to the Main Menu of the Inventory Entry System, and you will see the following screen, which allows you to create new items, edit existing items, and set the color balance.

- The "New Item" link allows you to create a new item
- The "Edit Item via ID" allows you to edit an existing item by the inventory ID
- The "Edit Item via Dot" allows to edit an existing item via its "dot" code (ex A123)
- The "Set Color Balance" allows you to adjust the color balance of the light that you're photographing in. Suggested values are provided.
Creating/Editing an Item
- If you press the "New Item" link, you will be presented with a blank item form
- If you press the "Edit Item via ID/DOT", you will presented with a form to enter the inventory ID or the Dot code. If the system can find the item, the form will be filled in with the existing data.
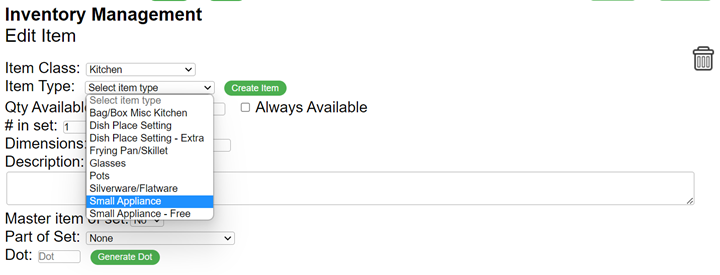
- The steps to inventory most furniture and housewares are the same. In the following example, we will use appliances as an example of how to enter a new item into the inventory system.

- All items are grouped by class. Examples of classes are Kitchen, Lamps, and Tables
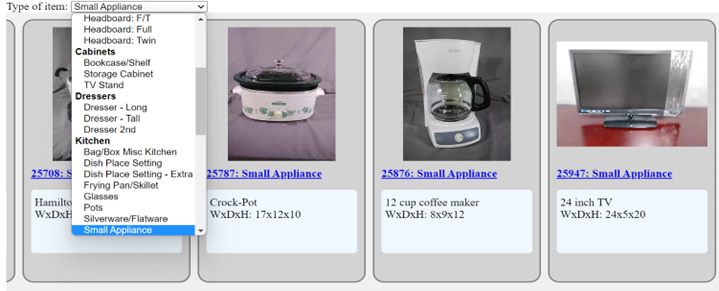
- Within each class, there are different types of items. The drop-down list will change based on the class.
- For example, "Small Appliance", "Small Appliance - Free", and other types are options in the Kitchen class.
- Select Kitchen in the Item Class drop-down menu
- Select "Small Appliance" from the Item Type

- For example, "Small Appliance", "Small Appliance - Free", and other types are options in the Kitchen class.
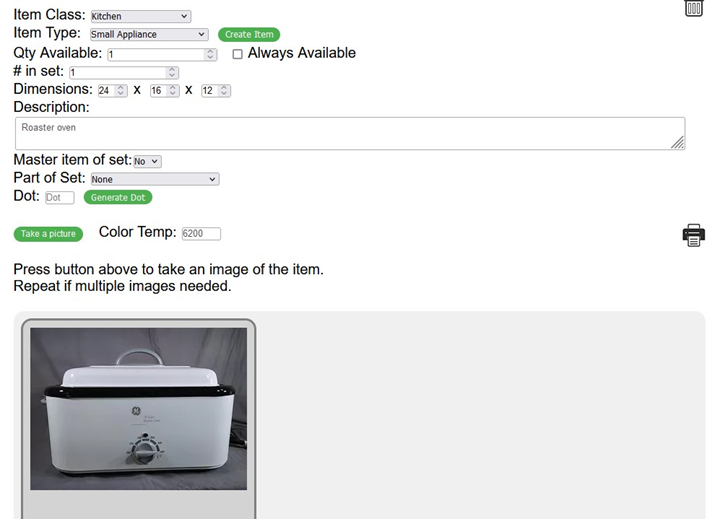
- Enter Details:
- Qty Available – default is 1. If we have received 10 coffee makers of the same type, change this to 10 and print 10 labels.
- # in set – default is 1. For example, if a dish set contains 4 place settings, change this to 4. If there are 2 matching end-tables, change this to 2.
- Dimensions – width x depth x height in inches
- Description
- Add a note, if necessary, to describe the item
- If an item is heavy, be sure to make a note of that.
- If there are flaws, include a description of the issue.
- Master item of set
- If there are multiple items in a set (ex: a dresser with a matching end table), select Yes to mark the dresser as the master item.
- Part of Set
- If this item is part of a set of items (ex: a matching end table to a dresser which is marked as the master part), select the master item from the list
- Dot
- If an item has multiple parts (ex: a headboard with a footboard, rails, slats, etc), press the Generate Dot button to create a dot code. The dot code will print on the label (ex: A123), and you should manually write the dot code onto the colored labels and stick them onto the parts. Also, stick the same color dot onto the label so the movers will know to look for a red A123 dot.
- Press the Create Item button to create a new item or press the Update button to save changes to an existing item.
- To print a label:
- Select the Printer icon
- Wait for the system print dialog box to appear.
- If you need to print multiple labels, change the quantity in the Copies.
- Press the yellow print symbol.
- Scotch tape the label to the item. Don’t stick the label directly on the item.
- To take a picture:
- Select Take a picture
- If the object is wider than it is high, take a horizontal picture. Otherwise, take a vertical picture.
- Click on the single “tree” icon on the left side of the screen. This will zoom in and allow you to take photos that aren’t distorted by the wide-angle lens. Step away from the object if necessary.
- Try to fill as much of the frame as possible.
- Click the Take Picture button
- Review the photo. If you’re happy, press OK, otherwise, press cancel and retake the photo.
- Add a second photo if the 1st picture doesn’t adequately show the item's print or color, take a closeup for a 2nd shot.
- Add additional photos to document any major flaws.
- If you need to re-take the 1st photo, DO NOT delete the 1st photo until you have taken a 2nd photo. You may then delete the 1st photo.

- Move the item to the appropriate storage location.
- If you have more items that need to be inventoried, press the New Item button and repeat.

End of Shift Review
-
15 minutes prior to leaving, review images
-
Select Home from the navigation bar
-
Click on the Latest Items icon
-
By default, the prior weeks of inventory are shown in numerical descending order, meaning that the latest items are shown first, followed by older items
- If multiple people are doing inventory entry, the photos will be mixed
-
Swipe left or use the scroll bar to get to older items.
- If you've only worked on one type of item, you can change the Item Type to what you've worked on

-
Editing Items:
- If you need to edit any of the details for an item, click on the item # under the photo
- This will bring you to the Inventory Entry system.
- Update the information that needs editing.
- Press the Update Item button and close the page.
- If NO IMAGE AVAILABLE appears on an item that you entered
- Click on the item number under the "No Image Available" image
- This will take you to the Inventory Entry system.
- Take a photo
- Click on the item number under the "No Image Available" image
Item Class Specific Guides
Appliances (anything with a cord)
Cleaning / Testing Inventory:
- The sorting area tests & cleans appliances
- If it doesn't look clean, don’t photograph. Return to sorting.
Inventory Entry
- Select Kitchen as the Item Class
- Select Small Appliance or Small Appliance- Free as the Item Type
- View the list on the photo studio wall to determine if Small Appliance- Free applies.
- Change the following fields if necessary
- Qty Available – default is 1
- # in set – default is 1
- Dimensions – width x depth x height
- Description – Add a note if it’s not a common appliance or size, i.e. Air Fryer, 4-cup coffee maker
- Click the Create Item button
- Select the Print icon to print a label & follow the above instructions
- Scotch tape the label to the item. Don’t stick the label directly on the item
- Click Take a picture
- Move inventory items to the appropriate kitchen appliance shelf, which are labeled.
Artwork
Sort:
- Framed Artwork, Mirrors, Wall Clocks- easy to hang
- DON’T INVENTORY overly large or heavy items, religiously themed items, posters, picture frames, unframed, faded/old
- Items can go to Savers if the frames are nice. If not, please throw it out.
Cleaning & Wrapping Inventory:
- Done by inventory person (if available, sorting volunteers will help)
- Clean glass and frame
- Wrap with plastic wrap
- Stick the label directly on plastic wrap. Do not use Scotch tape
Inventory Entry
- Select Artwork as the Item Class
- Select an appropriate Item Type depending on the artwork
- Types include: Abstact, Animals, Children, Clocks, Flowers, Landscape, Mirror, Misc, and People
- There is an artwork bin for each type.
- Change the following fields if necessary
- Qty Available – default is 1
- # in set – default is 1. Change if more than 1 piece is in the set.
- Dimensions – width x depth x height. Depth is typically 1-2"
- Description –If necessary
- Click the Create Item button
- Select the Print icon to print a label & follow the above instructions
- Click Take a picture. Repeat for additional items in the set.
- Wrap the artwork with plastic wrap
- Stick the label directly on the plastic wrap
- If there are multiple pieces in the set, you may break them into smaller sets & place a note on the label such as 1/2, 2/2.
- Move the artwork to the appropriate Artwork-type box and place in numerical order.
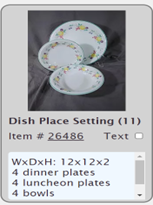
Dish Sets
Cleaning / Wrapping Inventory:
- Look at the small, colorful dish set form included in the box of dishes
- Dishes with at least 4 dinner plates and 1 matching component are classified as ‘Dish Place Setting’ in the Inventory system
- Matching dishes that do not qualify as a dish set are classified as ‘Dish Place Setting - Extra’ in the Inventory system
- Take out the sample set.
- This usually includes 1 of each type of unwrapped dish in the set.
- Make sure the sample is clean & not in poor condition before you that the photo.
- Set up the sample to be photographed using the plastic easels in the studio
- After taking the photo, wrap the sample
- Done by inventory person (if available, sorting volunteers will help)
- Done by inventory person (if available, sorting volunteers will help)
Inventory Entry
- Select Kitchen as the Item Class
- Select Dish Place Setting or DIsh Place Setting - Extra
- Change the following fields if necessary
- Qty Available – use the default of 1 unless you have multiple sets of the same dishes
- # in set – default is 1.
- For a Dish Place Setting, change to the number of dinner plates
- For a Dish Place Setting - Extra, change to the number of primary items (i.e. bowls. plates, etc)
- Dimensions
- The default is 12x12x2. This represents the approximate size of a wrapped dinner plate and should be left as is. For each dinner plate (or # in set) > 1, the inventory system adds to the dimensions in multiples of 2” to approximate a filled box.
- Description
- State the number & type of each item in the set as detailed on the small colorful dish set form
- Type all numbers as 4 (for example), not ‘four’, for non-English speakers to understand
- State the number of boxes that hold the dish set
- Qty Available – use the default of 1 unless you have multiple sets of the same dishes
- Click the Create Item button
- Select the Print icon to print a label & follow the above instructions
- For multiple boxes, print multiple labels
- Click Take a picture.
- ○ Use the plastic easels in the studio to help display the dishes

- ○ Use the plastic easels in the studio to help display the dishes
- Wrap the sample safely in the box
- Apply the label to the short size of the box, centered
- Write the total number of boxes for the dish set on the box (even if it is just ‘1 Box’) and their order (e.g. 1/ 3, 2 /3, 3/3).
- Move box(es) to the completed dish set storage area
Lamps
Cleaning / Testing Inventory:
- Sorting area tests & cleans the lamps. Cords are to be cleaned and wrapped.
- All lamps should have clean shades. If not, don’t inventory them.
- Repairs are placed on the workbench in storage behind the studio.
Inventory Entry
- Select Lamps as the Item Class
- Select an appropriate Item Type depending on the type of lamp
- Types include: Floor Lamp, Free Lamp, Table Lamp
- Change the following fields:
- Qty Available – default is 1, which is most common for a lamp. It is rare that we have a donor who gives/buys us many of the same lamp.
- # in set - if a matching pair of lamps – change to 2
- Dimensions
- Width x depth are typically the lamp shade diameter
- Height includes the finial
- Description – usually blank
- Select the Print icon to print a label & follow the above instructions
- Tape the label to the base of the lamp. NOT the shade!
Rugs
Cleaning / Wrapping Inventory:
- Inspect for stains, odor, or damages. If not easily cleaned, don’t inventory.
- Vacuum. and Spot Clean if needed
- Roll tightly and secure with plastic wrap. Stick the label on plastic wrap.
Inventory Entry
- Select Misc as the Item Class
- Select Rugs as the Item Type
- Change the following fields:
- Qty Available – default is 1.
- # in set - default is 1
- Dimensions
- Width x depth are the dimensions in inches
- Height is typically 1
- Width x depth are the dimensions in inches
- Description
- State size in Feet and inches.
- State the base color, if it's stained or worn, or if comes with a pad.
- Qty Available – default is 1.
- Select the Print icon to print a label & follow the above instructions
- Take 2 pictures
- Entire rug
- Close-up of the pattern and base color
- Roll the rug tightly with the backing facing out. Use plastic wrap to keep it secure.
- Stick the label directly on plastic wrap
- Place large rugs behind couches and smaller rugs in the bin
Movers and QR
Lead Mover
Lead Mover
Shift Planning
- Meet with the Store Manager 15 minutes before the start of shift to understand goals for the day.
- Ensure “Client Check-in” person is prepared to put Client name tags on vehicles.
- Plan the shift:
- Understand who has volunteered for the day as “Movers”. Consider experience, strength, ability to use the “Pick” software and ability to load trucks efficiently.
- Understand the Clients’ attributes for the shift. Consider the quantity of Clients for the shift, size of loads, vehicles to be loaded.
- Fill out the loading dock whiteboard. List the names of Movers and create teams if appropriate Consider the following:
- Are more than three Movers scheduled?
- Are more than six Clients scheduled?
- Will “Mover” skills support separate teams?
Loading Client’s vehicles
- Reference the Status Monitor to see when a Client is ready to load.
- Assign a moving team.
- Consider the Client’s cart and teams’ assets (heavy items, difficulty of the load, language, etc) to ensure the best match.
- You may verbally give direction and/or note the Client’s name under the team name on the loading dock white board.
- Find the vehicle which has the appropriate Client name tag and direct the Client to drive the vehicle to the loading area.
- Direct the Client to back the vehicle into position allowing for two vehicles to be loaded side-by-side. The back of the truck to be approximately ten feet from the end of the scissor lift.
- Ensure largest items are picked and loaded first. The pick list is usually arranged as such from left to right. (i.e.: Mattress/Boxspring, Couch, Dresser, etc).
- Coordinate carts:
- Ensure teams have the appropriate size carts for their stage of loading.
- Ensure carts are quickly unloaded and brought back inside.
- Note: Operating the lift is a good way to understand the needs and coordinate movements.
- Loading housewares.
- Typically the last step.
- Ensure the household cart item states, “Pick item”.
- Note: Although no additional communication is required, you may want to confirm completion of this step with the Lead Household items person. Items have been missed in the past, prior to recent process improvements so, some extra attention may provide assurance that this step is complete.
- Remember to take a photo of one client each shift (highlighting the client, the full vehicle, and a few Fresh Start volunteers). Send the photo to: wendy.b@freshstartfurniturebank.org.
- When loading is complete, ensure the Client’s vehicle door is closed properly and remove the Client’s name tag from the vehicle. Notify the Client that they are ready to go.
Off-loading donations (FSFB truck, Movers, 1-800-Got-Junk, etc):
- Coordinate off-loading donations with loading Clients such that carts are full coming into the building and full going out.
- Coordinate Teams or individual Movers to ensure a balanced flow.
- Note: Client loading is always the priority.
QR
Scanning QR Codes
In this job, you will support the Personal Shopper who is working with the client. While the Shopper and the client are choosing furniture, etc., you will be gathering any small inventory items that the client has selected including dish sets, small appliances, lamps, artwork, and other miscellaneous items for the client. You will be packing these items up for the client, as necessary.
Also, you will be coordinating the loading for each client with the volunteer movers. Therefore, you will need to keep informed about the progress that the kitchen and linens volunteers have made on each client. The lead mover will come to you to ask any questions regarding the status of a client’s order.
Overview/Coordinating the loading
- The white board at the front of the showroom lists the current day’s clients and their status (checked-in, running late, etc.). This board helps you to understand which clients need to be worked on. The computer screen near the loading dock lists, in order, the clients who are ready to be loaded. This screen helps you prioritize the order in which you work on the multiple clients.
- You should co-ordinate with the volunteers shopping for linens and kitchen items to choose a color for each client’s name tags and reserve a cart in the new annex for the client. Make sure a cone has been placed on the cart with the client’s name tag on it.
- Our volunteer movers will be focusing on gathering the furniture and loading it into the client’s vehicle. You will be focusing on the smaller items, such as the dish sets, small appliances, lamps, miscellaneous items (for example, small rugs, unique household items like bed risers or hanging storage), and art work.
- As the QR person, the items you are gathering may be staged on the client’s carts with their linen and kitchen goods.
- To avoid confusion, make sure that any items that you cannot fit on a cart are clearly labeled with your client’s name on the appropriate color tag.
- It is helpful to understand the typical shopping flow for each client. With some exceptions, the shopper usually offers the client dish sets first, then small appliances, large pieces of furniture, miscellaneous items, lamps, and finally, artwork. This means that once you have collected the client’s dish sets and appliances, there is often a lull before you are able to scan the remaining items. During this lull, you can start the next client.
- When the QR, linens, and kitchen volunteers have completed loading the client’s cart(s), you should bring the carts to the area outside the new annex area (in front of where the twin linens are stored). Do not bring partial loads to this staging area as this may lead to confusion with the movers about the location of carts in the annex area versus in the staging area. You need to be able to confidently assure the movers that the carts in the staging area contain all the non-furniture items.
Collecting items using the web-based shopping application (“app”)
- Using your phone, go to the Fresh Start web page (www.freshstartfurniturebank.org). Choose ‘Volunteer’. Scroll down and “press here to login” under Current Volunteers. Enter your email address and password. Choose ‘Order Pick-up’.
- On the Order Pick-up page you should now see tabs for Order#, Items, and Picked. Under the Order# tab, click on ‘Refresh List’. Once any shopper places the first item into their client’s on-line cart, that client’s name will be listed in the dropdown list. Select the client you are interested in from this dropdown list. Note that if a shopper has started a cart for a client who has a future appointment, their name will also be listed even though you are not responsible for gathering their items today.
- Once you select a client, their notes will appear on the Order# tab. In the notes, you can see which shopper created the order. You should direct any questions about this order to this shopper.
- You can now click on the Items tab to see the items that the client has chosen while working with the Personal Shopper. You may scroll left and right to review these items. The first items the shopper should place in the cart are the Target gift card given to the client (if applicable/available) and the ‘Carts for homegoods’. This cart is the reminder to the movers to look for the client’s linen, kitchen, and QR items after they have loaded the furniture.
- Each item in the cart has a unique item #. Each physical item has a sticker on it with the item # and the corresponding QR code.
- Each time you locate one of the client’s chosen items:
- You will press the green ‘pick item’ button below the picture of that item in the app.
- After clicking on ‘pick item’, the app will ask you to scan the QR code of the item. This is done for inventory purposes and to ensure that you have selected the correct item. The camera window will open within the app and you will point the camera at the QR code. It works best if the QR code is being viewed straight on (not tilted). If the app has successfully scanned the QR code, you will be brought back to the Items tab listing and that item will no longer be present.
- If the app is having a difficult time identifying the QR code, it is best to select ‘cancel’ (button on the bottom right of the camera viewing screen) and try again.
- If the item’s QR code cannot be read (for example, if the sticker is ripped or crumpled), once the camera has opened in the app to take a picture of the code you may scroll to the bottom of the viewing screen and select ‘Manual Scan’ (button on the bottom left). This overrides the need to match the QR code for the item number. Manual scans, which do not cross check to ensure you picked the correct item, should be avoided whenever possible.
- Once scanned, the item will be located under the “Picked’ tab. You can select the ‘Picked’ tab and review any scanned items if you have any questions about the status of an item.
- While working in the app, keep in mind that the Personal Shopper is continuing the selection process with the client. The app will automatically refresh. Make sure to check back on the app to see if any new items have been added since you last reviewed the client’s cart.
- When you are finished with a client, all the items you were responsible for should be found under the Picked tab and therefore will no longer be showing under the Items tab.
- Once the team of kitchen, linens, and QR volunteers (you!) have completed their task for a client and the carts have been delivered to the staging area, you will indicate this by selecting the “Mark Cart Ready” button under the ‘Carts for homegoods’ item in the client’s cart. Selecting “Mark Cart Ready” will cause the button under the homegoods cart to change to “Pick Item”.
- Once the movers see that the homegoods carts are ready (as indicated by the “Pick Item” button under the homegoods cart) and load these items into the client’s vehicle, a mover will select ‘Pick item’ for the carts for homegoods. The Items tab should now be empty and the mover will be able to close out loading for that client in the app.
Where to Locate Items
- There is a QR ‘alley’ in the new annex area where the shoppers are located. On the left side of the alley, you will find the lamps , small appliances , dish sets, dish sets – extra, and then the small appliances – free stored on the wire shelves.
- On the right side of the alley are the boxes of artwork, including mirrors and clocks. The boxes are arranged alphabetically (Abstract, Children, … People - back of room to front).
- Lamps – free are grouped together on a small shelf next to the alley. Overflow are on the bottom shelf where the table lamps are.
- Rugs are laying on the floor behind the couches. You need only collect and scan a rug if it is small enough to fit on a cart.
- Misc. Items, depending on what they are, can be stored in various places!
Packing notes
- For lamps, remove and wrap the bulbs and shades. Package the lamps.
- For appliances with glass parts (like coffee carafes), pack/secure the item safely.
- To avoid confusion, make sure that any boxes, bags, large artwork, floor lamps, etc. that you cannot fit on the cart(s) are seated next to the cart and are clearly labeled with your client’s name on the appropriate color tag.
Personal Shopper
Personal Shopper User Guide
PERSONAL SHOPPER
Fresh Start Furniture Bank’s mission is to help restore hope, dignity, and stability in our community by recycling donated furniture and housewares, for free, to people in need. Our personal shoppers have the most contact with our clients and, therefore, play an important role in reinforcing our mission statement. The personal shopper is the lead individual who is responsible for understanding the needs of the client and assisting the client in selecting furniture and other household items. It is imperative that the shoppers always keep in mind the dignity of our clients and ensure that they are treated with respect and leave their shopping experience feeling like they have been given a fresh start for a hopeful future.
If at any point you are having difficulties in your interactions with your client and feel that you need support, please ask the front desk personnel.
Furniture Selection Overview
Furniture is selected based on the supply that Fresh Start currently has, what the client needs, the space restrictions in the client’s dwelling, and transport restrictions. When showing furniture to a client, the personal shopper should get an understanding from the client regarding the size of their dwelling and any concerns about moving the furniture (e.g. availability of help to carry the items, what floor the apartment is on, tight hallways, stairwells, elevators, or door openings, etc.). The client’s transport vehicle(s) also dictates the amount and size of furniture chosen. If the vehicle capacity is in question, feel free to ask the lead in-store mover to have someone measure the vehicle so you better understand your space limitations.
The client selects the furniture based on their style and color choices; it is not appropriate for the shopper to select the furniture for the client. However, if the client finds the shopping process overwhelming and/or is experiencing extreme indecision or anxiety over the process, the personal shopper may help the client to come to a decision.
The inventory of furniture is constantly changing. As long as there are two pieces of furniture in any given category (e.g. kitchen tables), the client must choose between the two pieces if they are interested in that furniture category. They cannot return for a second visit in hopes of a different selection on their follow-up visit.
Meeting the Client and Preparing to Shop
Please refer to the laminated “Flow for Check In & Starting to Shop” at each shopping station for an overview of the information presented in this manual.
- Set yourself up at one of the four desks with a laptop computer found in the annex. Enter your email address and password on the Fresh Start Furniture Bank login page and select ‘Personal Shopper’. You are now logged into the web-based virtual shopping application (‘app’). (Note: If the previous shopper is still signed in, please logoff the previous volunteer and sign yourself in.)
- When a client arrives for their appointment, the client check-in volunteer will give you the Client General Check in sheet. Some of this sheet will be completed and will detail:
- The client’s name and the number in the family
- The ages and sexes of the children of the client
- The vehicle(s) that will be used to transport the client’s furniture, etc. (vehicle type, license plate #, any restrictions on use)
- Whether a Target gift card was given to the client
- After greeting the client and identifying yourself, you will complete the rest of this form:
- The client’s needs for mattresses, box springs or platform, metal bedframes, and headboards (by member of the family, by bed size)
- The items the client is interested in getting today and any priorities, if space is limited
- What floor the client lives on
- You will also complete the Client Release form, the Linens Wish list, and the Kitchen Wish List. Hand off the kitchen and linens wish lists to the volunteers on the shift who are packing those items.
- In the rare instance that the client has visited the store previously, you will be provided with a list of all items that the client has previously selected. You will need to keep these items in mind when offering additional items to the client.
- There are five tabs or screens in the shopping app: Client Info, Items, Chat, Audio, and Release. Three of these tabs (Chat, Audio, and Release) are not currently used by the shopper.
- The shopper is initially on the Client Info screen. Choose the client’s name from the ‘Select client’ drop-down box. The Client Info screen will then be populated with the client’s info. The client check-in volunteer will review the client with you and tell you if any of the client’s contact info needs to be updated. After you make any updates to the contact info, select the green ‘Update’ button found under the contact info.
- Review the transport choices under Vehicle 1 (and Vehicle 2, if applicable) on the Client Info screen and select the closest match for the client’s vehicle(s). It is not necessary to list the license plate number as the check-in volunteer will have tagged the vehicle. As the client chooses furniture, the app will calculate what percentage of their transport vehicle is full. You can see this percentage at any point while you are shopping by looking back at this Client Info screen. Once the app calculates that you have filled 50% of the client’s transport vehicle(s), it will continually remind you of the percentage filled.
- Before shopping with the client, you should put the Check-in Items in the client's cart as follows:
- The shopper selects the Items tab.
- In the ‘Item Class’ drop-down box, the shopper selects ‘Check-in Items'.
- In the ‘Item Type’ drop-down box, the shopper selects 'Carts for homegoods' and presses the green ‘Add to Cart’ button. This cart is the reminder for the movers to collect the client's non-furniture items.
- The cart, in the upper right-hand corner of the items screen, should now show ‘1’ item.
- If a Target gift card has been given to the client, the shopper should enter the Target card into the client’s cart similar to the instructions above (Item Type is Target gift card).
- You are now ready to shop with the client.
Beginning Shopping
- At each shopping station, there is a laminated double-sided “Flow for Check In & Starting to Shop” sheet. This sheet provides guidance for shopping in an organized manner starting with small kitchen items, moving onto furniture, and ending with lamps and artwork. In some instances, due to transport vehicle restrictions and/or priorities of the client, the personal shopper will present items in a different order but a review of this sheet is always helpful to confirm that you have offered all of the categories of items. This sheet also tells you the categories (‘Item Class’) in the app where you will find each item and the quantity limitations for each item. Unless you have been instructed otherwise, please adhere to the quantity limitations provided on this sheet.
- You will now step through the shopping process, item by item. For each item, your routine will be the same. Let’s use couches as an example:
- You will tell the client what item you will be reviewing. “Let’s look at couches next.”
- The Shopping Flow tells you that couches are found under the item class of seating. On the Item screen, in the Item Class’ drop-down box, select ‘Seating”. In the ‘Item Type’ drop-down box, select ‘Couch/Sofa”. The couch inventory will be displayed on your laptop.
- Tell the client the quantity restriction noted on the Shopping Flow sheet. “You may choose any combination of a couch and a loveseat.”
- When you and the client first start looking at the inventory, explain the following to the client:
- You will be scrolling left/right to review all the items.
- Make sure you read the descriptions underneath each item.
- If you want to see an item closer, we will click on the image. To return to the normal view, click on the ‘x’ in the upper right-hand corner of the picture.
- Some items have multiple pictures to give you different views or a close up of upholstery, etc. If multiple views are available, you can see them by clicking on the image.
- When the client finds an item they would like, add the item to the client’s cart by pressing the green “Add to Cart” button under the item they have chosen.
- If the client wants an item removed from their cart, select the green “Remove from cart” button under the item. This will return the item to the general inventory. Note: If you find that you need to select "Unpick Item" before picking "Remove from Cart", that means a fellow volunteer has already physically picked that item and therefore you need to tell them to put it back on the floor.
- You will repeat this process for each category.
- If the vehicle(s) is getting full (60%+) at any point during the process, you will need to revisit the client’s priorities. You may suggest they skip over several of the categories and focus on the items most important to them. Ask them which of the selected items in their cart are the lowest on their list so that you may tell the in-store movers this information.
- At any point, you may click on the cart in the upper right-hand corner of the Items screen to see the contents of the client’s cart. It is important to review with the client what is in their cart a few times throughout the process to ensure that there is no miscommunication about their choices. You are, however, not showing them their cart so they can change their mind or try to revisit the whole process!
Reconciling of Information
- After all the furniture and before moving on to the lamps and artwork, the personal shopper should reconcile with the client the furniture that has been selected by show
- Show them the contents of their cart. Once you get their approval that what is in their cart (which is the bulk of the shopping) appears correct, click on the “Ready to Load” button on the bottom of the Client Info screen. This enters your client into the waiting queue for the movers. The client’s name will show on the screen near the loading dock. Tell your client that a volunteer mover will at some point come to tell them where to move their vehicle when it is their turn.
- Complete the shopping for the last few categories with the client.
- Show the client their shopping cart one last time. Thank them for the opportunity to help them today. Ask them to wait outside for their turn loading.
- Confirm with the movers that they are aware of your client’s presence on the loading list (especially if it is a slower day and they are occupied with other tasks).
Completing the Process
- Go into the client’s cart and click on the orange ‘Mark Picked-up’ button below the Target gift card (if applicable).
- When the volunteers who are selecting linens and housewares are done with their respective jobs, they will give the shopper their completed wish lists.
- Using the Linens Wish List, complete the categories under the ‘Linens’ item class by entering the following items to their cart:
- For Item Type ‘Bag/Box Misc Linens’, enter 2 for the average family and select ‘Add to Cart’
- For Item Type ‘Blankets’, ‘Comforters’, ‘Pillows’, ‘Sheets’, and ‘Towels’, enter the number on the wish list and select ‘Add to Cart’
- For Item Type ‘Bag/Box Misc Linens’, enter 2 for the average family and select ‘Add to Cart’
- Using the Kitchens Wish List, complete the categories under the ‘Kitchen’ item class by entering the following items to their cart:
-
- For Item Type ‘Bag/Box Misc Kitchen’, enter 2 for the average family and select ‘Add to Cart’
- For Item Type ‘Frying Pan/Skillet’, ‘Glasses’, ‘Pots’, and ‘Silverware/Flatware’, enter the number on the wish list and select ‘Add to Cart’
-
- Now go into the client’s cart and for each of those kitchen and linens items that you have just put into their cart, click on the orange “Mark Picked-up’ button.
- Note: The above steps should be done when the movers are not actively working on the client (or done quite quickly while they are!). You do not want to muddy the waters by having the movers think that an item, like a blanket, is in the client’s cart but has not been picked up yet. The movers expect that the # of items selected vs. # of items picked will be equal when they complete the client loading.
- Add a note about the family. Click on the green “Add Note” button below the notes on the Client Info screen. A pop-up box will appear. List the family members, including the children's names, ages, and genders. This information is not included in the referral so it is good to document. Include any comments about their mattress needs, vehicle for transport, refused items, and any space limitations on the vehicle. Type your note in the box and hit enter.
- Once the personal shopper is confident that all of the client’s items have fit into their transport vehicle(s) and they have left the loading area, the shopper may close the client's order by clicking on the red ‘Close Order’ button on the bottom of the Client Info screen.
- If the client completed their shopping on this visit, the shopper may close the referral by clicking on the red ‘Close Referral’ button on the top of the Client Info screen.
- Staple together the check-in sheet, the Release, the linens wish list, and the kitchen wish list. File this group of formsin the file cabinet next to the front desk under the appropriate year.
Selecting Linens and Kitchenware
Selecting and Packing Linens
In this job, you will support the Personal Shopper who is working with the client. While the Shopper and the client are choosing furniture, etc., you will be selecting bed, kitchen, and bath linens for the client. You will also be packing these items up for the client.
It is our goal to provide the client with a nice selection of linens that match their tastes and satisfy their needs, however, keep in mind that we can only do the best we can. It is important to balance your client’s wishes against the overall good of all clients. Limit yourself to picking only one or two new items while filling in the rest of the client’s needs with used items. Do not take the last remaining item in multiple categories; leave some for the others. Keep in mind the client’s color and taste preferences but be ready to be flexible if their choices aren’t readily available.
Before beginning the selection process
- You will be given the orange Linens Wish List either directly from the Personal Shopper or from the volunteer who is handling client check-in. Review this form. Direct any questions you have about this form to the volunteer who completed the form.
- Familiarize yourself with the client and their family.
- How many adults are in the family?
- What are the sex and ages of their children (if they have any)?
- What size beds do they sleep in?
- What are their color preferences for bedding, kitchen, and bathroom linens?
- Are any vehicle restrictions noted? Can you pack in bulky boxes or do you need to be careful in your packing?
- Pay attention to what is marked as “yes” (wanted) versus “no” (not wanted) on the Wish List. Do not waste time and inventory giving items to clients that they have indicated they do not need.
- Familiarize yourself with the linens area of the store.
- Twin, Full, Queen, and King bedding each have their own shelving areas. In each of these areas, the sheets are on the top shelf, blankets on the second shelf, and comforters on the lower shelves.
- New bed pillows are lined up on a shelf or found in a box.
- Kitchen linens are grouped together, as are the bathroom items.
- Stuffed animals are kept in a bin/bag in the linens area.
- While reviewing the linens area, note any items that appear to be in short supply or, conversely, are in abundance. Do you see signs indicating you may give out more than the usual allotment of any items? Are there any specials, such as hand soap, that can be given out to every client?
- Be aware that the Shopper, at the end of their session with the client, will need to record in the web-based shopping system the quantities of specific items given to the client. You therefore need to clearly indicate on the Linens Wish List which items you gave the client and, specifically for bedding linens (sheets, blankets, and comforters), new bed pillows, and towel sets indicate the quantity given. The shopper will enter the number given of these specific items into the web-based shopping system. Any items other than bedding, pillows, and towel sets are accounted for by the Shopper entering that multiple “bag/box of misc. linens” were given to the client.
- Set yourself up at packing table. Co-ordinate with the volunteer scanning QR codes the color for the client’s name tags and note which cart has been reserved for this client. Make sure a cone has been placed on the cart with the client’s name tag on it. You will be packing as you shop. To avoid confusion, make sure that any boxes or bags that you cannot fit on the cart(s) are seated next to the cart and are clearly labeled with your client’s name on the appropriate color tag.
Shopping for the Linens Wish List items
- Select the bedding for each bed on the Linens Wish List, as requested. For each bed, the normal allotment is one set of sheets, one blanket, and one comforter. Posted signs will indicate if you can give extra linens or if there are limitations. If there are flannel sheets, these can be handed out as an additional set for the client. If possible, try to coordinate the linens for each bed. Always remember who you are shopping for. The bedding preferences of a young boy differ from that of a elderly female!
- Select new bed pillows for the client, if requested. Based on the availability of pillows, you may at most give one pillow per family member or, if the supply is low, you will be given a cap on how many you may provide per family.
- If the client has young children, select a stuffed animal for each child (if available).
- Select bathroom items, as requested. Each member of the family gets a towel set. When towels are in short supply, adults will be given a towel set and children will receive just a bath towel. Other bathroom items are handed out based on availability and the client’s interest in the item.
- Select kitchen linens, if requested. If the kitchen table size is not listed on the wish list, check with the Personal Shopper about what size and shape kitchen table the client has selected or look on the web-based shopping system to find which table the client has selected. If the shopper has not indicated kitchen colors, the kitchen linens can be chosen to match the dish set the client has chosen (dish set can also be viewed on the web-based shopping system). The size of the client’s family dictates the minimum number of placemats and/or napkins to give a client.
- If the client would like throw pillows or throw blankets for their home, look on the web-based shopping system to see which couch and/or upholstered chairs the client has selected and determine which colors would be best. If pillows or blankets have been staged on the couch in the showroom, pack up these loose items to go to the client.
After your shopping
- Make sure you have clearly indicated what you have given the client on the Linens Wish List.
- Did you check off everything that you gave?
- Did you clearly indicate the number of sheet sets, blankets, comforters, towel sets, and pillows that you handed out?
- Give the completed Linens Wish List to the Personal Shopper.
- Make sure the volunteer scanning the QR codes, who is coordinating the loading with the movers, is aware of the status of the linen items.
- When time permits, restock the linen shelves.
Selecting and Packing Kitchen
In this job, you will support the Personal Shopper who is working with the client. While the Shopper and the client are choosing furniture, etc., you will be selecting kitchen items. You will also be packing these items up for the client.
It is our goal to provide the client with a nice selection of items for their kitchen that satisfy their needs, however, keep in mind that we can only do the best we can. It is important to balance your client’s wishes against the overall good of all clients. Limit yourself to picking only one or two new items while filling in the rest of the client’s needs with used items. Do not take the last remaining item in multiple categories; leave some for the others. Keep in mind the client’s preferences but be ready to be flexible if their choices aren’t readily available.
Before beginning the selection process
- You will be given the yellow Kitchen Wish List either directly from the Personal Shopper or from the volunteer who is handling client check-in. Review this form. Direct any questions you have about this form to the volunteer who completed the form.
- Familiarize yourself with the client and their family.
- How many members are in the family? How many children?
- Does the family like to cook? To bake?
- Are any vehicle restrictions noted? Can you pack in bulky boxes or do you need to be careful in your packing?
- Has the family requested a kitchen starter kit (1st item on the kitchen wish list)? The client’s interest in this kit indicates they have very few items for their kitchen. If you give them a kitchen starter kit, you need not worry about the specific tools listed in the kitchen tools section found on the top of page 2.
- Pay attention to what is marked as “yes” (wanted) versus “no” (not wanted) on the Wish List. Do not waste time and inventory giving items to clients that they have indicated they do not need.
- Familiarize yourself with the kitchen area of the store. Most items are stored in the newest part (“annex”) of the store on the long metal shelving. Additional quantities, if any, are stored in the kitchen sorting area. It should be sufficient to select items from the annex unless you are looking for a particular or unique item that you think might be found in the kitchen sorting area.
- Be aware that the Shopper, at the end of their session with the client, will need to record in the web-based shopping system the quantities of specific items given to the client. You therefore need to clearly indicate on the Kitchen Wish List which items you gave the client and, specifically for silverware, drinking glasses, pots, and skillets indicate the quantity given. The shopper will enter the number given of these specific items into the web-based shopping system. Any items other than silverware, drinking glasses, pots, and skillets are accounted for by the Shopper entering that multiple “bag/box of misc. housewares” were given to the client.
- Set yourself up at packing table. Co-ordinate with the volunteer scanning QR codes the color for the client’s name tags and note which cart has been reserved for this client. Make sure a cone has been placed on the cart with the client’s name tag on it. You will be packing as you shop. To avoid confusion, make sure that any boxes or bags that you cannot fit on the cart(s) are seated next to the cart and are clearly labeled with your client’s name on the appropriate color tag.
Shopping for the Kitchen Wish List Items
Kitchen Starter Kit
- If requested and available, provide the client with a pre-made kitchen starter kit. If a kit has not been prepared in advance of the shift and a client wishes to have one, you will need to instead pack up all of the items on the kitchen starter list that you can find.
Kitchen Table Items
- Has the client indicated they would like extra soup bowls, mugs, serving bowls, or serving platters? Look at the client’s selected dish set in the web-based shopping system to see what color items might complement their dish set. Also note that this wish list was filled out before the client chose their dish set. Therefore, if their chosen set comes with sufficient bowls or mugs, you do not need to give them more.
- Silverware is prepacked in bags of serving sizes of 4, 6, 8, etc. The size of your client’s family dictates the minimum serving size they should be given but remember, no different than with your own family, sometimes dishes may be dirty or company may come over. If supplies permit, any client gets a minimum of a serving for 4 and families should be given generally two times the family size.
- Similar to silverware, the size of your client’s family dictates the minimum number of glasses they should be given.
- Select plastic dishes and cups for the adults and/or children, as requested.
Pots & Pans
- If supplies permit, clients are allowed 1 of each size pot (small/medium/large, if available) and skillet (small/large, if available). Extremely large pots should be given to bigger families.
Other
- Select a tea kettle and/or an ironing board if requested and if available
Kitchen Tools
- If you have given the client a kitchen starter set, this list of kitchen tools should be crossed out and may be ignored as these items are in the starter kit.
- If the client has not selected a kitchen starter kit, try and fill the client’s wish list for specific items.
Not in Starter Kit
- Some items can be handed out based on family size (casserole dishes, food storage containers) while other items may only be 1 max per family (pie plate or muffin tin) due to generally low inventory.
- Take advantage of any laundry baskets or garbage cans you give a client to pack items in!
After your shopping for items in the Kitchen Wish List
- Make sure you have clearly indicated what you have given the client on the Kitchen Wish List.
- Did you check off everything that you gave?
- Did you clearly indicate the number of silverware, drinking glasses, pots, and skillets that you handed out?
- Give the completed Kitchen Wish List to the Personal Shopper.
- Make sure the volunteer scanning the QR codes, who is coordinating the loading with the movers, is aware of the status of the kitchen items.
- When time permits, restock the kitchen shelves.
How to pick Mattresses, Bed Frames & Platform Beds
Personal Shopper
- Pick headboards first so you know the sizes necessary
- Some headboards come with side rails or a metal bedframe, so they don't need a platform or additional metal frame
Mattresses
- Select Mattresses - General or Mattresses - Grant as the class
- Queen – for a couple
- Full – adult(s) 18 or older
- Twin - kids ages 2 and up
- Twin Xl – same length as queen, good for tall kids or adults
- Toddler Mattress – find them in the Children's Furniture item class if we have any.
- These mattresses fit in a crib or a toddler bed
Platform Beds- Grant
- We buy these with grant money
- Twin, Full & Queen
- Only need a mattress
- No box spring is needed.
- No slats needed
- No other metal frame.
- Good if the truck or vehicle is small and we need to save space
- Comes in a compact box
- Assembly is required
- A picture is on the wall next to the frames
- Has 14 inches of storage space underneath and is very sturdy
- We have metal brackets for headboards only
Metal Bed Frames- used (Item Class “Mattresses- General”)
- First, pick used metal Bed Frames - if the size is available.
Grant Metal Bed Frames - (Item Class “Mattresses Grant”)
- We buy these with grant money
- If there are NO Used bed frames available, take one from the Grant category
- If the headboard/footboard comes with side rails, a metal frame is not needed
- None of these metal frames require slats to support a box spring
- #17047- Twin/ Twin XL or Full
- #25252- Full, Queen, or King- has a center span
Personal Shopper- Client Shopping Flow
Flow for Check in & Starting to Shop
- The Front Desk volunteer will check in the client by noting their arrival on the white board, completing the top half of the Client Check-In form, tagging their vehicle and giving the client their Target gift card (if applicable). They will bring the client to their Shopper.
- The Shopper will complete the Client check-in Form, the Release, and also the Linens & Kitchen Wish lists. These Wish Lists will be given to the linens and housewares packers.
- Sign in as a Personal Shopper and select your client.
- Enter Client’s Vehicle Info for the In Store Movers and for space calculations.
- Make any necessary changes to the referral. Click Update.
Shopping through the categories
If you don’t see a category listed in Personal Shopping System, it means we have NONE
Check-In Items
- Select Check-In Items: put a 'Cart for Homegoods' and a 'Target Gift Card', if applicable, in the cart.
Kitchen Dishes, Appliances & Kitchen Checklist
Kitchen – Item Class
- Dish Place Setting – Pick 1 set
- Dish Place Setting-Extra - Pick 1 set
- Small Appliances – Pick 2
- Free Small Appliances – Pick 1 if needed
- TV - Pick 1
Bedroom
Pick mattresses, platforms, bed frames: Always pick first from Mattress - General and then from Mattress - Grant (adhering to distribution guidelines)
Beds – Item Class
- Headboards – 1 per bed
- Bunk Beds & Toddler Beds – as needed
Dresser – Item Class
- Armoires, Dresser -Tall, & Dresser -Long – Pick 1 dresser per family
- 2nd or 3rd Dresser – Pick 1 for a family of 4+
***If a dresser includes a nightstand(s) that takes away from the end table allotment of 2 end tables/nightstands per family**
Living Room
- Seating – Item Class:
- Bench - 1
- Couch, Loveseat, Sleeper Sofa - Pick 1
- Upholstered chair/Recliner – Pick 2 [Only 1 Recliner per family]
- Rocker – 1
- Footstool/Ottoman – 1
- Tables – Item Class:
- Coffee Table – 1
- End Table – Max of 2 end table and nightstands combo
- Free End Tables – 1
- Desks – 1
- Misc Table - 1
- Cabinets – Item Class:
- Bookcases – 1
- Storage Cabinets – 1
- TV Stands – 1
- Misc – Item Class:
- Children’s Furniture – as needed for families with kids
- Misc Furniture - 1
- Rugs - 1
Kitchen Furniture
- Tables - Item Class:
- Kitchen Table – you will see if chairs come with the set
- Seating – Item Class:
-
Kitchen chairs & Misc chairs/Bar Stools – As Needed
-
**Review the shopping cart, click Ready to Load, notify Movers**
Other Items
- Lamps – Floor, Table (1- Floor & 2 – Table)
- Lamps Free – pick 2 as these are more accent lighting or desk lamps
- Artwork – pick 4 to 6 pieces out of the categories
- Mirrors & Clocks – under artwork - pick 1 each
- Misc Items – under Misc Item Class - As Needed
Final Steps
Enter items from the Kitchen and Linens Check Lists into the client's cart. Mark these items as 'picked'. Add a note about your client on the Client Info page of their record. Describe the family (children's ages and genders), their mattress situation, the vehicle(s) they had for transport, any items they declined, and any shopping or space limitations. Close the order. If applicable, close the referral.
Sorting
Sorting
General Introduction
Volunteers working in the sorting area at Fresh Start are a vital part of the behind-the-scenes work. All of the home goods donations received by our donations staff are brought to the sorting area. The soft items, such as bedroom, bathroom, and kitchen linens are deposited into the large bins in the sorting area. Hard items, such as small kitchen appliances, pots and pans, and dish sets are put on the donation shelves in the back of the sorting area. Volunteers working in the sorting area draw from the bins and/or the shelves and, in an organized fashion, process what they find. If you have any questions, always feel free to ask any of your fellow volunteers for help!
Safety is always our primary concern. Please keep the emergency exit doors clear, walkways clear of donations, and do not attempt to lift any item beyond your weight capability. There are always other volunteers in the store that can move that small appliance for you!
Keep in mind that a donor might have given us multiple bags and/or boxes. If you find what seems to be an incomplete set of dishes, sheets, etc., alert the sorting team, and put it aside while the volunteers work through the rest of that donor’s donation.
General Acceptance Guidelines
Fresh Start accepts donations of practical items for our clients which have been gently-used and are in good working condition. We do not accept items which are broken, torn, stained, foul smelling, covered with pet hair, show any evidence of insects or rodents, or are missing parts. We do not have the ability to pre-screen all donations and therefore the donations brought to the sorting area can fall into a wide range of conditions. Disposable gloves are provided for volunteers who wish to wear them.
We only accept seasonal items during the appropriate season due to space limitations. We do not accept items that have religious or political undertones.
Almost all of the donations are given to families in need. However, if a donated item looks like it might be of value, it is set aside with a note on it for our volunteer who researches these items. Value might stem from it being an antique, a desirable item on eBay, or a donation of substantial value (e.g. a brand new KitchenAid Mixer). We do consign or sell some items in order to help pay for some of our operating expenses.
Disposal Guidelines
Important: If a donated item smells poorly or exhibits any signs of insects, etc. it is important to put the item directly in the dumpster. Any of the other disposal options discussed below are not necessarily removed from the store on a daily basis and therefore are not appropriate for a foul item!
That being said, it is our goal both to keep items out of our landfills whenever possible and reduce our garbage disposal costs. For these reasons, we provide a wide variety of recycling or donation alternatives:
- For textiles:
- Savers receives any items which are in a good condition but are on our do not accept list. The Savers boxes are on the rolling cart in the sorting area. These are brought to Savers at the end of every shift. Please do not give anything to Savers that they would not be able to proudly sell.
- The Wrapping Bins, found under the counter in the sorting area, are where you can deposit unacceptable linens in decent condition that might find another life with the client. These linens should be a handy size for wrapping artwork and/or covering furniture surfaces in moving.
- The Textile Recycling Bin, under the counter, holds textiles not appropriate for the above two bins. We are paid on a $/pound basis for these items which we take to the Hudson Transfer Station. Place these items directly into 13-gallon trash bags within the bin.
- Often times a volunteer will offer to take a few bags to Buddy Dog. These linens, primarily towels, should not contain wires (e.g. electric blankets), stuffing, or be of a nature that an animal could catch their paws on the fabric. These donated linens will be used in the dogs’ cages.
- For items other than textiles:
- The bin labeled Items for Free Shelf, under the sorting counter, is for small decorative items of good quality. For example, a nice picture frame, a pretty vase, a good-sized single coffee mug with words of encouragement on it, a crystal candy dish, a nice figurine, etc. Our clients are here for practical items to help them get back up on their feet but, at the same time, it is nice for the personal shopper to choose something unique and attractive for the client to display in their house. These items are moved onto the Free Shelf in the showroom when space permits.
- The bin labeled Kitchen Items for Bins Outside, also under the sorting counter, holds everyday items (primarily kitchen but there is leeway) that are best chosen by the client based on their needs and interests rather than by our team of volunteers. Examples of these items are Bundt pans, drawer organizers, novelty mugs, unique kitchen tools, etc. These items are moved into the outside bins when space permits.
- Savers receives any items which are in a good condition but do not meet any of our clients’ needs, as discussed above for textiles.
- Hudson Swap Shack items can be left in the designated bin found in the loading dock area. Typical Swap Shack items are usable items that could not be sold by Savers, like dishes with minor chips.
- Recycling bins are available in the loading dock area for your typical residential recycling items such as tin, aluminum, plastic (with a stamped recycling logo) and all kinds of paper, including newspapers, cardboard and broken down boxes. Bins are also available for glass and metal.
Looking to volunteer a bit more? We are always looking for volunteers to drop off the Buddy Dog, Textile Recycling, and Savers donations to their respective locations!
Presentation Guidelines
We want the home goods area of our showroom to be attractive and, in large part, how the items are cleaned and packaged in the sorting area contributes to achieving our desired look. It is always vital for linens and housewares to be clean before being placed in their bins in the sorting area. Clean linens are generally tied in ribbons before being put in their respective bins or shelves in the sorting area and eventually placed out on the showroom floor. It is desirable for like items to be packaged in similar size bundles so they stack neatly on the showroom shelves. Items should be tied snuggly so that the bundle does not fall apart when handled.
Restocking Guidelines
It is our goal to have a well-stocked showroom. Replenishing items on the floor should be done before our opening hours or after the clients are completed for the day. Whenever possible during our shifts, donated items which have been processed should be placed into that item’s applicable bin or shelf space in the sorting area. There will be times, due to low inventory as a result of a hectic day, when items will be needed on the shelves in the showroom during the middle of a shift. This restocking should be done without interfering with the work being done for the clients.
Care of the Sorting Area
We do our best to keep an organized sorting area with bins and shelves to store the majority of items that will be processed on any given day. It is important to understand that the inventory can fluctuate greatly from week to week, so we need to be flexible and creative with our storage solutions.
At the end of each shift, the volunteers should take some time to ensure that the sorting area looks neat and organized for those who will be working the next shift. At shift’s ends, please do the following:
- Clear off all counter tops and tables. Any item left on the counter will only cause confusion for the next shift. If you are in the middle of a big project, like testing and cleaning an appliance, you may leave the appliance on the counter with a note as to its status. If you were about to start a small project, like measuring a set of sheets, just put the sheets back in the donations bin for the next shift.
- Vacuum the floor in the sorting area.
- Start the dishwasher, if necessary. Note on the dishwasher the status of the contents for the next shift (dirty/clean).
- Restock the showroom floor, as necessary.
- Note any categories of items that are in low supply and give this list to the front desk.
- Note any categories of items in unusually high supply. Tell the front desk and they might consider increasing the client limit for that item.
- Notify the front desk of any cleaning supplies or stationary items that are in low supply.
Let’s learn about the specific items we will be sorting; linens, tableware, and housewares, and decorative items.
LINENS
We accept:
- Bedding: sheets, bed blankets, comforters & bedspreads, duvet inserts and duvet covers, new bed pillows, new or like new mattress pads
- Bathroom: towels, beach towels, shower curtains and curtain rings, bath mats, bath rugs, bathroom accessories, new shower liners
- Kitchen: placemats and napkins, dishcloths, dish towels, tablecloths, table runners, potholders
- Miscellaneous: rugs (large and small), curtains (at your discretion), baby linens, decorative pillows, throw blankets, and new stuffed animals
We DO NOT accept:
- Items that do not meet our General Acceptance Guidelines (refer p. 1)
- Dust ruffles (unless with a matched comforter)
- Used bed pillows, mattress pads, or shower liners
- Fitted sheets that don’t have good elastic and a minimum of 9” corner depth
- Older electric blankets
- Curtains (at your discretion)
Bedding
-
Sheets
- All sheets should be matched and put into sets: flat sheet, fitted sheet and pillowcase(s). There should be one standard pillowcase for a twin set, two standard pillowcases for full and queen sets, and two king pillowcases for a king set.
- Measure (see reference chart displayed on wall in sorting area), fold into a small neat package, and wrap the sheet sets tightly using ribbon. Tie the set as you would a present (both length and width-wise).
- Make sure the folded smooth edges of the sheets and pillowcases are all going the same way so that they look neat.
- Use the white labels found in the folders on the sorting counter (twin, full, queen, king) to label the sheet sets.
- Put in appropriate sorting room bin.
- If you cannot make a matching sheet set:
- If you only have a flat sheet, fold and tie the flat sheet, label it with the white labels found in the folders on the sorting counter (twin, full, queen, king), write ‘flat only’ on the label, and put it in the proper bin in the sorting area.
- If you only have a fitted sheet, locate a complimentary colored flat sheet in the appropriate size flat sheet bin, locate the correct number and size of pillowcases, and process as in steps 1-5 above.If you have only miscellaneous pillowcase(s), roll, tie, label as ‘1 std.’, ‘2 std.’, ‘1 king’, or ‘2 king’ (using a blank white label), and put in the proper containers found on the shelves in the showroom. There are three containers: one for a single pillowcase (found in the Twin section), one for a pair of standard pillowcases (found in the Full section), and one for king pillowcases-singles and pairs (found in the King section).
-
Bed Blankets
- Measure (see reference chart), fold, and wrap blankets tightly using ribbon. Tie the set as you would a present (both length and width-wise).
- Use the white labels found in the folders (twin, full, queen, king) to label the blanket.
- Put on a shelf in the sorting room or on the appropriate shelf in the showroom.
-
Comforters & Bedspreads
- Measure (see reference chart), fold, and wrap comforter using ribbon or, if available, place in a comforter storage bag.
- Use the larger colored labels found in the basket on the shelf in the sorting area (twin, full, queen, king) to label the comforter.
- Put on appropriate sorting room shelf or showroom shelf.
-
Duvet Inserts and Covers
- If you have a duvet insert within a duvet cover, process like a comforter (see above).
- If you have a duvet insert without a cover, locate a cover in the appropriate bin in the sorting area, insert the duvet inside the cover, and process like a comforter.
- If just a duvet cover has been donated, measure, fold, and tie and label as a (insert size) duvet cover, and store in the applicable bin.
- Note that duvet covers can often be used to cover a comforter in marginal condition and give the comforter new life.
-
Bed Pillows
- Bed pillows are only accepted in new condition and are put out on the showroom floor or, if a large quantity, in the storage area. Do not add any donated pillows to our stock without adding the number of new pillows to our inventory (item #724 in the web-based shopping system - ask a fellow volunteer if you do not know how to do this).
Bathroom
-
Towels
- Towel sets are made up of a bath towel, hand towel and face cloth. A guest-sized hand towel (smaller than a normal hand towel) can be placed in addition to, but not in replacement of, a regular hand towel in a set.
- If you don’t have a perfectly matched set, put together a set that goes well together.
- After inspecting, fold each towel and facecloth in threes and stack with folded edges all going the same way. Wrap tightly, like a present, using ribbon.
- Put in appropriate sorting room bin.
- If individual towels are donated and there are not a sufficient selection to make a set, place the neatly folded towels into their respective bins in the sorting area.
-
Beach Towels
- Roll and tie. No label is necessary.
- Put in appropriate sorting room bin, if one exists, or on the appropriate shelf in the showroom.
-
Shower Curtains
- Fold and tie with ribbon like a present. No label is needed.
- Liners donated in original wrapping should be left as is.
- Loose shower curtain hooks, in sets of 12, are to be placed in a small Ziploc bag.
- Put in appropriate sorting room bin, if one exists, or on the appropriate shelf in the showroom.
-
Bath mats and Bath Rugs
- Fold, tie, and put on the appropriate shelf in the showroom. No label is needed.
-
Bathroom Accessories
- Bathroom accessories, such as small wastebaskets, soap dishes, toothbrush holders, Kleenex box covers, etc. should be clean and displayed near the bathroom shower curtains and rugs.
Kitchen
-
Placemats and Napkins
- Count, roll, and tie placemats and/or napkins. Keep matching sets together.
- There is no need to put placemats and napkins, which are donated separately, together as sets.
- Using a blank label, write the number in each group (ex. 8 placemats, 4 napkins).
- Put in the appropriate sorting room bin, if one exists, or on the appropriate shelf in the showroom.
-
Dish Towels and Dishcloths
- Fold and put in the appropriate sorting room bin, if one exists, or on the appropriate shelf in the showroom.
-
Tablecloths
- Measure length and width and determine the shape (oval, round, rectangle, square).
- Using a tablecloth form found in the tablecloth folder on the sorting counter, fill in the information including length, width, # of people at table, and date received.
- Hang tablecloth on a hanger.
- Use a safety pin to attach the form to the tablecloth. Tablecloths are hung by color and size (round and square on top, oval, rectangle on bottom) in the showroom.
-
Table Runners
- Measure length and width.
- Write measurements on a blank label and stick on runner.
- Place on a hanger. Table runners hang on the end of the top rack in the showroom.
Miscellaneous
-
Rugs
- Large rugs are handled by the volunteers who are cleaning furniture in the storage area.
- For smaller rugs (door mat size), vacuum, stain treat if necessary, measure and roll with the rug pattern showing.
- Write the size on a piece of masking tape and put the small rug in the showroom in the linen section.
-
Baby Linens
- Roll and label baby linens. Be specific about what the item is: crib sheet, receiving blanket, etc.
- Put in appropriate showroom bin.
-
Decorative Pillows
- Place on a couch as a nice accessory or in a cardboard bin in the showroom.
-
Throw Blankets
- Couch and smaller sized throw blankets are rolled and tied.
- Use the white couch throw label found in a folder on the sorting table for the larger throws.
- Put on the appropriate showroom shelf.
TABLEWARE
We accept:
- Dish sets
- Glasses and Mugs
- Silverware
We DO NOT accept:
- Items that do not meet our General Acceptance Guidelines (refer p. 1)
- Alcoholic beverage glasses (wine glasses, beer mugs, etc.)
- Items with logos
- Chipped or cracked dishes (minor chipped items can be deposited in Swap Shack bin)
- Dishes, Glasses, or Mugs if there are less than 2 matching items
- Jelly jars or mason jars to be used for drinking glasses
- Coffee cups/mugs that are not big enough to hold a decent sized cup of coffee or tea
- China and non-dishwasher-safe dishes
Dish Sets
Complete Dish Sets
- A complete dish set (“Dish Place Setting” in the web-based shopping system) is made up of a minimum service of 4 dinner plates and at least two different matching components (i.e. 4 dinner plates plus 4 bowls and 4 mugs, or 4 dinner plates plus 4 luncheon plates, and 4 bowls, etc.).
- There does not need to be the same number of each dish item as long as the minimum service is satisfied. The number of dinner plates will dictate what the serving size of the dish set is.
- We do not break up large sets that are donated to us but we should ensure that they are given to a large family.
- All serving pieces (bowls, platters, butter dishes, and so on) are kept with the dish set.
- Any set which does not have at least 4 dinner plates but still provides a nice assortment of dishes can be bundled together as extra dishes (“Dish Place Setting – Extra” in the web-based shopping system). Clients can pick these sets in addition to their primary dish set.
- To package up a dinner set (primary or extra),
- Locate the small blue dish set forms.
- Count the number of each dish item (e.g. 6 dinner plates, 6 bowls, 8 saucers, etc.).
- Enter these numbers on the blue dish set form.
- If this is an extra set, write “Extra dishes” on the blue dish set form.
- Holding a sample of the dish pieces aside, package up the dish items and place in a sturdy copier paper box (with a lid). The sample will be placed inside of the box on top of the wrapped contents.
- The total number of boxes (generally 1 or 2) is noted on the dish set form.
- The dish set form is inserted in the box with the sample.
- The number of boxes is written on the side of the box (e.g. Box 1 of 1, or Box 1 of 2 and Box 2 of 2).
- If this is an extra set, write “Extra dishes” on the side of the box.
- The boxes are given to the volunteer who is photographing inventory items and assigning inventory numbers and QR codes.
Incomplete Dish Sets
- We retain items that are not a set but for which there are at least 2 matching items.
- These items can be placed on the dish shelves in the sorting area. They will eventually be found to be good matches for existing sets or be placed out in the showroom as extra bowls or serving dishes to supplement the clients’ dish sets.
China
- As a rule, we do not accept china but sometimes a china set will come in with a donation. China would not be given to a client as their primary dish set because it is often not dishwasher safe and/or microwave safe.
- China that seems fragile or is rimmed with silver or gold should be given to Savers. We do not want to risk our families putting the china in the microwave.
- China that seems suitable for everyday use should be packaged up as extra dish set (see above).
Glasses and Mugs
Glasses
- Any loose glasses are stored in the bins which says “glasses to be made into sets” in the sorting area. Periodically, glass sets are made from these unmatched glasses.
- A glass set, if possible, should contain an assortment of at least 2 different sizes of glasses (e.g. 4 small and 4 large or 6 large and 4 medium).
- There should be a minimum of 2 of each size of glass in a set. A set should be a minimum of 6 total glasses.
- Glass sets are safely wrapped and boxed.
- A piece of paper should be taped to the outside of the box to detail the appropriate family size (Family of 1-3, Family of 4-6, Family of 7+), and what # and size of glasses are contained in the box.
- All the glasses in the set do not need to match but a good effort should be made for the glasses to look like they belong together.
- We do not break up large sets of glasses that are donated to us but we should ensure that they are given to a large family.
- Boxed glass sets are stored on a shelf in the showroom with overflow on the shelves in the sorting area.
Mugs
- Sets of 4 or more mugs should be placed in bins in the sorting area until they are needed in the showroom.
- Attractive sets of 2 or 3 mugs can be placed in the Kitchen Items for Bins Outside bin.
Silverware
- If a silverware set is received, it should be packaged as such.
- If stray silverware is donated, it should be sorted by type of utensil and put in the bins on the sorting shelves (or sometimes kept in the storage area).
- Any rusty utensils should be put in the metal recycling bin.
- A silverware set is service for a minimum of 4. A set contains dinner forks, knives, and teaspoons (at a minimum) but often also desert forks, and tablespoons.
- When silverware sets are packaged from unmatching items, we generally make bundles to serve 4, 6, or 8.
- If a large matching silverware set is donated, we do not separate the donation. It is packaged up and we try to ensure that it goes to a large family.
- When making silverware sets, an effort is made to combine items with similar handles. Depending on supply and need, these efforts need to be relaxed at times.
- Silverware sets are placed in gallon plastic bags, masking tape is used to secure the items, and the service (4, 6, 8, etc.) is written on the masking tape.
- Finished sets are kept in bins in the showroom and overflow is kept in bins in the storage area.
HOUSEWARES
We accept:
- Prepware: mixing bowls, measuring cups, measuring spoons, cutting boards, colanders, knives, etc.
- Cookware: sauce pans, frying pans or skillets, casserole dishes, etc.
- Bakeware: cookie sheets, baking pans, cake pans, pie plates, muffin tins, etc.
- Kitchen Utensils: Spoons, spatulas, whisks, can openers, tongs, soup ladles, rubber spatulas, etc.
- Small appliances: coffee makers, blenders and/or food processors, hand or stand mixers, microwaves, toasters, etc.
- Lamps and shades
- Plastic storage containers and plastic tableware items
We DO NOT accept:
- Items that do not meet our General Acceptance Guidelines (refer p. 1)
- Wooden utensils, bowls, and cutting boards (unless new)
- Teflon pots and pans that are highly scratched and/or in poor condition
- Large or built-in appliances
- BBQ or camping tools or dishesSingle-use plastic storage containers
- Specialty items that would be used infrequently by our clients
Prepware
- Mixing bowl can be stacked and put on their place on the shelves in the sorting area.
- Measuring cups, both solid and liquid, and measuring spoons are placed in their bin on the shelves in the sorting area.
- Cutting boards should be gently used or new and should be stacked on the shelves in the sorting area.
- For knives,
- The sharp ends of knives should be wrapped in plastic wrap. Sets of knives (e.g. paring, bread, cleaver, utility, etc.) are grouped together and taped with masking tape.
- Sets of 4 or more steak knives are labeled as such and masking taped together.
- All knives can be stored in their bins on the shelves in the sorting area.
Cookware
- The lids to pots and pans should be taped, using masking tape, onto the pot.
- Any extra lids are placed in the bin of extra pan lids on the shelves in the sorting area. Likewise, if a pan does not have a lid, try to match it with a lid.
- A small set of matching pans can be stacked as a set. Clients generally can only choose 3 saucepans and 2 skillet so large sets are not kept together to go to one client.
- Pot and pans are stored in the bins (small pans, large pans, skillets) in the sorting area and on the showroom floor.
- Lids to casserole dishes should be taped on, using masking tape.
- Casserole dishes are stored on the shelves in the sorting area.
Bakeware
- Glass and metal baking items are stored in their respective bins in the sorting area.
Kitchen Utensils
- Kitchen utensils are sorted to their respective bins in the sorting area. There are individual bins for the common utensils. Unique items, for which you cannot find a bin, are put in the Kitchen Items for Outside Bins bin so that the client can choose that item.
Small Appliances
- Appliances need all their parts. Instruction manuals, if donated, need to stay with the item.
- We cannot test an appliance fully but we can do a cursory check to make sure it, at a minimum, seems to turn on and operate. Appliances can be tested in various ways:
- Heat a glass of water in a microwave to ensure it works.
- Plug in and see if unit (crockpot, waffle maker, coffee pot burner, iron, etc.) gets warm. Be Careful!!
- Plug in and see if unit functions (blender, toaster, mixer, etc.).
- Most appliances that do not work can be left in metal recycle.
- Once tested, wrap the cord with a twist tie or tape.
- Cleaned and tested appliances are given to the volunteer who is photographing inventory items and assigning inventory numbers and QR codes.
Lamps
- All lamps need to be tested. If the lamp needs a lightbulb, one can often be found on the shelf above the sorting counter.
- If the lamp does not work and it is of decent quality (e.g. not a cheap desk lamp), give to the men in the repair area of the backroom. They can either fix it or, at a minimum, use it for parts. Broken inexpensive lamps should be put into the trash.
- If the lamp does not have a shade, attempt to find a matching shade. Extra shades are kept on the top shelf in the sorting area. Lamps for which we cannot find an adequate shade are put aside to see if a shade comes in. After a reasonable period, if no shade is found, we give the lamp to Savers.
- If needed, a supply of harps and finials can be found at the repair bench in the sorting area.
- Once tested, wrap the cord with a twist tie or tape.
- All lamps are given to the volunteer who is photographing inventory items and assigning inventory numbers and QR codes.
Plastic storage containers and plastic tableware items
- We receive many plastic storage containers in poor condition and therefore, we need to be selective. New single use containers can be handed out to clients. For used items, we tend to save items of a Tupperware quality or above. The items we do not keep can be put in the recycling bin if they have a recycling code on the bottom or given to Savers if they are of adequate quality.
- Plastic storage containers are often bundled.
- Nice plastic dishes and cups should be bundled. They are a favorite of families with children.
- Items are kept in various bins (plastic dishes bin, storage containers bin) in the sorting area.
DECORATIVE ITEMS
Artwork
- Accepted artwork is often handled by the volunteers who are cleaning furniture in the storage area. All pieces of cleaned artwork are given to the volunteer who is photographing inventory items and assigning inventory numbers and QR codes.
Transport
Truck Maintenance
Registration and Inspection:
- Renew Registration - Due December 2025
- File paperwork in glove compartment
- Replace the sticker
- MA Inspection due in February each year.
- Have garage do an inspection of truck.
- Have garage change oil.
General Maintenance:
- Check oil monthly.
- Oil changed when truck is inspected.
- Check windshield washer fluid monthly.
- Wash the truck after winter.
- Remove trash from the cab after each use.
- Wash windshield as needed (windshield should be clean inside and out to provide good vision without excessive glare)
- Wipers should be replaced as needed
- Remove snow and ice
Truck SOPs
Supplies:
Ensure the following are on the truck:
- Tool backpack
- Dots
- Screwdrivers
- Adjustable wrench
- Zip-Lock bags to transport hardware
- Plastic wrap
- Soft-blow hammer
- Marking pen
- Bin #1 - Tie-down Straps
- Bin #2 - Approximately 6 moving blankets
- Bin #3 - Empty (to be used to transport fragile items such as small lamps)
Prepare to drive the truck:
- Obtain key from top file cabinet drawer
- Walk-around: ensure tires are inflated and no visible damage.
- Check that all lights are working
- Ensure mirrors are in position
- Review Transport Schedule
Driving:
- Obey all MA driving laws (seatbelts, speed, etc).
- After starting the truck, disengage the towing feature.
- The light should be off.
- Use the parking brake and tire chock when parked on a severe incline.
- Transport Assistants - Navigate and call donors when en route.
- Check Fuel level. If below 1/4, refuel
Communication with Donors:
- The Transport Assistant calls the donor before arrival.
- Greet Donors and introduce yourselves.
- Confirm donated items.
- If there are many items, do an initial walk-through and develop a loading plan.
- Inspect donations and confirm items are acceptable. (page 3)
- Butt check - sit on couches and chairs to ensure adequate support.
- Lift cushions to ensure no damage.
- Determine if the effort to clean or repair is excessive.
- Size - reject items which are impractical for an apartment.
- Use - reject items which are special purpose and thus, impractical.
- Weight - If an object is too heavy to safely carry, reject the item.
- Location - If the item is located somewhere that makes it impractical to move, reject the item.
- If items must be rejected, use a statement such as; “I’m sorry, but we will pass on this because…”. Use acceptance guidelines on our website
- Secure the load using tie-down straps. Furniture should not be loose in the truck.
Unloading:
- Position the scissor lift in the UP position.
- Place the chock on white spot, 6 feet in front of the scissor lift.
- Back up the truck against the chock.
- Secure parking brake.
- Turn off the ignition.
- Unload the truck using carts and by raising and lowering the lift to match the truck height and dock height.
Wrap-up:
- Remove all trash.
- Sweep out the truck as needed.
- Replenish supplies as needed.
- Back truck into a parking space which does not have tree branches or light poles.
- Make sure all windows are closed and the doors are locked.
- Return key to file cabinet top drawer.
- Return clipboard with Transport Schedule and envelope with donations and review with front desk.
- If the name or addresses on checks do not match the Transport Schedule verify which pick up gave the check/s.
- Point out any items listed that were not picked up and reason why- no longer available or did not meet our standards?
- Check Fuel level
- Inform front desk of the truck status: Includes Fuel level (and any other issues (windshield wiper if they need replacement, cleanliness if the truck needs to be washed, oil change if the mileage is getting close to the recommended change on the sticker, etc)

How to Print the Transport Schedule
Start a web browser
Log into your FSFB account
Click on the Call Center app button
Click on the Donations group button
On the black menu bar at the top of the screen, you should see "Transport Schedule". Click on that.
Transport Schedule will only appear for users who have the Transport Admin privilege.
You will see a display showing available transport dates. Click on the appropriate date.
Click on the Print button at the bottom of the screen.
If you use ^P, it will print too small.
Transport Scheduling
Description
This guide describes how to view the transportation schedule, set the route, and schedule new transport slots.
Viewing the Transport Schedule
You can view the transport schedule by going into the Call Center app and selecting the Donations group. There will be a black navigation bar at the top of the page. If your FSFB account has the "Transport Admin" privilege, you will see a "Transport Schedule" link on the black menu bar. Clicking on that link will display a page similar to this:
This shows the date of the transport, an optional title, the towns we will be picking up from, the overall duration of the transport, how many pick-ups have been scheduled, and the amount of time available for pick-ups.
If you click on one of the dates, it will display the details for that pick-up:
You can edit any of the fields on the form. Press Update to save your changes.
- The "Close Transport" button appears when a transport date has passed. Clicking on this will remove it from the list of available transport dates and mark the tickets associated with the pick-up as having been completed.
- The "Cancel Transport" button will send an email to all of the tickets associated with the transport, letting them know that their pick-up has been canceled. The associated tickets will have the transport canceled, and their status will be set to Unknown.
- The "Reopen Transport" button will appear if a transport has been closed. As you may be able to guess, this will reopen a closed transport.
At the bottom of the page, under the list of pick-ups, you will find the following buttons:
Interaction with the Donations Team
A day or two before the schedule gets set, someone needs to review the details of what's getting pick up. If there are open slots, send an email to the donations team (donations@freshstartfurniturebank.org) to let them know that there's an open slot.
If a donor cancels, creating an open slot, send an email letting the donations team know.
Sometimes a pick-up duration gets extended past the the standard of 0:45. This can leave gaps in the schedule that the won't get filled in. We plan for (4) 0:45 pick-ups, and if someone extends a pick-up to 1:00, there will be a 0:30 slot available. In this case, you can check to see if any of the existing pick-up can be shortened to 0:30, or you can send an email out to the donations team, letting them know that there's a 0:30 slot available. Quite often we get requests for pick-ups that don't meet our minimums, but in this case, can be filled in with a 0:30 slot.
Transport Schedule Routing
To arrange the pick-up schedule:
- Use the above section to open the transport schedule for a given date. Typically, we do this on the Thursday (Friday at the latest) before the pick-up.
- Press the Map button at the bottom of the page.
- Use Google Maps to arrange the pick-ups in an order that makes sense.
- We like to schedule the furthest away pick-up first and then work our way back towards the store. That way if we have to drop off furniture at the store mid-route, we're closer to the store.
- Note the order of the pick-ups.
- Return to the browser page you opened in step 1 and drag the tickets, using the cursor, into the same order you did in step 4. Note that you can't do this with a tablet/phone, as you don't have a mouse.
- Press the Map button to make sure that the order is correct.
- If appropriate, use the Send Email buttons to notify the donors and the team.
Creating a New Transport Slot
At the bottom of the Transport Schedule display, there is a button labeled "Schedule New Transport". Click on that and you will see:
- Click on the calendar icon in the Date/Time field, and select a date. Set the time to whenever the pick-up should start (typically 9:00 AM).
- Set the duration to however long the pick-up should last. The typical duration is 3:00 hours.
- Select a zone for the pick-up.
- We typically alternate between zones 4 and 5.
- Zone 99 is reserved for special pick-ups that aren't constrained by ZIP code.
- If a volunteer job has been scheduled for the date in the Date/Time box, one or more jobs will appear in the Job drop-down menu. Typically you will pick the "Transport" job. If volunteers have signed up for that job, the Transport team field will populate with the divers and movers signed up.
- Press Update to save your changes.
Computer/Technical Issues
Importing a Word document into BookStack
Here's how you convert a word document into a format that you can import into BookStack.
One-time operation:
- There's a plugin for word that allows you to convert a Word (.docx) document into a Markdown (.md) file.
- Install https://www.writage.com/docs-page/
For each Word document that you want to convert:
- Use your file explorer to find the file that you want to convert
- Double click on the .docx file to open it in Word
- Save-AS Markdown file (mine shows up at the bottom of the list). Save it in the same directory as the original file
- In your file explorer, you'll now see your word document with a ".md" extension
- Right click on that and Open-Using either NotePad or WordPad or whatever editor you want
- In NotePad/WordPad
- ^A to select all
- ^C to copy everything
- In your web browser
- Open https://bookstack.freshstartfurniturebank.org/shelves
- Click on the book that you to insert the page into (for example, Volunteer Policies and Procedures in the Policies and Procedures book)
- Pick the chapter where you want to insert the page (for example, Front Desk)
- On the right-hand side, click on New Page
- At the top, Change "New Page" to whatever title you want
- At the very top, you will see 3 vertical dots. Click on those
- Click on "Switch to Markdown Editor (clean content)"
- The screen will spit into 2 screens.
- Click on the line labeled "1" on the left-hand screen
- ^V to paste what you copied from NotePad/WordPad
- Click on the 3 vertical dots on the top
- Switch to WYSIWYG editor
- Make any changes that you want to the document
- Select document headers. Change their style from "Paragraph" to one of the header styles. I use Medium and Small. These will form breadcrumbs that appear on the right hand of the screen for the reader.
- When you're done, click on Save Page
- If you want to re-arrange the order that pages appear in the book, click on the Sort Book link on the right-hand side
If your document isn't a Word document
- Select and Copy the content
- Follow the 1st 5 instructions from above
- Paste your content into the WYSIWYG editor and make changes as needed
Workflow with No Network
Client Flow When Experiencing Network Issues
Determine the issue:
- If a shopper’s laptop is experiencing problems connecting to the web-based shopping application, follow these steps to diagnose the issue and attempt to resolve the problem:
- Refer to "Network Debugging" document to diagnose the problem.
If you have determined that the network is down and there is no near-term fix, follow these procedures:
Day of Network Outage
- The shoppers will be unable to use their laptops. They should use their phones selecting to use their mobile data plan rather than wifi. Some volunteers’ phones might perform better on mobile data due to the strength of the signal for their carrier. The shopper and client may need to work outside of the building for a better signal.
- Using the shopping application on their phones, the shoppers will load the client’s cart.
- The Kitchen and Linens Wish lists will be fulfilled as usual with the exception that the shoppers will not add the kitchen and linens items into the clients’ carts on the shopping application.
- The movers and QR person, using their phone on mobile data, will likely be able to see the items being put into the cart. The use of phones on different carriers can introduce some timing issues when making changes to the inventory database. For this reason, a paper approach will be used for choosing the items and no scanning will be done during the outage.
- The QR person or the shopper will make a list of each item chosen by the client, listing the client’s name and all the item’s QR numbers and item descriptions (e.g. 11234 Dressers – 2nd or 12434 Art – Animals). This list will include all the furniture to be loaded by the movers plus any items handled by the QR person. It is helpful if the items handled by the movers are grouped together and those handled by the QR person are grouped together on the paper list.
- The QR person should confirm that the number of items on the list reconciles with the number of items in the client’s cart (less any items such as the Target gift card which neither the movers or QR person deal with).
- A copy of the paper list will be made. The copy is given to the movers and the original is kept by the QR person.
- The movers may now start using this sheet to load the client. For each item loaded, the movers should:
- Check off the item on their sheet, and
- Whenever possible retain the QR slip. QR slips cannot be retained if they are permanently affixed to the item such as in the case of mattresses, boxsprings, platforms, and new bed frames.
- The QR person may now start using their sheet to pull the client’s small items. For each item gathered, the QR person should:
- Check off the item on their sheet, and
- Whenever possible retain the QR slip. QR slips cannot be retained if they are permanently affixed to the item, such as dish sets.
- Affix the QR slips to a blank piece of paper. Eight slips can fit on each side of a sheet.
- When the movers are done loading the furniture, they should give their paper list with all the furniture checked off to the QR person along with the gathered QR slips.
- The QR person will confirm that all items (mover’s items + QR person’s items) have been selected and will communicate this to the movers.
- The QR person will affix the QR slips from the movers on the sheet(s) with the others.
- The paper list, the sheets with the QR slips attached, and the Kitchen and Linens Wish Lists should be collected for each client.
Once the Outage is Over
- Each client from the day of the outage needs to be completed by either the shoppers or the QR person.
- In Personal Shopper mode, the Kitchen and Linens Wish List items should be added to each client’s cart. These items should then be picked (Mark Picked-Up). If a Target Gift card was given and has not been picked yet, it should be picked.
- In Order Pickup/Mover mode,
- Each of the items for which we collected a QR slip should be picked (Pick Item and then scan the QR slip).
- Before moving on to the items for which we could not collect QR slips, review which items are left unpicked. Are they all items that could be reasonably expected to have had their QR slip permanently affixed to them (like mattresses, boxsprings, platforms, new metal bed frames, dish sets)? Or are there any “regular” items still unpicked? If the latter, check in the showroom and storage area to make sure the item is not still on the floor and therefore forgotten. Do not assume everything loaded correctly!
- For each of the items for which we were unable to collect a QR slip, these items should be picked (Pick Item) and then manually scan the item (Manual Scan). Manually scanning the item (rather than, for instance, scanning an item with an identical QR# on hand) documents that there is not absolute assurance that the correct item was chosen and loaded.
- Confirm that all items have been picked. If any items remain, resolve why.
- When all items have been picked and any discrepancies resolved, the order may be closed and if appropriate, the referral closed.
- Many of the items that QR slips can not be collected for (and therefore we have no proof the correct item was handed out) are items that Fresh Start purchases and therefore it is critical that we keep accurate track of the inventory. These items include mattresses, boxsprings, platforms, and new bed frames. If time allows, it is wise to inventory these items before going forward to confirm the inventory is accurate.
Network Debugging
I hope that no one is reading this because the network is down, but stuff happens, and as a result, I've written this guide on how to do simple debugging of the network. Good luck, and may rebooting solve everything!
Initial Checks
- The first thing to do is to check your phone and see if it's connected to either the FSFB or FSFB-5G network.
- If it is, that's good.
- If it isn't, that's bad. Check the available networks and see if you see FSFB or FSFB-5G.
- If so, connect to them.
- If not, go to the section on Rebooting the Network.
- Using the browser on your phone, try to do something on the network.
- If you can, then the network is running, and it's probably a problem with a single device. See the section on Rebooting Devices.
- If you can't do anything, then try connecting to FSFB (if you're on FSFB-5G) or FSFB-5G (if you are on FSFB) and check to see if you can do anything on the network.
- If you can do something by changing networks, then go to the section on Rebooting Access Points
- Another thing to check is the store phone. Pick it up and see if you can dial someone. If you can, the Internet is running, at least via a hird-wired connection.
- If you're lucky, and Mark Pollard happens to be in, get him and have him help. He's a techie.
- If the Status Display isn't showing orders to load and the Movers app isn't working, go to the "Pi debugging" section
- At this point, we will just reboot everything and hope that solves the issue.
- Unplug the modem from its power supply and plug it back in.
- Unplug the router from its power supply and plug it back in.
- Wait several minutes before retrying the Initial Steps.
Server Rack
- Go to the network server rack, as shown below:

- Check to see if there are there lights on.
- If not, then the power is off, and you need to:
- Get Mark Revett if he's there, and have him help
- Make sure that the UPS at the bottom of the rack is turned on
- Make sure that there is power to the UPS. The outlet should be labeled with the panel # and the breaker #. Check the breaker.
- If not, then the power is off, and you need to:
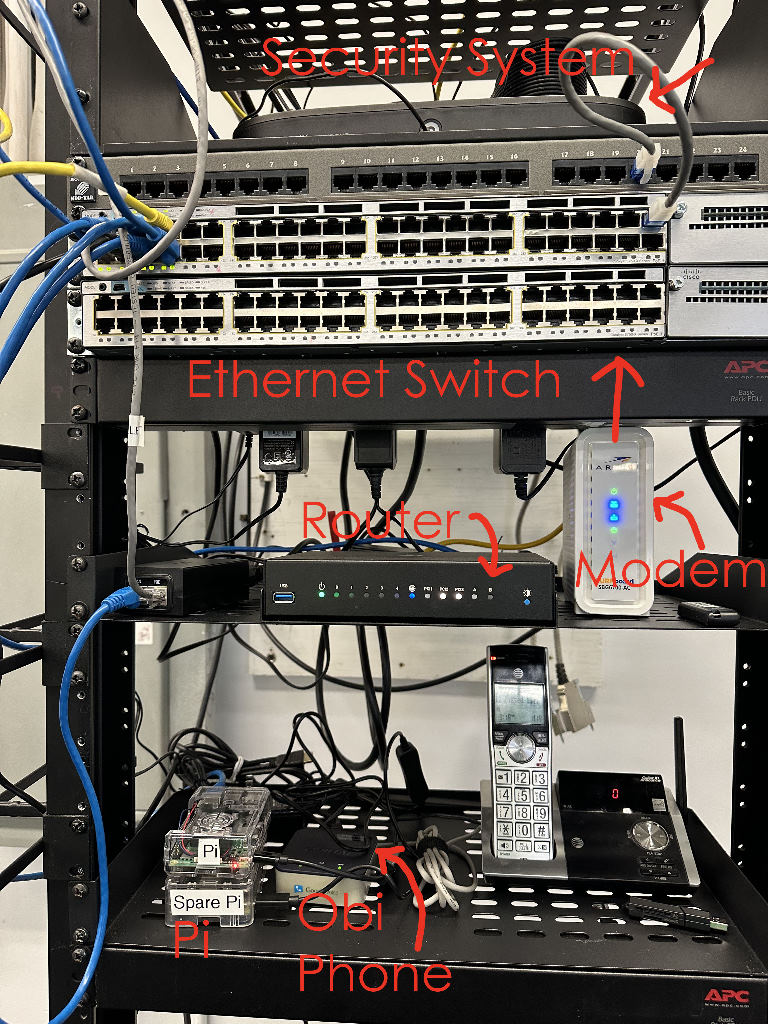
Modem
- Start off by looking at the modem as shown below:

The bottom light, which looks like a globe, should be green.
- If it isn't green, unplug the modem and plug it back in.
- Give it several minutes to turn green.
- If it doesn't turn green, then the problem is with Comcast, and you need to call Comcast at 800-934-6489 and report an outage. You'll have to wait for them to repair the outage. Our account number is 8773103600392443.
- If it does turn green, rerun the Initial Checks.
- If it isn't green, unplug the modem and plug it back in.
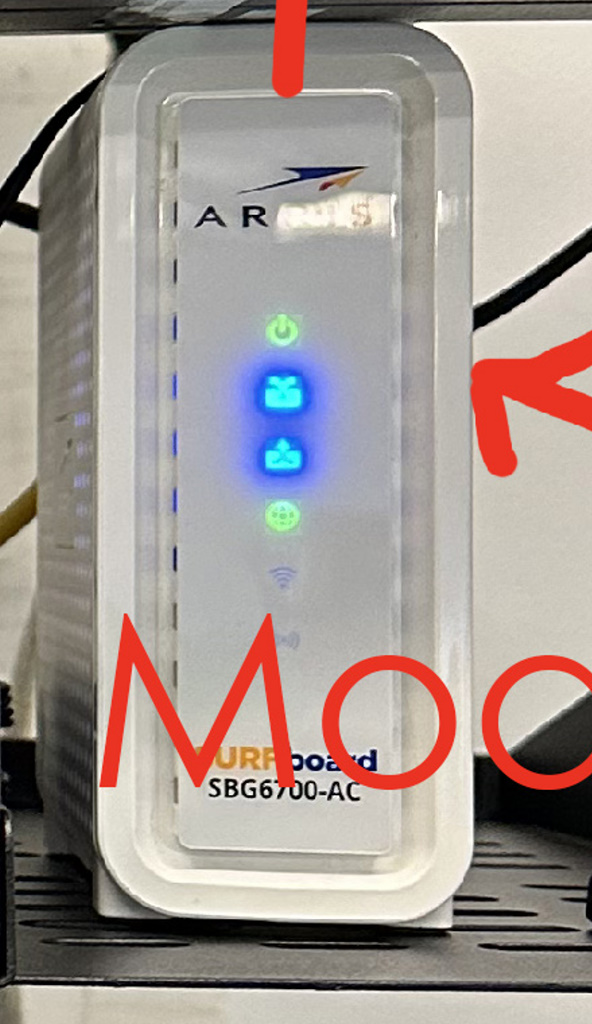
Router
- Check the Router as shown below:

You should see the following:- The far left power light should be on
- The light under 0 should be on
- If it's not, see the section below on the Ethernet switch
- The blue Globe LED should be lit & flashing rapidly
- If it isn't, check the cable that runs between the modem and the router. You may want to replace it with a spare from the utility room. Make sure that it gets plugged into the port labeled WAN.
- If it isn't, check the cable that runs between the modem and the router. You may want to replace it with a spare from the utility room. Make sure that it gets plugged into the port labeled WAN.
- On the store desktop:
- Hold the Windows key down and press X
- Select Windows Powershell
- A blue window will appear
- Type: ping 192.168.1.1
- You should see several lines stating something like "Reply from 192.168.1.1: bytes=32 time=1ms TTL=64"
- If you see that, then that means that you can talk to the router, which is good. What it also means is that the router can't communicate with the Internet, and you should call Comcast at 800-934-6489 and let them know that you have a routing issue. Our account number is 8773103600392443.
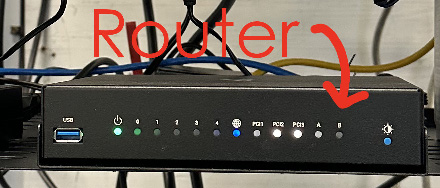
Ethernet Switch
- Next, check the Ethernet switch, which is shown below:

- There are 2 switches stacked on top of one another. The top one is active, and the bottom one is a spare.
- There's a fairly low probability that this will be the problem, but it's not a 0% probability.
- On the top one, you'll see 8 Ethernet cables plugged into Ethernet ports
- There are 2 LEDs under each column of cables. All of the LEDs should be green and may be blinking.
- If they aren't lit, then the switch has failed.
- Unplug the power cable from the top Ethernet switch and plug it into the bottom switch
- Move the cables from the upper switch to the lower switch, making sure that they click into place
- Give it several minutes to boot
- Unplug the power cable from the top Ethernet switch and plug it into the bottom switch
- If they aren't lit, then the switch has failed.
- The most important LED is #1. That goes to the router, and if that's not blinking, then:
- Move the port 1's cable to an empty port. It should turn orange and then green
- If that doesn't fix it, try moving the cable to another port (1-4) on the backside of the router.
- The LED corresponding to the port should light up on the front of the router.
- If that fails, try swapping the cable with a new one.
- If that fails, something is wrong with the router, or you're not fully seating the cable.

Rebooting Access Points
- There are 3 access points in the store that provide WiFi.
- To the right of the sink, you'll see a router mounted on the wall. Unplug it from the wall socket and plug it back in.
- On top of the network server rack, you'll see a router (not shown in the above photo), just like the one near the sink. Unplug that one, and plug it back in.
- You'll see a blue Ethernet cable going up the wall towards the ceiling. Unplug the cable from the Ethernet switch, pause 10 seconds, and plug it back in.
- Give everything a couple of minutes, and then rerun the Initial Checks.
Rebooting Devices
- If you can access the Internet on other devices, but can't access it on some, just try rebooting the bad devices.
- On the tables, press and hold the power button until you see a message about shutting down or rebooting. Select reboot
- On the laptops, hold the Windows key down and press X.
- Select "Shutdown or Signout" and then select Reboot.
Pi Debugging
- A big part of our operations runs on a device called a Raspberry Pi. It's a tiny, but powerful computer. Here's a photo of the active one sitting on top of a spare.

- There's a red LED in front of the Pi. If it isn't lit, then there's a good chance that the power supply has died.
- Move the Spare Pi to the top of the stack for better airflow.
- Unplug the existing power supply from the 120V power strip.
- Plug the spare power supply into the 120V power strip
- Move the Ethernet cable from the 1st Pi to the spare.
- If the LED is on,
- Go to the store laptop
- Hold the Windows key down and press X
- Select Windows Powershell
- A blue window will appear
- Type: ping 192.168.1.210
- You should see several lines stating something like "Reply from 192.168.1.210: bytes=32 time=1ms TTL=64"
- If you see that, then that means that you can talk to the Pi, which is good. Stop and call Geoff
- If you see a message stating "Destination host unreachable", follow the instructions above about switching to the spare Pi.
- There's a red LED in front of the Pi. If it isn't lit, then there's a good chance that the power supply has died.

What next?
- If the network is still down, start using the "Operating without a Network" document,
- Call/text Geoff/Sue
Port Forwarding
The following information is for the network administrator if they need to set up a new router;
- wan:3000 -> nodejs:3000
- wan:80 -> nodejs:80
- wan:51820 -> nodejs:51820
Volunteers
Volunteer Scheduling System
System Description
The FSFB Volunteer Scheduling System is designed to easily handle the complex task of managing jobs and associating them with volunteers. Volunteers sign up for jobs using a website or text messages, which are described in another document. This document describes the administrative portion of the website that handles:
- Creating a list of jobs and assigning them to groups
- Replicating a job for future dates
- Assigning volunteers to specific jobs
- Sending messages
- Replicating jobs
Note: This document describes the use of sub-jobs, which was a fine way to break up a large job into departments when all of the jobs started at the same time. That is no longer the case on Saturdays, as we have Donations starting at 8:30, Transport starting at 9:00, and Clients starting at 9:30. The major issue is that a volunteer is only allowed to sign up for 1 shift per job, and we often have volunteers signing up for both Donations and Clients. As a result, we have 3 primary-jobs with no sub-jobs. This manual has not been re-written to remove sub-jobs, but all of the concepts are the same.
Accessing the System
To access the administrator Volunteer Scheduling web page:
- Log into the FSFB web site
- Click on the Schedule Details app
Alternately:
- Log into the FSFB website
- Click on the Volunteer Scheduling app
- Click on one of the date fields in the list of available job dates
- You now see the primary-jobs and sub-jobs that were assigned to that date. You can expand/contract the information for any day by clicking on the +/- symbol next to the job title (which is “Saturday” in this example).

In this case, “Saturday” has 2 sub-jobs named “Store” and “Transport,” and each of them has a series of jobs that volunteers can sign up for. The “Transport” job has 2 volunteer-jobs which are “Transport Assistant” for which has 0 out of 2 job slots filled and “Transport Driver”, which has Mike Dameri signed up for the single job slot.
If you click on any of the job titles (i.e. “Saturday”, “Store”, “Transport”, “Transport Assistant”, etc), the system shows you information about that job.
There are 3 types of jobs: primary-jobs, sub-jobs, and volunteer-jobs.- Primary jobs are the top-level job, and volunteers can only sign up for 1 volunteer-job within them.
- Sub-jobs are things like “Store” and “Transport” which are used to group jobs together.
- Volunteer-jobs are jobs that volunteers can sign up for.
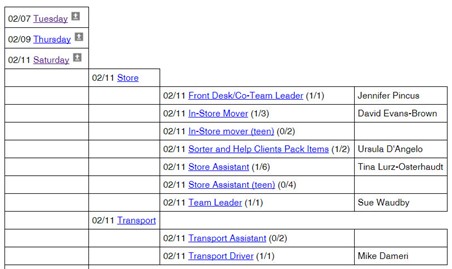
Sending e-mail or text messages to volunteers
One of the most common tasks is to message volunteers to see if they are available to work on a specific day. Unfortunately, it feels like we’re always asking people to sign up, so we’ve made it as easy as possible to communicate our needs and for them to sign up.
If you click on a job title, you will be taken to a screen that shows all of the jobs associated with it. I.E. If you click on Saturday, it shows Store and Transport sub-jobs and the volunteer jobs associated with those 2 sub-jobs. If you click on Store, it only shows jobs associated with the Store.
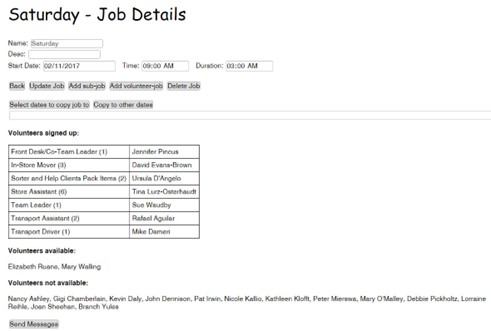
Ignoring the top 1/3 of the page, it shows you job names, (the number of volunteers requested), and the volunteers who have signed up for the job. At the bottom of the page, it shows you volunteers who are available but haven’t signed up and then a list of volunteers who are not available.
To send a message to volunteers, click on the Send Message button at the bottom of the screen. You will then see a screen like this:

The first set of checkboxes allows you to select who you want the message to go out to. Volunteers can have 4 different statuses:
- Available - they have marked themselves available for that primary-job, but haven't selected a job.
- Not Available - they have marked themselves as unavailable.
- Unknown - they haven't marked themselves as available, not available, or signed up for a job.
- Signed up - They've signed up for a job within that primary job.
By default, the Available and Unknown boxes are checked. If you want the message to only go to people who have already signed up, clear the other boxes and check the Signed up box.
The next set of checkboxes indicates the groups to whom you want to send the message. There are checked boxes next to every group who can sign up for a job. Feel free to clear any check boxes to narrow down to whom your messages are going. When you’re ready, click on the “Find Volunteers” button. You will then see a screen that allows you to select specific volunteers and enter your message text.
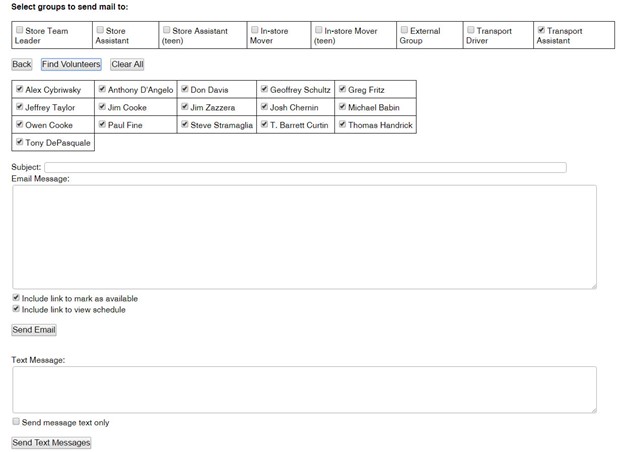
In this case, I cleared all of the groups other than Transport Assistant. All of the volunteers who are part of the Transport Assistant group and were available or had an unknown availability are shown. Clear individual check boxes if you know that someone isn’t available, or click on Clear All to clear them all.
Enter the subject of the e-mail message and then the body of the e-mail message below that. Do not include a salutation, as “Hello [first_name] will be added to your text”. Under the "Email Message" box, you will find 3 check boxes:
- Include link to mark as available includes the following at the bottom of the email.
- I am available or I am NOT available to volunteer on [Date/time].
- Include link to view schedule includes the following at the bottom of the email:
- View my schedule
- Message contains HTML (which is not shown above) is used if you're embedding HTML into your message. Pro use only.
When you’re done, click on the Send Email button.
Similarly, enter the text that you want to send as an SMS text message in the “Text Message” box and click on Send Text Message to send the message.
Signing-up or cancelling volunteers
If you want to directly sign-up or cancel volunteers for a specific job, click on that job’s name. In the following example, I clicked on “Transport Assistant”.

In this case, we want 2 volunteers (as shown in the Qty field) for this job and as a result, there are 2 pull-down boxes shown directly above this text. Rafael is signed up for 1 slot, and the other is unassigned.
- To cancel a volunteer, select “- None –“ from the list of available volunteers.
- To sign someone up, select their name from the list.
Note that signing-up or canceling occurs immediately upon making a selection, and the volunteer will receive a message notifying them of the change.
Creating a Primary Job
A Primary Job is the top-level job that you see on the scheduling system. Typically these are the Tuesday/Thursday/Saturday jobs, but we may create them for special events. To create a primary job, go into the scheduling system, and at the bottom of the page you’ll see a button labeled “Add a new job”. Click on that and a job titled “New job” will appear at the top of the list of jobs. It will have today’s date. Click on that job and a page will display titled “New job – Job Details”. Follow the procedure below to update it.
- Change the name to whatever describes the job best.
- Typically we leave the Description field blank.
- Click on the Start Date field and change it to whatever date this job will occur on.
- Click on the Time field and change it to the starting time.
- Click on the duration field. Due to technical issues, this field displays as a time, starting at 12:00 AM, which means 0 hours. Ideally, this would display 00:00, but it doesn’t. If you want a job to last for 3 hours, change it to 03:00 AM.
- If this job will have client appointments associated with it, set the maximum number of client appointment slots that you want per hour. You can disable individual appointment slots later.
- Change the Job Owner field (not shown) to whoever should get signup/cancel notices.
- Press Update Job
Client Appointment Slots
If you created a primary job with client appointment slots, you will see a display similar to the following:

- Cancel Appt - Cancels the client's appointment
- Disable Slot - Makes the slot unavailable
- Enable Slot - Makes the slot available
Creating a Sub-job
Sub-jobs are jobs underneath of a Primary-Job which break functionality into groups. For example, within the Tuesday master job, you’ll see Store and Transport sub-jobs. By clicking on those sub-jobs, you can send messages to just people within that sub-job. To create a sub-job:
- Click on the primary-job (i.e. Tuesday)
- Click on the Add Sub-job button
- You will see a display of all of the jobs, and you’ll see “New sub-job” underneath that.
- Change the Name of the sub-job to something descriptive.
- Typically the description is left blank.
- Typically the State Date, Time, and Duration fields are left alone.
- Press Update Job
- Your updated sub-job should appear under the Primary Job.
Creating a Volunteer-Job
A Volunteer-job is a job that a volunteer can sign up for. This is under a Primary-job or a Sub-job. To create a Volunteer-job:
- Select the Primary or Sub job that you want the Volunteer-job created under
- Click the Add volunteer job button
- You’ll see “New volunteer-job” appear under the job that you selected above.
- Click the New volunteer-job
- A page titled “New volunteer-job – Job Details” will appear
- Update the Name to something descriptive
- Put in a Description that describes what the volunteer will be doing. This description will be displayed when the volunteer receives an e-mail/text-message telling them about their job and will be preceded by the text "...where you'll [description]". As a result, the description should not start with a capital letter.
- On the Group pull-down, select the group who may sign up for this job. If you want everyone to be able to sign up for it, select Any Group.
- Update the Qty field to reflect the number of people who can sign up for the job.
- Press Update Job.
Deleting a Job
To delete a Primary/Sub/Volunteer-job:
- Select the job that you want to delete from the list of jobs. You may have to click on the +/- symbol to see the sub/volunteer-jobs.
- If you are selecting a Primary or Sub-job, all of the jobs underneath of it will be deleted. Be sure that you are on the correct level.
- Click on the Delete Job button.
- A dialog box will pop up asking you if you’re sure that you want to delete job X. If you’re positive that you want to do this, click Yes, otherwise, click Cancel.
- If you clicked Yes, the job and any sub-jobs will be deleted.
- If this was a Primary job, all of the volunteer availability information associated with it will be deleted.
Replicating a Job
On a monthly basis, we typically replicate the jobs from the previous month. This involves selecting a single Tuesday, Thursday, and Saturday job and copying it to the following month. For example, if I want to copy a Saturday job, I would select one of the Saturday primary-jobs and then press Select dates to copy job to button.
A calendar then appears as shown to the right. Click on the dates that you want to copy the job to. The dates selected are listed above the calendar. Press the Copy to other dates button to copy the job.
*** Note that something strange happens after you click on 2 dates in the next month. The Calendar changes back to the current month. I don’t know why, but you do need to be careful with what dates you pick ***.
New Volunteer Information Sheet
New Volunteer Information Sheet
Our Address: 16 Brent Drive, Hudson
Our Mission:
Fresh Start Furniture Bank helps restore hope, dignity, and stability in our community by recycling donated furniture and housewares for free to people in need.
About Fresh Start:
Fresh Start is a volunteer-based non-profit that collects donations of furniture and home goods from the public and distributes them for free, to people in need. To receive furniture, clients must obtain a referral from a social service agency. Clients then have 30 days to come in and select their furniture and housewares, and must take all of the items they selected on that date. We do not store items for later pick-up.
Our Clients:
Every one of our clients has a story, and we may never know how they ended up in need. They could be escaping domestic violence, moving out of a shelter, in recovery from physical or mental illness, Veterans, refugees, immigrants, recovering from addiction, or working low-wage jobs.
Our clients generally have a lot going on in their lives, so our volunteers need to be patient and calm, making sure that every interaction is treated with dignity and respect.
Our Volunteers:
Along with our Donors, our Volunteers are our biggest asset. If you have a special talent that you would like to share, please let us know!
Store Hours:
Monday 8:45-12:00
- Store catch-up day - No client appointments or donations accepted
Tuesdays and Thursdays 8:45-12:00
- Donations of housewares and linens are accepted.
- Client appointments are at 9:15 and 10:15.
Saturdays Donations: 8:15-10:30
- All donations on the “what we take” list are accepted.
Saturday Clients: 9:15-12:30
- Client appointments are at 9:30 and 10:30.
What to Wear:
- Please dress comfortably and in layers. Temperatures vary quite a bit in different parts of the building.
- Be prepared to walk outdoors: you may need a warm coat, hat, gloves, or a raincoat.
- Keep in mind that you may get dirty.
- No open-toed shoes.
- Once you volunteer at Fresh Start 3 times, you will receive a green Fresh Start shirt! If you would like a second T-shirt, the cost is $10.
Where to Park:
Volunteers should park on the left side. Parking spots close to the entrance are for clients and donors.
When you Arrive for a Shift:
Please plan to arrive 10-15 minutes before the shift.
- Check-in at the front desk.
- Hang coats on a rack in the front office or sorting area.
- If a problem should arise during a shift, please speak to Sue, Geoff, Bob, or the front desk volunteer.
Volunteers’ Donations:
Donations from volunteers have the same rules as any donors and will be inspected.
To Sign Up for a Volunteer Shift or to Cancel:
- Go to the FSFB Website: FreshStartFurnitureBank.org
- Click on Volunteers
- Scroll down to the bottom of the page to Current Volunteers, click here to logon
- Login using your email address and your password. The default password is fsfb. Click Submit.
- Click on Volunteer Scheduling
- Select the Available radio-button for the date(s) you want to sign up.
- A list of jobs will appear. This is based on your training. Select a job and click “Click here to sign up”.
- You will receive an email of the job role immediately & a reminder will be sent one day prior to that date.
- To cancel, select the Unavailable radio-button, or in your reminder email, click the “I am NOT available” link.
Please feel free to take pictures, but ask permission first of any clients or donors.
We use #FreshStartFurnitureBank when tagging photos.
We also post on Instagram.
Please join our private Facebook Fresh Start Furniture Bank Volunteer group!
Questions: Email: volunteers@freshstartfurniturebank.org
New Volunteer Process
New Volunteers Process
Tour Times
- 11am on the first Saturday, and following Thursday per month
- Dates may change due to trainers’ availability
- Dates are updated on the website
Tour with New Volunteers
- Provide 4 Handouts
- Initial Tour
- Information
- Application
- Release form (“New Volunteer” folder behind front desk)
- Finish the tour in the break room.
- If they are still interested
- Fill out the application.
- **Review their email address**
- Show the volunteer the login process on a tablet.
- Review volunteer sign-up/cancel (steps listed on Volunteer info handout)
- New Volunteer roles will be cleaning & sorting with a training partner and then they may decide their preference for other roles.
Paperwork > Database
- After the tour, enter the new Volunteer into the database
- Select groups:
- All Groups
- New Volunteer
- Select groups:
- Staple application to the release form
- Write the date entered into system on application page
Tracking Dates
- Add new Volunteer name to .xls / clipboard.
- Document visit information – date, role, partner
- 3rd visit – give them a t-shirt and update Volunteer database roles.
Questions: Contact Volunteers@FreshStartFurnitureBank.org
New Volunteer Tour
Our Address: 16 Brent Drive, Hudson
How Clients Set Up Appointment:
To receive furniture, clients must obtain a referral from a social service agency. Clients then have 30 days to come in and select their furniture and housewares. Clients can have up to 2 visits and must take all items selected during a visit.
When Clients Come to the Store:
The goal is to shop and pack in 1 hour. The steps are:
-
Check in
- verify address, phone, family members,
- get vehicle size & license plate (for capacity purposes & to load into correct vehicle!)
- provide bags for bonus extra items (small items that we recycle into a new home!)
- get a shopper to work with client
-
Shopper
-
Reviews lists with client – mattress, furniture, kitchen, linens (outdoors)
-
Distribute Household and Linens list to assigned volunteers for them to pack.
-
Tablet – shops for items and “check in” items for client.
**QR and movers locate item/number in clients
**System provides packing % based on vehicle**
-
-
Household & Linens
-
QR – appliances, lamps, artwork
-
Movers – load beds, furniture, rugs + soft good items (#3 & #4)
Volunteer areas:
- Donations In-take
- Cleaning furniture
- Cataloging Inventory
- Sorting - Linens
- Shop
Questions: Email: volunteer@freshstartfunriturebank.org