Inventory Entry
General Instructions
Main Menu
- Turn on the lights in the photo area.
- Position the lights so that they adequately illuminate to photo area.
- Go to the Volunteer page on the FS website
- Log in
- Select the Inventory Entry application
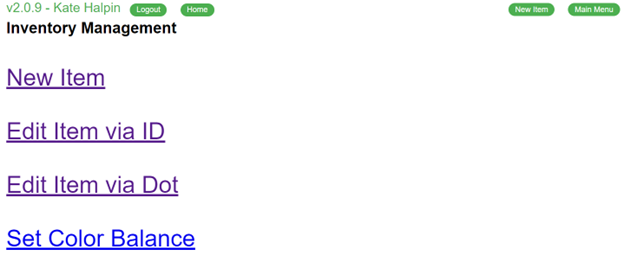
- This icon opens to the Main Menu of the Inventory Entry System, and you will see the following screen, which allows you to create new items, edit existing items, and set the color balance.

- The "New Item" link allows you to create a new item
- The "Edit Item via ID" allows you to edit an existing item by the inventory ID
- The "Edit Item via Dot" allows to edit an existing item via its "dot" code (ex A123)
- The "Set Color Balance" allows you to adjust the color balance of the light that you're photographing in. Suggested values are provided.
Creating/Editing an Item
- If you press the "New Item" link, you will be presented with a blank item form
- If you press the "Edit Item via ID/DOT", you will presented with a form to enter the inventory ID or the Dot code. If the system can find the item, the form will be filled in with the existing data.
- The steps to inventory most furniture and housewares are the same. In the following example, we will use appliances as an example of how to enter a new item into the inventory system.

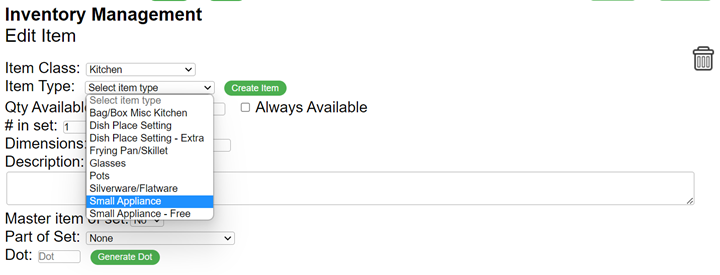
- All items are grouped by class. Examples of classes are Kitchen, Lamps, and Tables
- Within each class, there are different types of items. The drop-down list will change based on the class.
- For example, "Small Appliance", "Small Appliance - Free", and other types are options in the Kitchen class.
- Select Kitchen in the Item Class drop-down menu
- Select "Small Appliance" from the Item Type

- For example, "Small Appliance", "Small Appliance - Free", and other types are options in the Kitchen class.
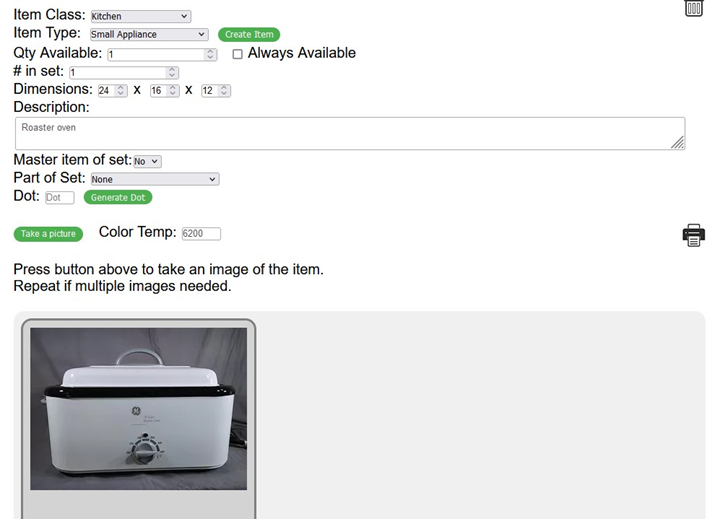
- Enter Details:
- Qty Available – default is 1. If we have received 10 coffee makers of the same type, change this to 10 and print 10 labels.
- # in set – default is 1. For example, if a dish set contains 4 place settings, change this to 4. If there are 2 matching end-tables, change this to 2.
- Dimensions – width x depth x height in inches
- Description
- Add a note, if necessary, to describe the item
- If an item is heavy, be sure to make a note of that.
- If there are flaws, include a description of the issue.
- Master item of set
- If there are multiple items in a set (ex: a dresser with a matching end table), select Yes to mark the dresser as the master item.
- Part of Set
- If this item is part of a set of items (ex: a matching end table to a dresser which is marked as the master part), select the master item from the list
- Dot
- If an item has multiple parts (ex: a headboard with a footboard, rails, slats, etc), press the Generate Dot button to create a dot code. The dot code will print on the label (ex: A123), and you should manually write the dot code onto the colored labels and stick them onto the parts. Also, stick the same color dot onto the label so the movers will know to look for a red A123 dot.
- Press the Create Item button to create a new item or press the Update button to save changes to an existing item.
- To print a label:
- Select the Printer icon
- Wait for the system print dialog box to appear.
- If you need to print multiple labels, change the quantity in the Copies.
- Press the yellow print symbol.
- Scotch tape the label to the item. Don’t stick the label directly on the item.
- To take a picture:
- Select Take a picture
- If the object is wider than it is high, take a horizontal picture. Otherwise, take a vertical picture.
- Click on the single “tree” icon on the left side of the screen. This will zoom in and allow you to take photos that aren’t distorted by the wide-angle lens. Step away from the object if necessary.
- Try to fill as much of the frame as possible.
- Click the Take Picture button
- Review the photo. If you’re happy, press OK, otherwise, press cancel and retake the photo.
- Add a second photo if the 1st picture doesn’t adequately show the item's print or color, take a closeup for a 2nd shot.
- Add additional photos to document any major flaws.
- If you need to re-take the 1st photo, DO NOT delete the 1st photo until you have taken a 2nd photo. You may then delete the 1st photo.

- Move the item to the appropriate storage location.
- If you have more items that need to be inventoried, press the New Item button and repeat.

End of Shift Review
-
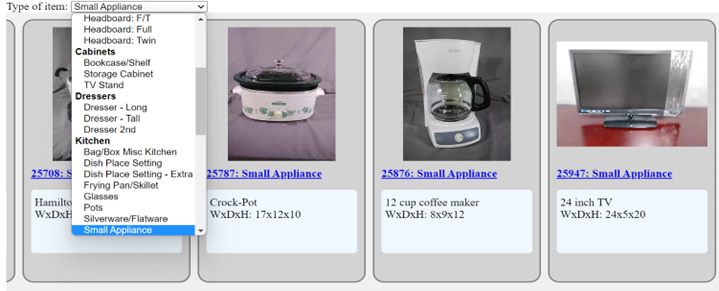
15 minutes prior to leaving, review images
-
Select Home from the navigation bar
-
Click on the Latest Items icon
-
By default, the prior weeks of inventory are shown in numerical descending order, meaning that the latest items are shown first, followed by older items
- If multiple people are doing inventory entry, the photos will be mixed
-
Swipe left or use the scroll bar to get to older items.
- If you've only worked on one type of item, you can change the Item Type to what you've worked on

-
Editing Items:
- If you need to edit any of the details for an item, click on the item # under the photo
- This will bring you to the Inventory Entry system.
- Update the information that needs editing.
- Press the Update Item button and close the page.
- If NO IMAGE AVAILABLE appears on an item that you entered
- Click on the item number under the "No Image Available" image
- This will take you to the Inventory Entry system.
- Take a photo
- Click on the item number under the "No Image Available" image
Item Class Specific Guides
Appliances (anything with a cord)
Cleaning / Testing Inventory:
- The sorting area tests & cleans appliances
- If it doesn't look clean, don’t photograph. Return to sorting.
Inventory Entry
- Select Kitchen as the Item Class
- Select Small Appliance or Small Appliance- Free as the Item Type
- View the list on the photo studio wall to determine if Small Appliance- Free applies.
- Change the following fields if necessary
- Qty Available – default is 1
- # in set – default is 1
- Dimensions – width x depth x height
- Description – Add a note if it’s not a common appliance or size, i.e. Air Fryer, 4-cup coffee maker
- Click the Create Item button
- Select the Print icon to print a label & follow the above instructions
- Scotch tape the label to the item. Don’t stick the label directly on the item
- Click Take a picture
- Move inventory items to the appropriate kitchen appliance shelf, which are labeled.
Artwork
Sort:
- Framed Artwork, Mirrors, Wall Clocks- easy to hang
- DON’T INVENTORY overly large or heavy items, religiously themed items, posters, picture frames, unframed, faded/old
- Items can go to Savers if the frames are nice. If not, please throw it out.
Cleaning & Wrapping Inventory:
- Done by inventory person (if available, sorting volunteers will help)
- Clean glass and frame
- Wrap with plastic wrap
- Stick the label directly on plastic wrap. Do not use Scotch tape
Inventory Entry
- Select Artwork as the Item Class
- Select an appropriate Item Type depending on the artwork
- Types include: Abstact, Animals, Children, Clocks, Flowers, Landscape, Mirror, Misc, and People
- There is an artwork bin for each type.
- Change the following fields if necessary
- Qty Available – default is 1
- # in set – default is 1. Change if more than 1 piece is in the set.
- Dimensions – width x depth x height. Depth is typically 1-2"
- Description –If necessary
- Click the Create Item button
- Select the Print icon to print a label & follow the above instructions
- Click Take a picture. Repeat for additional items in the set.
- Wrap the artwork with plastic wrap
- Stick the label directly on the plastic wrap
- If there are multiple pieces in the set, you may break them into smaller sets & place a note on the label such as 1/2, 2/2.
- Move the artwork to the appropriate Artwork-type box and place in numerical order.
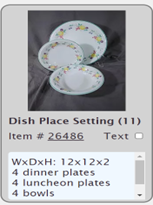
Dish Sets
Cleaning / Wrapping Inventory:
- Look at the small, colorful dish set form included in the box of dishes
- Dishes with at least 4 dinner plates and 1 matching component are classified as ‘Dish Place Setting’ in the Inventory system
- Matching dishes that do not qualify as a dish set are classified as ‘Dish Place Setting - Extra’ in the Inventory system
- Take out the sample set.
- This usually includes 1 of each type of unwrapped dish in the set.
- Make sure the sample is clean & not in poor condition before you that the photo.
- Set up the sample to be photographed using the plastic easels in the studio
- After taking the photo, wrap the sample
- Done by inventory person (if available, sorting volunteers will help)
- Done by inventory person (if available, sorting volunteers will help)
Inventory Entry
- Select Kitchen as the Item Class
- Select Dish Place Setting or DIsh Place Setting - Extra
- Change the following fields if necessary
- Qty Available – use the default of 1 unless you have multiple sets of the same dishes
- # in set – default is 1.
- For a Dish Place Setting, change to the number of dinner plates
- For a Dish Place Setting - Extra, change to the number of primary items (i.e. bowls. plates, etc)
- Dimensions
- The default is 12x12x2. This represents the approximate size of a wrapped dinner plate and should be left as is. For each dinner plate (or # in set) > 1, the inventory system adds to the dimensions in multiples of 2” to approximate a filled box.
- Description
- State the number & type of each item in the set as detailed on the small colorful dish set form
- Type all numbers as 4 (for example), not ‘four’, for non-English speakers to understand
- State the number of boxes that hold the dish set
- Qty Available – use the default of 1 unless you have multiple sets of the same dishes
- Click the Create Item button
- Select the Print icon to print a label & follow the above instructions
- For multiple boxes, print multiple labels
- Click Take a picture.
- ○ Use the plastic easels in the studio to help display the dishes

- ○ Use the plastic easels in the studio to help display the dishes
- Wrap the sample safely in the box
- Apply the label to the short size of the box, centered
- Write the total number of boxes for the dish set on the box (even if it is just ‘1 Box’) and their order (e.g. 1/ 3, 2 /3, 3/3).
- Move box(es) to the completed dish set storage area
Lamps
Cleaning / Testing Inventory:
- Sorting area tests & cleans the lamps. Cords are to be cleaned and wrapped.
- All lamps should have clean shades. If not, don’t inventory them.
- Repairs are placed on the workbench in storage behind the studio.
Inventory Entry
- Select Lamps as the Item Class
- Select an appropriate Item Type depending on the type of lamp
- Types include: Floor Lamp, Free Lamp, Table Lamp
- Change the following fields:
- Qty Available – default is 1, which is most common for a lamp. It is rare that we have a donor who gives/buys us many of the same lamp.
- # in set - if a matching pair of lamps – change to 2
- Dimensions
- Width x depth are typically the lamp shade diameter
- Height includes the finial
- Description – usually blank
- Select the Print icon to print a label & follow the above instructions
- Tape the label to the base of the lamp. NOT the shade!
Rugs
Cleaning / Wrapping Inventory:
- Inspect for stains, odor, or damages. If not easily cleaned, don’t inventory.
- Vacuum. and Spot Clean if needed
- Roll tightly and secure with plastic wrap. Stick the label on plastic wrap.
Inventory Entry
- Select Misc as the Item Class
- Select Rugs as the Item Type
- Change the following fields:
- Qty Available – default is 1.
- # in set - default is 1
- Dimensions
- Width x depth are the dimensions in inches
- Height is typically 1
- Width x depth are the dimensions in inches
- Description
- State size in Feet and inches.
- State the base color, if it's stained or worn, or if comes with a pad.
- Qty Available – default is 1.
- Select the Print icon to print a label & follow the above instructions
- Take 2 pictures
- Entire rug
- Close-up of the pattern and base color
- Roll the rug tightly with the backing facing out. Use plastic wrap to keep it secure.
- Stick the label directly on plastic wrap
- Place large rugs behind couches and smaller rugs in the bin