Computer/Technical Issues
Importing a Word document into BookStack
Here's how you convert a word document into a format that you can import into BookStack.
One-time operation:
- There's a plugin for word that allows you to convert a Word (.docx) document into a Markdown (.md) file.
- Install https://www.writage.com/docs-page/
For each Word document that you want to convert:
- Use your file explorer to find the file that you want to convert
- Double click on the .docx file to open it in Word
- Save-AS Markdown file (mine shows up at the bottom of the list). Save it in the same directory as the original file
- In your file explorer, you'll now see your word document with a ".md" extension
- Right click on that and Open-Using either NotePad or WordPad or whatever editor you want
- In NotePad/WordPad
- ^A to select all
- ^C to copy everything
- In your web browser
- Open https://bookstack.freshstartfurniturebank.org/shelves
- Click on the book that you to insert the page into (for example, Volunteer Policies and Procedures in the Policies and Procedures book)
- Pick the chapter where you want to insert the page (for example, Front Desk)
- On the right-hand side, click on New Page
- At the top, Change "New Page" to whatever title you want
- At the very top, you will see 3 vertical dots. Click on those
- Click on "Switch to Markdown Editor (clean content)"
- The screen will spit into 2 screens.
- Click on the line labeled "1" on the left-hand screen
- ^V to paste what you copied from NotePad/WordPad
- Click on the 3 vertical dots on the top
- Switch to WYSIWYG editor
- Make any changes that you want to the document
- Select document headers. Change their style from "Paragraph" to one of the header styles. I use Medium and Small. These will form breadcrumbs that appear on the right hand of the screen for the reader.
- When you're done, click on Save Page
- If you want to re-arrange the order that pages appear in the book, click on the Sort Book link on the right-hand side
If your document isn't a Word document
- Select and Copy the content
- Follow the 1st 5 instructions from above
- Paste your content into the WYSIWYG editor and make changes as needed
Workflow with No Network
Client Flow When Experiencing Network Issues
Determine the issue:
- If a shopper’s laptop is experiencing problems connecting to the web-based shopping application, follow these steps to diagnose the issue and attempt to resolve the problem:
- Refer to "Network Debugging" document to diagnose the problem.
If you have determined that the network is down and there is no near-term fix, follow these procedures:
Day of Network Outage
- The shoppers will be unable to use their laptops. They should use their phones selecting to use their mobile data plan rather than wifi. Some volunteers’ phones might perform better on mobile data due to the strength of the signal for their carrier. The shopper and client may need to work outside of the building for a better signal.
- Using the shopping application on their phones, the shoppers will load the client’s cart.
- The Kitchen and Linens Wish lists will be fulfilled as usual with the exception that the shoppers will not add the kitchen and linens items into the clients’ carts on the shopping application.
- The movers and QR person, using their phone on mobile data, will likely be able to see the items being put into the cart. The use of phones on different carriers can introduce some timing issues when making changes to the inventory database. For this reason, a paper approach will be used for choosing the items and no scanning will be done during the outage.
- The QR person or the shopper will make a list of each item chosen by the client, listing the client’s name and all the item’s QR numbers and item descriptions (e.g. 11234 Dressers – 2nd or 12434 Art – Animals). This list will include all the furniture to be loaded by the movers plus any items handled by the QR person. It is helpful if the items handled by the movers are grouped together and those handled by the QR person are grouped together on the paper list.
- The QR person should confirm that the number of items on the list reconciles with the number of items in the client’s cart (less any items such as the Target gift card which neither the movers or QR person deal with).
- A copy of the paper list will be made. The copy is given to the movers and the original is kept by the QR person.
- The movers may now start using this sheet to load the client. For each item loaded, the movers should:
- Check off the item on their sheet, and
- Whenever possible retain the QR slip. QR slips cannot be retained if they are permanently affixed to the item such as in the case of mattresses, boxsprings, platforms, and new bed frames.
- The QR person may now start using their sheet to pull the client’s small items. For each item gathered, the QR person should:
- Check off the item on their sheet, and
- Whenever possible retain the QR slip. QR slips cannot be retained if they are permanently affixed to the item, such as dish sets.
- Affix the QR slips to a blank piece of paper. Eight slips can fit on each side of a sheet.
- When the movers are done loading the furniture, they should give their paper list with all the furniture checked off to the QR person along with the gathered QR slips.
- The QR person will confirm that all items (mover’s items + QR person’s items) have been selected and will communicate this to the movers.
- The QR person will affix the QR slips from the movers on the sheet(s) with the others.
- The paper list, the sheets with the QR slips attached, and the Kitchen and Linens Wish Lists should be collected for each client.
Once the Outage is Over
- Each client from the day of the outage needs to be completed by either the shoppers or the QR person.
- In Personal Shopper mode, the Kitchen and Linens Wish List items should be added to each client’s cart. These items should then be picked (Mark Picked-Up). If a Target Gift card was given and has not been picked yet, it should be picked.
- In Order Pickup/Mover mode,
- Each of the items for which we collected a QR slip should be picked (Pick Item and then scan the QR slip).
- Before moving on to the items for which we could not collect QR slips, review which items are left unpicked. Are they all items that could be reasonably expected to have had their QR slip permanently affixed to them (like mattresses, boxsprings, platforms, new metal bed frames, dish sets)? Or are there any “regular” items still unpicked? If the latter, check in the showroom and storage area to make sure the item is not still on the floor and therefore forgotten. Do not assume everything loaded correctly!
- For each of the items for which we were unable to collect a QR slip, these items should be picked (Pick Item) and then manually scan the item (Manual Scan). Manually scanning the item (rather than, for instance, scanning an item with an identical QR# on hand) documents that there is not absolute assurance that the correct item was chosen and loaded.
- Confirm that all items have been picked. If any items remain, resolve why.
- When all items have been picked and any discrepancies resolved, the order may be closed and if appropriate, the referral closed.
- Many of the items that QR slips can not be collected for (and therefore we have no proof the correct item was handed out) are items that Fresh Start purchases and therefore it is critical that we keep accurate track of the inventory. These items include mattresses, boxsprings, platforms, and new bed frames. If time allows, it is wise to inventory these items before going forward to confirm the inventory is accurate.
Network Debugging
I hope that no one is reading this because the network is down, but stuff happens, and as a result, I've written this guide on how to do simple debugging of the network. Good luck, and may rebooting solve everything!
Initial Checks
- The first thing to do is to check your phone and see if it's connected to either the FSFB or FSFB-5G network.
- If it is, that's good.
- If it isn't, that's bad. Check the available networks and see if you see FSFB or FSFB-5G.
- If so, connect to them.
- If not, go to the section on Rebooting the Network.
- Using the browser on your phone, try to do something on the network.
- If you can, then the network is running, and it's probably a problem with a single device. See the section on Rebooting Devices.
- If you can't do anything, then try connecting to FSFB (if you're on FSFB-5G) or FSFB-5G (if you are on FSFB) and check to see if you can do anything on the network.
- If you can do something by changing networks, then go to the section on Rebooting Access Points
- Another thing to check is the store phone. Pick it up and see if you can dial someone. If you can, the Internet is running, at least via a hird-wired connection.
- If you're lucky, and Mark Pollard happens to be in, get him and have him help. He's a techie.
- If the Status Display isn't showing orders to load and the Movers app isn't working, go to the "Pi debugging" section
- At this point, we will just reboot everything and hope that solves the issue.
- Unplug the modem from its power supply and plug it back in.
- Unplug the router from its power supply and plug it back in.
- Wait several minutes before retrying the Initial Steps.
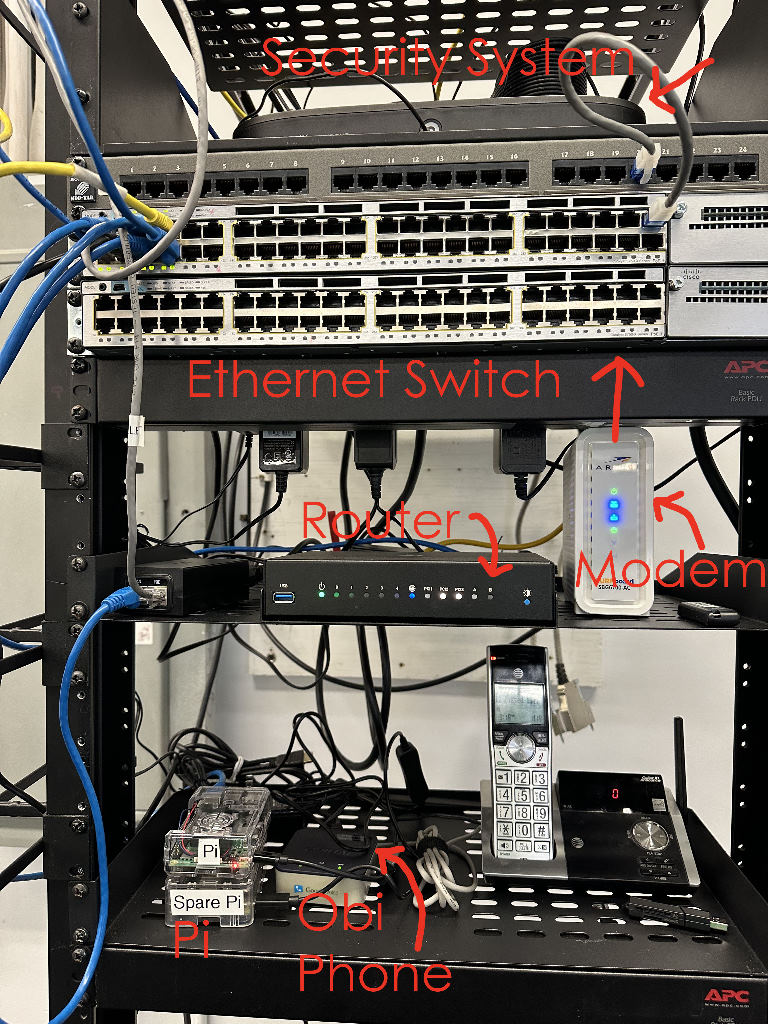
Server Rack
- Go to the network server rack, as shown below:

- Check to see if there are there lights on.
- If not, then the power is off, and you need to:
- Get Mark Revett if he's there, and have him help
- Make sure that the UPS at the bottom of the rack is turned on
- Make sure that there is power to the UPS. The outlet should be labeled with the panel # and the breaker #. Check the breaker.
- If not, then the power is off, and you need to:
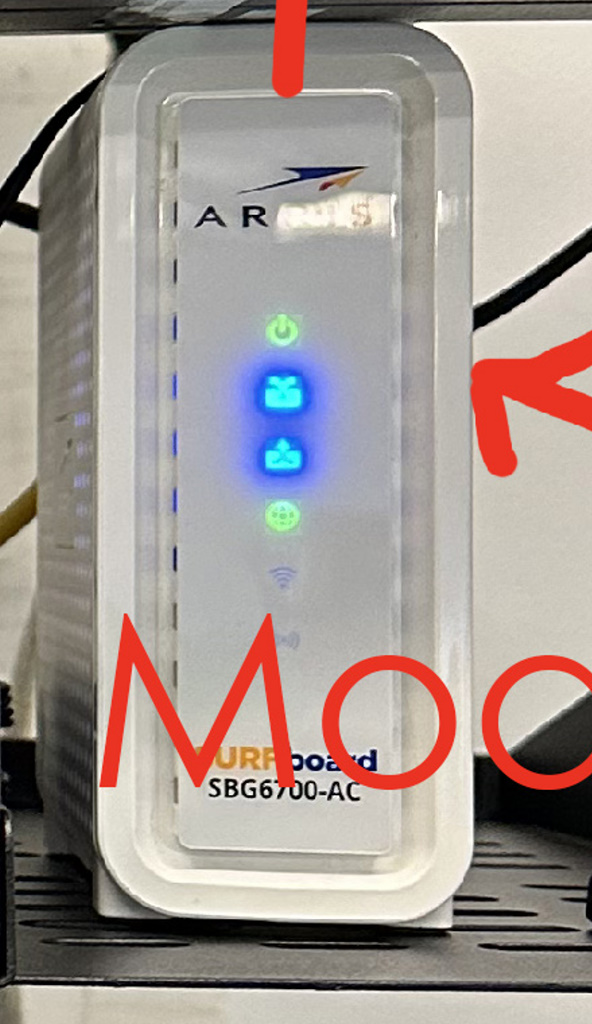
Modem
- Start off by looking at the modem as shown below:

The bottom light, which looks like a globe, should be green.
- If it isn't green, unplug the modem and plug it back in.
- Give it several minutes to turn green.
- If it doesn't turn green, then the problem is with Comcast, and you need to call Comcast at 800-934-6489 and report an outage. You'll have to wait for them to repair the outage. Our account number is 8773103600392443.
- If it does turn green, rerun the Initial Checks.
- If it isn't green, unplug the modem and plug it back in.
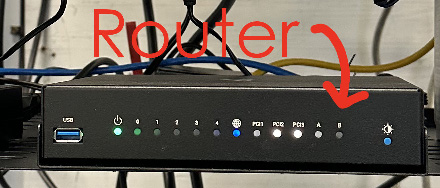
Router
- Check the Router as shown below:

You should see the following:- The far left power light should be on
- The light under 0 should be on
- If it's not, see the section below on the Ethernet switch
- The blue Globe LED should be lit & flashing rapidly
- If it isn't, check the cable that runs between the modem and the router. You may want to replace it with a spare from the utility room. Make sure that it gets plugged into the port labeled WAN.
- If it isn't, check the cable that runs between the modem and the router. You may want to replace it with a spare from the utility room. Make sure that it gets plugged into the port labeled WAN.
- On the store desktop:
- Hold the Windows key down and press X
- Select Windows Powershell
- A blue window will appear
- Type: ping 192.168.1.1
- You should see several lines stating something like "Reply from 192.168.1.1: bytes=32 time=1ms TTL=64"
- If you see that, then that means that you can talk to the router, which is good. What it also means is that the router can't communicate with the Internet, and you should call Comcast at 800-934-6489 and let them know that you have a routing issue. Our account number is 8773103600392443.
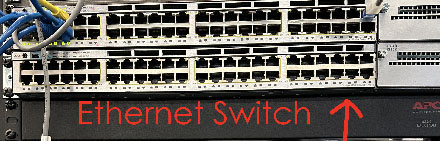
Ethernet Switch
- Next, check the Ethernet switch, which is shown below:

- There are 2 switches stacked on top of one another. The top one is active, and the bottom one is a spare.
- There's a fairly low probability that this will be the problem, but it's not a 0% probability.
- On the top one, you'll see 8 Ethernet cables plugged into Ethernet ports
- There are 2 LEDs under each column of cables. All of the LEDs should be green and may be blinking.
- If they aren't lit, then the switch has failed.
- Unplug the power cable from the top Ethernet switch and plug it into the bottom switch
- Move the cables from the upper switch to the lower switch, making sure that they click into place
- Give it several minutes to boot
- Unplug the power cable from the top Ethernet switch and plug it into the bottom switch
- If they aren't lit, then the switch has failed.
- The most important LED is #1. That goes to the router, and if that's not blinking, then:
- Move the port 1's cable to an empty port. It should turn orange and then green
- If that doesn't fix it, try moving the cable to another port (1-4) on the backside of the router.
- The LED corresponding to the port should light up on the front of the router.
- If that fails, try swapping the cable with a new one.
- If that fails, something is wrong with the router, or you're not fully seating the cable.
Rebooting Access Points
- There are 3 access points in the store that provide WiFi.
- To the right of the sink, you'll see a router mounted on the wall. Unplug it from the wall socket and plug it back in.
- On top of the network server rack, you'll see a router (not shown in the above photo), just like the one near the sink. Unplug that one, and plug it back in.
- You'll see a blue Ethernet cable going up the wall towards the ceiling. Unplug the cable from the Ethernet switch, pause 10 seconds, and plug it back in.
- Give everything a couple of minutes, and then rerun the Initial Checks.
Rebooting Devices
- If you can access the Internet on other devices, but can't access it on some, just try rebooting the bad devices.
- On the tables, press and hold the power button until you see a message about shutting down or rebooting. Select reboot
- On the laptops, hold the Windows key down and press X.
- Select "Shutdown or Signout" and then select Reboot.
Pi Debugging
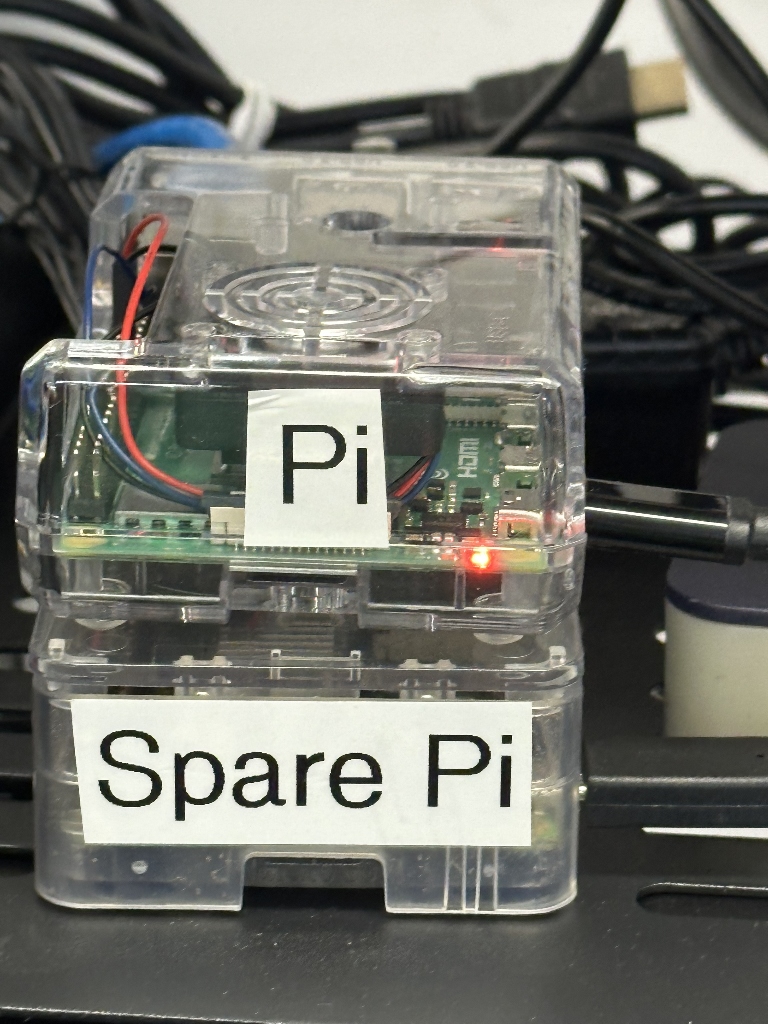
- A big part of our operations runs on a device called a Raspberry Pi. It's a tiny, but powerful computer. Here's a photo of the active one sitting on top of a spare.

- There's a red LED in front of the Pi. If it isn't lit, then there's a good chance that the power supply has died.
- Move the Spare Pi to the top of the stack for better airflow.
- Unplug the existing power supply from the 120V power strip.
- Plug the spare power supply into the 120V power strip
- Move the Ethernet cable from the 1st Pi to the spare.
- If the LED is on,
- Go to the store laptop
- Hold the Windows key down and press X
- Select Windows Powershell
- A blue window will appear
- Type: ping 192.168.1.210
- You should see several lines stating something like "Reply from 192.168.1.210: bytes=32 time=1ms TTL=64"
- If you see that, then that means that you can talk to the Pi, which is good. Stop and call Geoff
- If you see a message stating "Destination host unreachable", follow the instructions above about switching to the spare Pi.
- There's a red LED in front of the Pi. If it isn't lit, then there's a good chance that the power supply has died.
What next?
- If the network is still down, start using the "Operating without a Network" document,
- Call/text Geoff/Sue
Port Forwarding
The following information is for the network administrator if they need to set up a new router;
- wan:3000 -> nodejs:3000
- wan:80 -> nodejs:80
- wan:51820 -> nodejs:51820