Call Center
- Call Center User's Guide
- Call Center User's Guide for the Donations Group
- Info email from GetHelpMail.com
- How To Print The Transport Schedule
- Transport Schedule
- Manage Groups and Users
Call Center User's Guide
Description
The Call Center is a web-based system allowing agencies, clients, donors, etc., to communicate with Fresh Start via a web browser, email, or phone. This guide describes how these contacts should be handled. It is strongly suggested that you play the part of an end-user and utilize these systems to understand what the end-user would experience. There is a separate guide that describes how to handle donors.
Volunteers are assigned to various Call Center groups, depending on what work they want to do. For example, we have an Agency group, which handles questions on how agencies utilize our systems. We also groups for Clients, the Director, Donations, President, Volunteers, Web Master, etc.
The basic unit of work is a ticket, which contains the correspondence between a user and Fresh Start. Anyone in a group can access a ticket and take action on it. That way, if someone can't handle their tickets, anyone can pick them up.
Contact Methods
Tickets are created when an end-user contacts Fresh Start. There are three ways that tickets are created: Email, website, or via our phone system.
- Email: If an end-user sends an email to our info account, a ticket gets generated. Someone in the Info group will read the ticket and assign it to the appropriate group.
- Website: The end-user accesses our website and uses a form to correspond with us. The form creates a ticket in the appropriate group.
-
Phone: The end-user calls our main number and follows voice prompts to the appropriate group. Some groups allow the end-user to leave a message. We are trying to limit the availability of leaving messages and forcing the end-user to use our website forms. Right now, only clients with appointments are allowed to leave messages.
-
If a message is left, it will be translated into text (some translations are better than others), and the transcript and audio will be attached to a ticket. If there's an existing ticket from the same phone number, the audio & translation will be attached to the existing ticket.
Once a ticket has been created and assigned to a group, anyone in that group can use the Call Center system to email the end-user. All correspondence to/from the end-user is copied to the ticket. An end-user can only have one ticket open per group.
Workflow
The basic workflow is as follows:
- An end-user uses the website form to submit a question, sends an email to the info-account, or calls our main number and leaves a message
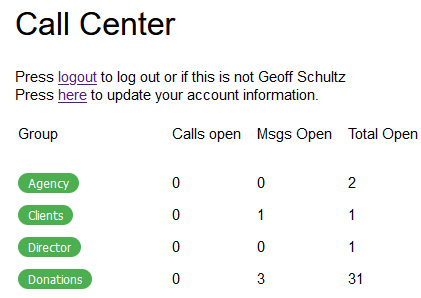
- As a Call Center member, you will have a Call Center button in your list of apps when you log in. Multiple groups use the Call Center, and depending upon what groups you're in, you will see a display something like the following:
This displays the number of phone calls that are open, messages needing some action, and the total number of open tickets in that group.
- Click on a green button with the name of the group that you want to access.
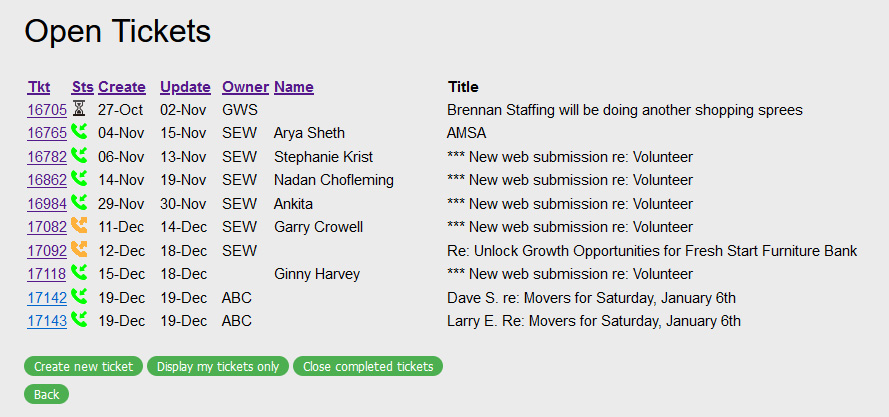
- If you were to click on the green Volunteer button, you would see a list of open tickets, as shown below:

- This shows the ticket number, the ticket status, when it was created and last updated, the ticket owner's initials, the end-user's name, and a title that should describe what the ticket is about.
The Sts (status) field provides a visual status of the ticket:- A yellow phone indicates that we need to contact the end-user.
- A green phone means we're waiting to hear from the end-user.
- An hourglass icon that implies that you're waiting for some event to occur in the future.
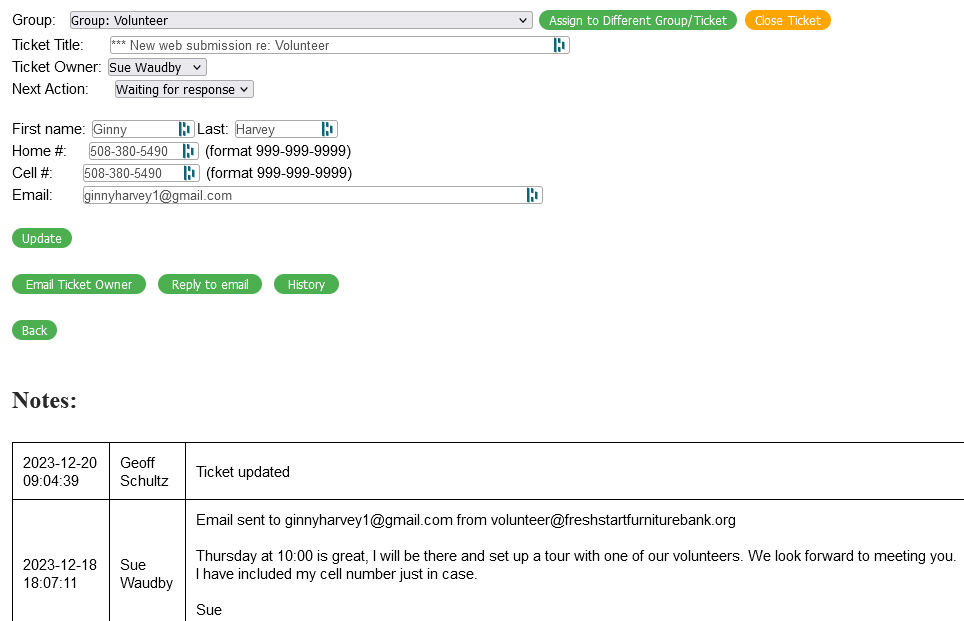
- To view a ticket, click on the ticket number. You will then see a ticket similar to the following:

This shows the group that the ticket belongs to, the ticket owner, the next action for the ticket, the end-user's name, and contact info.
There are a series of buttons which:
-
-
Sends an email to the owner of the ticket.
-
Sends an email to the end-user.
-
Displays the history showing who has done what with the ticket
-
-
- Below that is the correspondence with the end-user and/or notes that have been created. Finally, there is a button to add a new note.
If any photos have been received, they will be displayed under the notes. If you place the cursor over a photo, a magnified view will appear to the right, showing photo details.
The way that I (Geoff) like to handle tickets is to:
- Click on a ticket with a yellow phone icon.
- If this is a new ticket, change the Ticket Owner to yourself.
- Review the information that the end-user has sent.
- Change the Ticket Title to something that describes the ticket.
- Press Update to save your changes
- Click on "Reply to Email".
Feel free to use any system that works for you
Replying to an Email
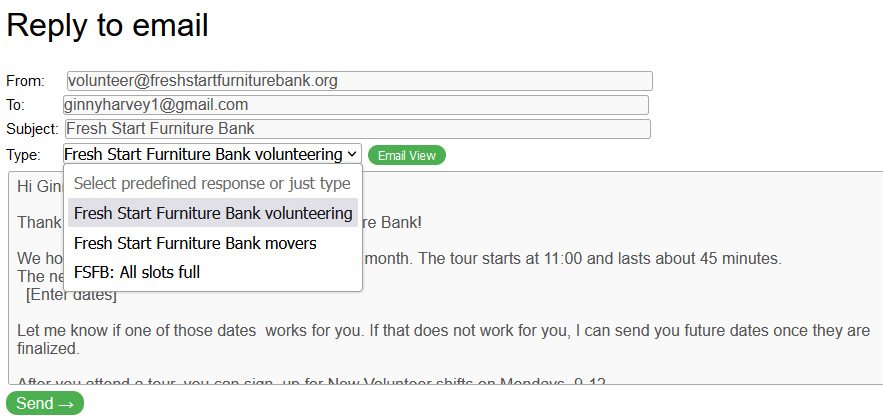
- Pressing the "Reply to email" button causes a new web page to appear:

The end-user's email address is filled in, and there are a series of canned responses that you can utilize. Each group (i.e. Donations, Clients, Agencies, etc) has its own set of canned responses. The titles of the canned responses should give you an idea as to what they're about. Select one that best matches the question, or write your own. - You can edit the canned responses. In some cases, there are fields that need to be replaced. For example, in the above canned response, you would need to replace “[Enter dates]” with the dates that we run new-volunteer tours/training. Be careful not to corrupt the HTML (the stuff between the <>).
- Pressing the "Email View" button displays what the email will look like to the end-user. Press again to switch back to edit mode.
- When you're all set, press the "Send" button. Then press the "Return to Tickets" button. The "Status" icon will change to a green phone.
- You will then see a list of tickets. Lather-rinse-repeat for any other tickets that need responses.
Open Tickets Page Details
This section provides details on all of the various buttons and fields on the Open Tickets page:
- There is a black menu bar at the top of the page with the following links:
- Volunteer – Takes you to the main volunteer app page.
- Call Center – Takes you to the main Call Center page where you can pick groups.
- Tickets – Displays the Open Tickets page.
- You will see column titles at the top of the page. You can click on any of these to sort by that field.
- "Create new ticket" does exactly what it sounds like. It creates a new, blank ticket.
- "Display my tickets only" causes the web page to display only the tickets that you own AND any tickets that haven't been assigned an owner.
- "Close completed tickets" closes any tickets that have a green checkmark next to them. These are tickets that have had a pick-up scheduled and that pick-up has occurred.
- "Find closed tickets" displays the last 100 closed tickets. You can specify a date range if you need to find an older ticket. The "Search note field" is not very useful.
Ticket Page Details
This section provides details on all of the various buttons and fields on the Open Tickets page:
- "Assign to Different Group/Ticket" allows you to move a ticket to a different group or to merge two tickets. The Group pull-down lists various options.
For example, if a ticket ends up in the Info group, but is really actually related to a client, use the pull-down to select "Group: Clients" and then press the "Assign to Different Group/Ticket" button.
If a new ticket gets created and it is actually related to an existing ticket, use the pull-down to select the existing ticket, and then press the "Assign to Different Group/Ticket" button to merge the tickets. - "Close Ticket" closes the ticket.
- "Update" updates the database with any changes you have made on the form.
- "Email ticket owner" displays an email form with a To: address of the ticket's owner.
- "Reply to Email" displays an email form with a To: address of the end-user.
- "History" displays information on who has done what with the ticket.
- "Add Note" lets you add a note to the ticket.
- "Attachments" section displays photos sent via email or text message.
Photos
Photos are typically only associated with the Donations group, but an end-user may want to send photos for other reasons. Photos appear at the bottom of the ticket. If you're using a PC, you can place the cursor over a section of the image, and a magnified view of the image will appear to the right. If you're on a device that doesn't have a mouse/trackpad, you can click on the filename above the image. This will open up a separate browser window just containing the image.
There are 2 ways that photos can be sent:
- If the end-user provided a cell phone number, they can text photos to the number in the email. Photos will immediately be attached to the ticket upon receipt.
- They can reply to the email that they received and attach photos. The system only processes emails once an hour, so it can take up to an hour for them to appear.
Once you close a ticket, the photos are deleted. As a result, you probably want to make sure that you're completely finished with the ticket before closing it.
Update User Setting
On the main page of the Call Center, you will see a link for "Press here to update your account information." When you click on this link, you will see the normal settings to update your account information, plus the following:
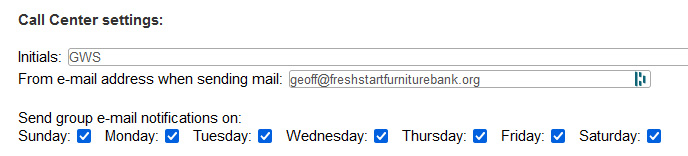
Enter the initials that you want to display on tickets that you own on the Open Tickets page.
The "Send group email notifications on" section only applies to the Donations group. Check any days that you want to receive emails regarding new tickets. You will always receive email, regardless of what's checked above, when an end-user updates a ticket that you own.
Press Submit when you're done.
Call Center User's Guide for the Donations Group
Description
The Fresh Start Furniture Bank Call Center group is responsible for handling web-based queries and e-mail from donors wishing to donate items to Fresh Start Furniture Bank. This guide describes how these contacts should be handled. It is strongly suggested that you play the part of a donor and utilize these systems to understand what the donor would experience.
Workflow
The basic workflow is as follows:
- A donor goes to the Fresh Start website and clicks on the Donate Items button. This takes them to a page that:
- Describes our quality standards.
- Provides a detailed list of what we take and don't take. You should thoroughly review this list, as donors will test you on it on a regular basis.
- Lists our pick-up schedule, showing availability and what towns we'll be picking up in on each date.
- Provides contact information for external for-pay companies who can pick up their items if they are outside our pick-up radius or we can't pick them up in time.
- Provides a link to download a donation receipt that the donor can fill out.
- Has a Pick-up Request button that allows the donor to request a pick-up.
- Has a Donation Question button that allows them to ask a general question.
- The Pick-up Request button takes the donor through a series of questions before allowing them to fill out the Pick-up Request form:
- Asks if they've read the what-we-take and don't-take lists.
- Informs the donor that items must be in a garage or curbside.
- Allows them to enter their address to ensure they are within a 25-minute driving radius of Fresh Start.
- If they pass the above, they can fill out a form asking for their name, address, email, and a description of what they want to donate.
- Once they have submitted the form, they will receive an email thanking them for contacting us. We ask that they send photos of their items via email or text and let them know that we'll get back to them once we receive their photos.
- The Donation Question button:
- Asks if they've read the what-we-take and don't-take lists.
- Checks to ensure they're not using this for a pick-up request.
- Collects their name and email address.
- Allows them to ask questions about donating something.
- Sends them a thank-you message and lets them know we'll get back to them.
- Both of these buttons create a Donations ticket in our Call Center and sends email to the members of the Donations group who have elected to receive emails on that day of the week. These tickets track correspondence with the donor and allow all members of the Donations group to interact with the donor.
- As a Call Center member, you will have a Call Center button in your list of apps when you log in. The Call Center is used by multiple groups, and depending upon what groups you're in, you will see a display something like the following:
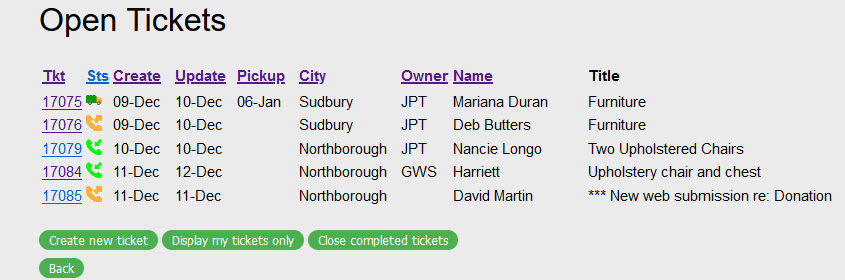
This displays the number of phone calls that are open, messages needing some action, and the total number of open tickets in that group. - If you were to click on the green Donations button, you would see a list of open tickets, as shown below:

This shows the ticket number, the status of the ticket, when it was created and last updated, the pick-up date (if one has been scheduled), the city, the ticket owner's initials, the donor name, and a title that should describe what is being donated.
The Sts (status) field provides a visual status of the ticket. The truck means that a pick-up has been scheduled, a yellow phone indicates that we need to contact the donor, and a green phone means that we're waiting to hear from the donor. There's also an hour-glass icon that implies that you're waiting for some event to occur in the future, and a checkmark to indicate that a transport has been completed for the ticket.
- To view a ticket, click on the ticket number. You will then see a ticket similar to this:

This shows the group that the ticket belongs to, the ticket owner, and the next action for the ticket. It also shows the donor's name, address, and contact info. If the donor provided a cell phone number, they can text photos of their items directly to us. There are also fields showing how far away the pick-up is from FSFB. Finally, there is a field that shows the selected pick-up date and/or available pick-up dates.
There are a set of buttons which:
- Calculates the time from FSFB to the donor.
- Displays a map of the donor's location.
- Sends an email to the owner of the ticket.
- Sends an email to the donor.
- Displays the history showing who has done what with the ticket.
Below that is the correspondence with the donor and/or notes that have been created. Finally, there is a button to add a new note.If any photos have been received, they will be displayed under the notes. If you place the cursor over a photo, a magnified view will appear to the right, showing photo details.
-
As described in the "Update User Settings" section below, you can specify which days of the week you want to receive emails regarding new tickets. For example, if you're handling Tuesdays, you should have Tuesday enabled at minimum, and you will receive an email when a new ticket is created on a Tuesday. If you are the owner of a ticket, you will receive an email whenever that ticket is updated by the donor.
If you want, you can respond immediately, or you can wait until the end of the day, or even wait until the next day to handle the calls that come in on Tuesday. The yellow telephone icon marks tickets that need responses.
- The way that I (Geoff) like to handle tickets is as follows. Note that you may find a workflow that works better for you, and that's fine.
- Click on a ticket with a yellow phone icon.
- If this is a new ticket, change the Ticket Owner to yourself.
- Review the information that the donor has sent.
- Change the Ticket Title to something that describes the ticket.
- If the donor hasn't sent photos of the items yet, change the Next Action to "Waiting for response". This will change the Next Action icon to a green phone when updated.
- If you need to schedule a pick-up:
-
Press the "Calculate distance" button. This will populate the Distance and Time fields. The donor needs to be within 25 minutes of FSFB.
-
Most pick-ups have a duration of 45 minutes. You may need to increase the time if you have a very large pick-up. Alternately, if several small pick-ups are located near one another, you may want to decrease this value to fit in an additional pick-up. Use the Duration drop-down to modify the duration if appropriate.
-
Select the pick-up date from the "Date" pull-down menu.
-
Once you have selected a pick-up date, a box will appear under the pick-up date, which is titled "Notes for transport team." This is what the transport team will see when doing the pick-up.
Make a list of the items to be picked up, one item per line. Also, include a note as to what to expect for a donation. The phrase "Donation OK" is often used to indicate that the donor agreed to provide a donation.
-
- Press Update to save your changes.
-
If you can see that we can't do a pick-up for various reasons (i.e. they want us to do a pick-up for just a single item), use the "Reply To Email" button to send a canned response informing them why. That way, they don't have to waste their time sending us photos of the chair. Go back to that ticket and click on the Close Ticket button.
-
At this point, you probably need to reply to the donor, so press the "Reply to email" button. If you will be letting the donor know about pick-up dates, click on the "Date" pull-down menu prior to "Reply to email" to see what dates are available.
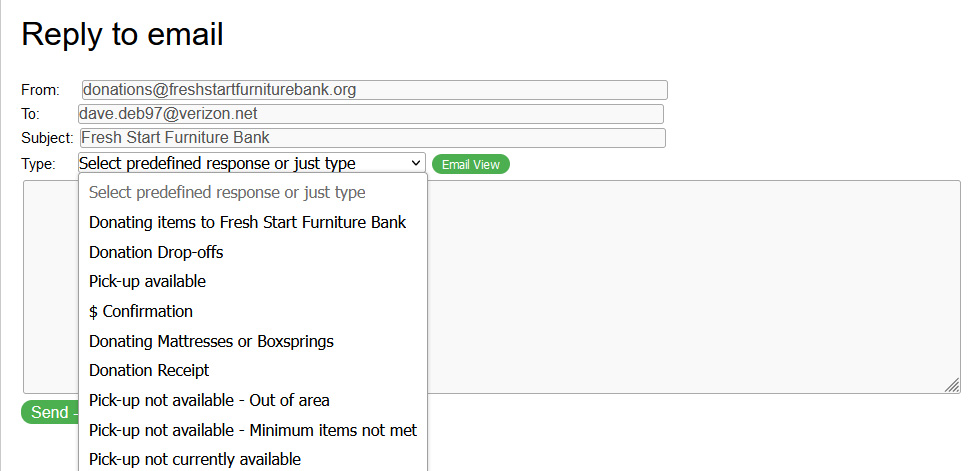
- Pressing the "Reply to email" button causes a new web page to appear:

The donor's email address is filled in, and there are a series of canned responses that you can utilize. Each group (i.e. Donations, Clients, Agencies, etc) has its own set of canned responses. - For the donations group, here's a quick summary of what is in each canned response:
- "Donating Items to FSFB": This is the message that is initially sent to a donor when they request a pick-up.
- "Donation Drop-offs": Provides our donation drop-off hours, location, and quality standards.
- "Pick-up available": Provides information about pick-up dates that are available, pick-up donation, location of items, etc. You need to fill in the date, which will come from the Ticket screen.
- $ Confirmtion: If a pick-up has been scheduled, but the donor hasn't committed to a donation, use this to nicely ask if they will donate.
- "Donating Mattresses or Boxsprings": Describes our mattress quality standards and drop-off times.
- "Donation Receipt": Provides a link to download a donation receipt.
- "Pick-up not available – out of area": Used when the donor is outside of our 25-minute pick-up radius. Describes drop-off times.
- "Pick-up not available – Minimum items not met": We can only schedule pick-ups with a minimum of two major items (Sofa/Love Seat, Dresser, Table/Chairs, etc.). Provides drop-off info.
- "Pick-up not currently available": Used when we don't have any pick-ups available within the donor's timeframe.
- You can use a canned response or type in your own. You can also edit the canned responses. Be careful not to corrupt the HTML (the stuff between the <>).
- Pressing the "Email View" button displays what the email will look like to the donor. Press again to switch back to edit mode.
- When you're all set, press the "Send" button. Then press the "Return to Tickets" button. The "Status" icon will change to a green phone.
- You will then see a list of tickets. Lather-rinse-repeat for any other tickets that need responses.

Open Tickets Page Details
This section provides details on all of the various buttons and fields on the Open Tickets page:
- There is a black menu bar at the top of the page with the following links:
- Volunteer – Takes you to the main volunteer app page.
- Call Center – Takes you to the main Call Center page where you can pick groups.
- Tickets – Displays the Open Tickets page.
- Transportation Schedule – Displays the Pick-up (Transport) schedule page.
- You will see column titles at the top of the page. You can click on any of these to sort by that field.
- "Create new ticket" does exactly what it sounds like. It creates a new, blank ticket.
- "Display my tickets only" causes the web page to display only the tickets that you own AND any tickets that haven't been assigned an owner.
- "Close completed tickets" closes any tickets that have a green checkmark next to them. These are tickets that have had a pick-up scheduled, and that pick-up has occurred.
- "Find closed tickets" displays the last 100 closed tickets. You can specify a date range if you need to find an older ticket. The "Search note field" is not very useful.
Ticket Page Details
This section provides details on all of the various buttons and fields on the Open Tickets page:
-
"Assign to Different Group/Ticket" allows you to move a ticket to a different group or to merge two tickets. The Group pull-down lists various options.
For example, if a ticket ends up in the Donations group, but is really actually related to a client, use the pull-down to select "Group: Clients" and then press the "Assign to Different Group/Ticket" button.
If a new ticket gets created and it is actually related to an existing ticket, use the pull-down to select the existing ticket, and then press the "Assign to Different Group/Ticket" button to merge the tickets.
-
"Close Ticket" closes the ticket.
-
"Update" updates the database with any changes you have made on the form.
-
"Calculate distance" calculates the time and distance from FSFB to the donor's address and displays them on the form.
-
"Map" displays a map of the donor's location. I sometimes use the Google Maps street view to see a photo of where the pick-up will be.
-
"Email ticket owner" displays an email form with a To: address of the ticket's owner.
-
"Reply to Email" displays an email form with a To: address of the donor.
-
"History" displays information on who has done what with the ticket.
-
"Add Note" lets you add a note to the ticket.
-
"Attachments" section displays photos that have been sent via email or text message.
Photos
It is important to receive photos of items before scheduling a pick-up. It's amazing how many donors will tell you that their items are in great shape…until you see them. Photos provide a chance to turn down items before the transport team shows up at the donor's house.
Photos allow you to see if there are obvious rips/tears/stains/etc on an item. You can also tell if something is an antique, beat up, or too large for our clients.
Photos appear at the bottom of the ticket. If you're using a PC, you can place the cursor over a section of the image, and a magnified view of the image will appear to the right. If you're on a device that doesn't have a mouse/trackpad, you can click on the filename above the image. This will open up a separate browser window just containing the image.
The message sent to the donor when they requested a pick-up includes instructions on how to send photos. There are 2 ways that they can do this:
- If they provided a cell phone number, they can text photos to the number in the email. Photos will immediately be attached to the ticket upon receipt.
- They can reply to the email that they received and attach photos. The system only processes emails once an hour, so it can take up to an hour for them to appear.
Update User Settings
On the main page of the Call Center, you will see a link for "Press here to update your account information." When you click on this link, you will see the normal settings to update your account information, plus the following:
- Enter the initials that you want to display on tickets that you own on the Open Tickets page.
- Check any days that you want to receive emails regarding new tickets. You will always receive an email, regardless of what's checked above, when a donor updates a ticket that you own.
- Press Submit when you're done.
Info email from GetHelpMail.com
There's a website called FindHelpMail.com, which connects people who need help with an appropriate agency/group. We receive emails from them in our Info account. The following describes how to handle these emails:
- Assign the ticket to the Clients group
- Go to the Clients group and open the ticket
- Check to see if the email includes the client's email address. If it doesn't, you have 2 options
- Just close the ticket
- Call the client to get an email address.
- Change the email address to the client's email address, which is in the GetHelpMail email.
- Update the ticket
- Click on Reply to Email
- Select the "How to Obtain a Referral to Fresh Start" message, which will tell them how to go about getting a referral.
- Send the mail
- Close the ticket
How To Print The Transport Schedule
- Start a web browser
- Log into your FSFB account
- Click on the Call Center app button
- Click on the Donations group button
- On the black menu bar at the top of the screen, you should see "Transport Schedule". Click on that.
- Transport Schedule will only appear for users who have the Transport Admin privilege.
- You will see a display showing available transport dates. Click on the appropriate date.
- Click on the Print button at the bottom of the screen.
- If you use ^P, it will print too small.
Transport Schedule
Description
This guide describes how to view the transportation schedule, set the route, and schedule new transport slots.
Viewing the Transport Schedule
You can view the transport schedule by going into the Call Center app and selecting the Donations group. There will be a black navigation bar at the top of the page. If your FSFB account has the "Transport Admin" privilege, you will see a "Transport Schedule" link on the black menu bar. Clicking on that link will display a page similar to this: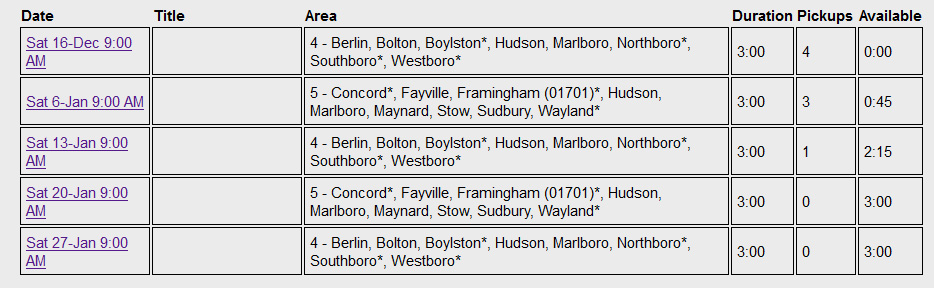
This shows the date of the transport, an optional title, the towns we will be picking up from, the overall duration of the transport, how many pick-ups have been scheduled, and the amount of time available for pick-ups.
If you click on one of the dates, it will display the details for that pick-up: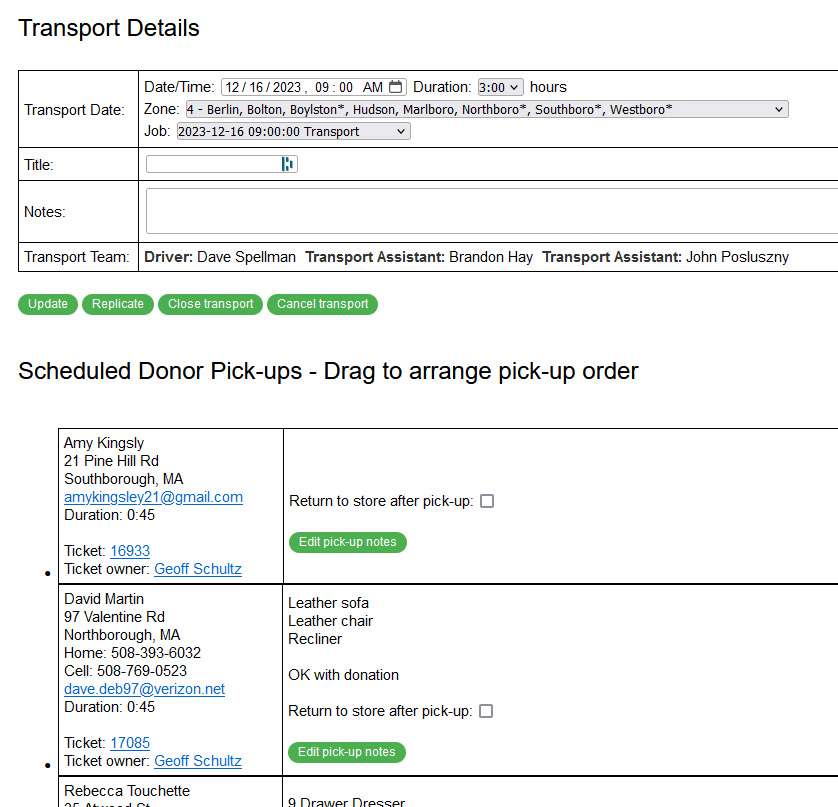
You can edit any of the fields on the form. Press Update to save your changes.
- The "Close Transport" button appears when a transport date has passed. Clicking on this will remove it from the list of available transport dates and mark the tickets associated with the pick-up as having been completed.
- The "Cancel Transport" button will send an email to all of the tickets associated with the transport, letting them know that their pick-up has been canceled. The associated tickets will have the transport canceled, and their status will be set to Unknown.
- The "Reopen Transport" button will appear if a transport has been closed. As you may be able to guess, this will reopen a closed transport.
At the bottom of the page, under the list of pick-ups, you will find the following buttons:
Transport Schedule Routing
To arrange the pick-up schedule:
- Use the above section to open the transport schedule for a given date. Typically, we do this on the Thursday (Friday at the latest) before the pick-up.
- Press the Map button at the bottom of the page.
- Use Google Maps to arrange the pick-ups in an order that makes sense.
- We like to schedule the furthest away pick-up first and then work our way back towards the store. That way if we have to drop off furniture at the store mid-route, we're closer to the store.
- Note the order of the pick-ups.
- Return to the browser page you opened in step 1 and drag the tickets, using the cursor, into the same order you did in step 4. Note that you can't do this with a tablet/phone, as you don't have a mouse.
- Press the Map button to make sure that the order is correct.
- If appropriate, use the Send Email buttons to notify the donors and the team.
Creating a New Transport Slot
At the bottom of the Transport Schedule display, there is a button labeled "Schedule New Transport". Click on that and you will see:

- Click on the calendar icon in the Date/Time field, and select a date. Set the time to whenever the pick-up should start (typically 9:00 AM).
- Set the duration to however long the pick-up should last. The typical duration is 3:00 hours.
- Select a zone for the pick-up.
- We typically alternate between zones 4 and 5.
- Zone 99 is reserved for special pick-ups that aren't constrained by ZIP code.
- If a volunteer job has been scheduled for the date in the Date/Time box, one or more jobs will appear in the Job drop-down menu. Typically you will pick the "Transport" job. If volunteers have signed up for that job, the Transport team field will populate with the divers and movers signed up.
- Press Update to save your changes.
Manage Groups and Users
- To add or remove a user from a group (Agency, Clients, Donations, etc), go into the Call Center and at the bottom, you'll see a link titled "Manage Groups and Users". Click on that.
- Select the group from the pull-down menu that you want to add or remove a user.
- The system will display a list of users who are currently in the group, and a list of users who can be added to the group.
- If you want to remove a user, click on a user who is part of the group.
- If you want to add a user, click on the user in the "Available Volunteers" list.